Powerfix Aluminium Window Insect Screen Benutzerhandbuch
Hyönteisverkko ikkunaan, Insektsnät för fönster, aluminium, Vindue med myggenet af aluminium
j
At regular intervals, take the insect screen out of the window to give it a thorough clean.
j
Use a mild cleaning agent where necessary.
Q
Disposal
The packaging is made entirely of recyclable materials, which you may dispose
of at local recycling facilities.
Contact your local refuse disposal authority for more details of how to dispose of your worn-
out product.
Q
Manufacturer / Service
FeinHeim GmbH
Bischof-Otto-Str. 60
D-94486 Osterhofen
Service hotline: +49-9932-4025 897
E-mail: [email protected]
Last Information Update: 01 / 2011
Ident no.: 012011-3
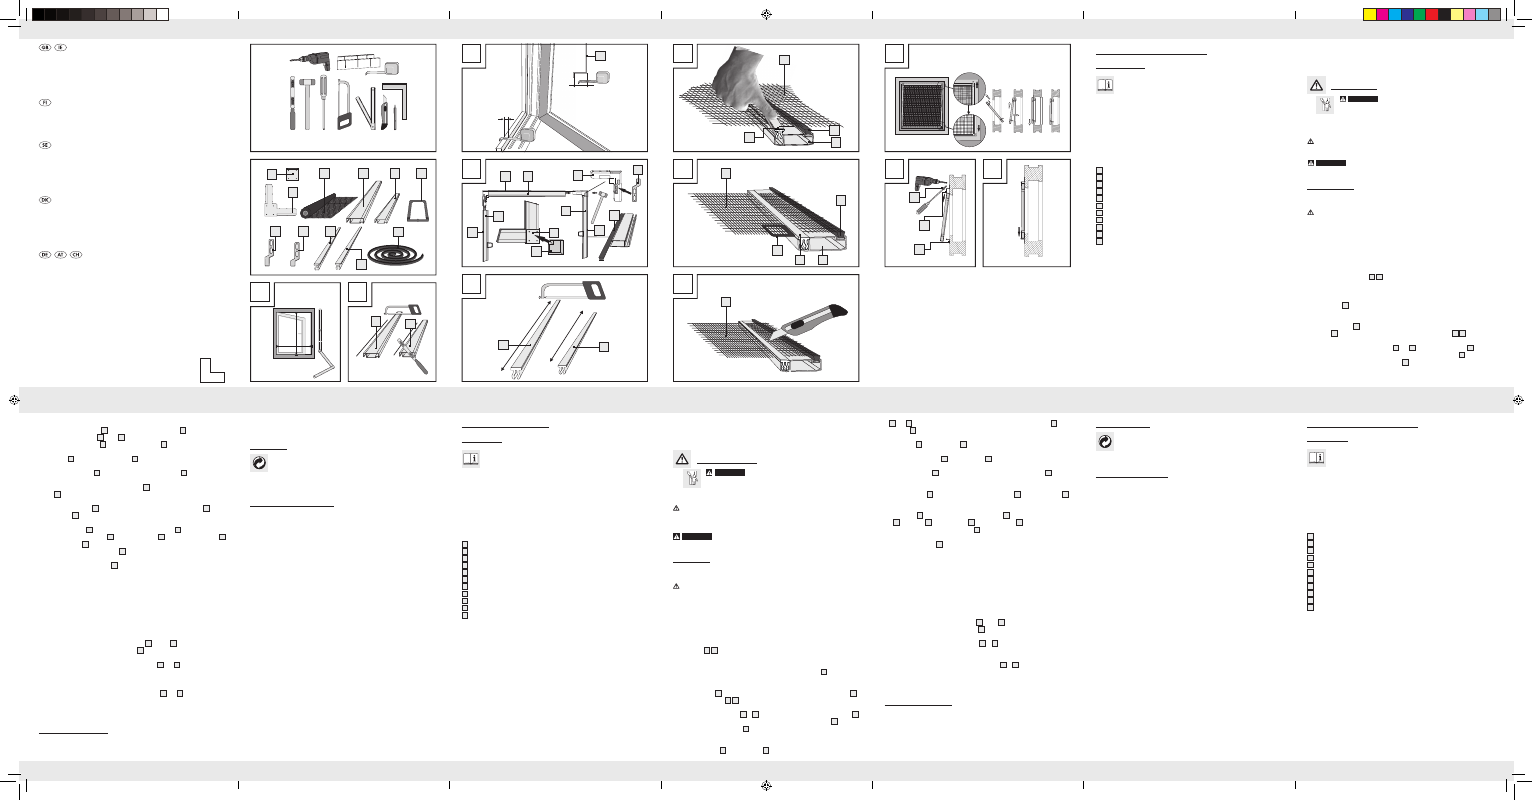
Step 6
Connect the aluminium profiles
3
together with the corner connectors
1
(see Fig. D). Ensure
that the aluminium profiles H
3a
and B
3b
are in their correct positions. When assembling
the parts push the brush seals
7
into the corner connectors
1
.
Step 7
Push the caps
1a
on to the corner connectors
1
(see Fig. D).
Step 8
Shorten the two click strips
6a
to the length of the aluminium profile H
3a
(see Fig. E).
Step 9
Add 1.3 cm to the length of the aluminium profile B
3b
and shorten the two remaining click
strips B
6b
to the calculated dimension (see Fig. E).
Step 10
Place the fibreglass fabric
2
over the frame and fix it to the aluminium profiles B
3b
with
the click strips B
6b
(see Fig. F).
Step 11
Insert the loop handles
4
in the centre of the aluminium profiles H
3a
in accordance with
Fig. G and fix the fibreglass fabric
2
and the loop handles
4
to the aluminium profiles H
3a
with the click strips H
6a
.
Note: Ensure that the fibreglass fabric
2
is adequately stretched.
Step 12
Trim off the surplus fibreglass fabric
2
using the carpet knife (see Fig. H).
Step 13
Insert the insect screen window (see Fig. I).
Q
Alternative external installation with screws
j
For external installation will require screws and dowels suitable for the substrate (wood,
concrete, masonry etc.).
j
Follow steps 1 and 2 of the section on “Internal installation”.
j
Follow steps 4 and 6 to 12 of the section on “Internal installation”.
Step 14
Place the smallest stainless steel suspension brackets
5a
top and
5b
bottom on the frame.
Ensure that the stainless steel suspension brackets
5a
with the long leg are placed on the top.
Step 15
Hold the frame with the stainless steel suspension brackets
5a
and
5b
from the outside on to
the window frame or the masonry and mark the positions of the holes to be drilled. If possible
have someone help you with this step.
Step 16
Drill the holes and fix the stainless steel suspension brackets
5a
and
5b
on to the outside
face of the wall with screws (not included) (see Fig. J).
Step 17
Insert the insect screen window (see Figs. J + K).
Q
Cleaning and care
J
Do not under any circumstances use corrosive or abrasive cleaning agents.
j
Clean the fibreglass fabric and frame with a lint-free, slightly damp cloth.
2 Click strips B
1 Brush seal
1 Installation instructions
Safety advice
J
WArNiNg!
riSK OF FATAL iNJUrY AND riSK OF ACCi-
DENTS FOr iNFANTS AND CHiLDrEN! Never leave children unattend-
ed with the packaging material or the product. There is a risk of suffocation
from the packaging materials and a risk of fatal injury by strangulation. Children often
underestimate dangers. Always keep children away from the product. The product is not
a toy.
CAUTiON! riSK OF iNJUrY! Ensure that all parts are undamaged and have
been assembled appropriately. Risk of injury exists if assembled incorrectly. Damaged
parts can affect safety and function.
WArNiNg!
DANgEr TO LiFE! Do not lean too far out of the window when assem-
bling, dismantling or cleaning.
Q
installation
j
Before assembly, make sure that your window is suitable for this product and that it does
not exceed the maximum dimensions.
CAUTiON! riSK OF iNJUrY! Installation requires a saw, carpet knife and an
electric drill (only for external installation). Always refer to the operating instructions for
the required tools.
Q
internal installation
Step 1
First measure the height (H) and width (W) of the internal window frame (see Fig. A).
Step 2
Subtract 1.2 cm from the measured height (H) and 3.5 cm from the measured width (W) and
shorten the aluminium profiles
3a
3b
to the calculated height (h) and width (w) respectively
(see Fig. B). Remove any burrs from the sawn surface using a file.
Step 3
Measure the depth of the frame and select the most appropriately sized 4 stainless steel sus-
pension brackets
5
(see Fig. C).
Attention: Please note that the brush seal is only approx.
2 mm high.
Step 4
Shorten the brush seal
7
into 2 lengths h + 5.2 cm and 2 lengths b + 4 cm and push the
brush seals
7
into the grooves provided for this purpose in the profiles
3a
3b
(see Fig. D).
Step 5
Insert the stainless steel suspension brackets
5a
and
5b
into the corner connectors
1
in accord-
ance with Fig. D.
Note: Ensure that the stainless steel suspension brackets
5a
with the long
leg are inserted into the top corner connectors
1
.
Attention: Ensure that the 4 brackets
have the same leg depth X (see Fig. C)!
insektsnät för fönster, aluminium
Q
inledning
Informera dig om produkten före monteringen. Läs noga igenom följande monte-
ringsinstruktion och säkerhetsinformationen. Använd produkten endast enligt be-
skrivningen och endast för de angivna ändamålen. Förvara denna anvisning väl.
Överlämna även dessa handlingar om du överlåter produkten till en tredje person.
Q
Ändamålsenlig användning
Denna artikel är avsedd för skydd mot insekter, t.ex flugor i privata hushåll. Annan användning
än avsedd eller förändrad produkt är inte tillåten och kan medföra personskador och / eller
produktskador. Tillverkaren ansvarar inte för skador vilka kan härledas ur felaktig hantering.
Produkten är endast avsedd för privat bruk.
Q
De olika delarna
1
Hörn
1a
Täckkåpa
2
Glasfiberväv
3a
Aluminiumprofil H
3b
Aluminiumprofil B
4
Grepp
5a
Rostfri inhängningsvinkel med lång sida
5b
Rostfri inhängningsvinkel med kort sida
6a
Klicklist H
6b
Klicklist B
7
Borsttätning
Q
Tekniska data
Max. fönstermått: 130 x 150 cm
Q
Leveransens omfattning
Obs: Se till att inte kasta bort monteringsmaterial när produkten packas upp. Kontrollera att
alla delarna finns med i leveransen och att produkten och dess delar är oskadade. Montera
inte produkten om leveransen inte är fullständig.
4 hörn
4 täckkåpor
1 glasfiberväv
2 aluminiumprofiler H
2 aluminiumprofiler B
2 grepp
10 rostfria inhängningsvinklar med lång sida
10 rostfria inhängningsvinklar med kort sida
2 klicklister H
2 klicklister B
H
3a
ja B
3b
ovat moitteettomasti paikoillaan. Työnnä yhdistettäessä harjatiivisteet
7
kulma-
kappaleisiin
1
.
Vaihe 7
Pistä peitelevyt
1a
kulmakappaleisiin
1
(katso kuva D).
Vaihe 8
Lyhennä kaksi kiinnityslistaa
6a
alumiiniprofiilin H
3a
mittaan (katso kuva E).
Vaihe 9
Lisää alumiiniprofiilin B
3b
mittaan 1,3 cm ja lyhennä kaksi muuta kiinnityslistaa
6b
vastaa-
vaan mittaan (katso kuva E).
Vaihe 10
Aseta lasikuitukudos
2
kehyksiin ja kiinnitä se kiinnityslistoilla B
6b
alumiiniprofiileille B
3b
(katso kuva F).
Vaihe 11
Aseta pidikkeet
4
kuvan G mukaisesti alumiiniprofiilien H
3a
keskelle ja kiinnitä lasikuituku-
dos
2
ja pidikkeet
4
kiinnityslistoilla H
6a
alumiiniprofiileille H
3a
.
Huomautus: Tarkista, että lasikuitukudos
2
on riittävästi pingotettu.
Vaihe 12
Poista liika lasikuitukudos
2
mattoveitsellä (katso kuva H).
Vaihe 13
Aseta hyönteissuojaikkuna paikoilleen (katso kuva I).
Q
Asennus vaihtoehtoisesti ruuveilla ulkoa
j
Hanki ulkopuolista asennusta varten ruuvit ja tulpat alustaa vastaten (puu, betoni, kivi-
seinä jne.).
j
Seuraa kappaleen „Sisäasennus“ 1 - 2 työvaiheita.
j
Seuraa kappaleen „Sisäasennus“ työvaiheita 4 sekä 6 - 12.
Vaihe 14
Aseta pienimmät jaloteräksiset ripustuskulmat
5a
ylös ja
5b
alas kehyksille. Pidä aina huoli
siitä, että asennat jaloteräksiset ripustuskulmat
5a
pitkillä kyljillä ylös.
Vaihe 15
Pidä kehykset jaloteräksisine ripustuskulmineen
5a
ja
5b
ulkoa ikkunanpieliä tai kiviseinää
vasten ja merkitse porausreiät. Ota tarvittaessa toinen henkilö avuksesi.
Vaihe 16
Poraa porausreiät ja asenna jaloteräksiset ripustuskulmat
5a
ja
5b
ruuveilla (eivät sisälly toi-
mitukseen) ulkoseinään (katso kuva J).
Vaihe 17
Aseta hyönteissuojaikkuna paikoilleen (katso kuvat J + K).
Q
Puhdistus ja hoito
J
Älä missään tapauksessa käytä hankaavaa tai syövyttävää puhdistusainetta.
j
Puhdista lasikuitukangas ja raami nöyhtäämättömällä, hieman kostealla liinalla.
j
Irrota hyönteissuojaikkuna säännöllisin väliajoin ikkunasta ja puhdista se perusteellisesti.
j
Käytä tarvittaessa mietoa puhdistusainetta.
2 kiinnityslistaa B
1 harjatiiviste
1 asennusohje
Turvallisuusohjeet
J
VArOLTUS!
PiKKULAPSiA JA LAPSiA UHKAA TAPATUrMA-
JA HENgENVAArA! Älä koskaan päästä lapsia ilman valvontaa pak-
kausmateriaalin ja tuotteen läheisyyteen. Pakkausmateriaali voi aiheuttaa
tukehtumisvaaran ja sähköisku hengenvaaran. Lapset eivät useinkaan tunnista uhkaavia
vaaroja. Pidä siksi lapset aina loitolla tuotteesta. Tuote ei ole mikään lasten leikkikalu.
VArO! LOUKKAANTUMiSVAArA! Varmistaudu, että kaikki osat on asennettu
ammattitaidolla ja vahingoittumatta. Jos asennusta ei suoriteta ammattitaitoisesti, uhkaa
loukkaantumisvaara. Vahingoittuneet osat voivat vaikuttaa totteen turvallisuuteen ja toi-
mivuuteen.
VArOLTUS!
HENgENVAArA! Älä nojaa asennuksen, irrotuksen tai puhdistuksen
aikana liian pitkälle ulos ikkunasta.
Q
Asennus
j
Varmista ennen asennusta, että ikkuna on tähän tuotteeseen sopiva eikä ylitä maksimi-
mittoja.
VArO! LOUKKAANTUMiSVAArA! Asennukseen tarvitset sahan, mattoveitsen ja
porakoneen (vain ulkoasennukseen). Ota tässä ehdottomasti avuksesi tarvittavien työka-
lujen käyttöohjeet.
Q
Sisäasennus
Vaihe 1
Mittaa ensin ikkunasi karmien korkeus (H) ja leveys (B) (katso kuva A).
Vaihe 2
Vähennä mitatusta korkeudesta (H) 1,2 cm ja leveydestä (B) 3,5 cm ja lyhennä vastaavat
alumiiniprofiilit
3a
3b
vastaavaan korkeuteen (h) ja leveyteen (b) (katso kuva B). Puhdista
leikkuupinnat viilalla.
Vaihe 3
Mittaa kehysten syvyys ja valitse vastaavat 4 jaloteräksistä ripustuskulmaa
5
(katso kuva. C).
Huomio: Ota huomioon, että harjatiiviste lisää mittaa 2 mm:llä.
Vaihe 4
Katkaise harjatiiviste
7
2 x mittaan h + 5,2 cm ja 2 x mittaan b + 4 cm ja työnnä harjat
7
niille varattuihin profiilien
3a
3b
uriin (katso kuva D).
Vaihe 5
Aseta jaloteräksiset ripustuskulmat
5a
ja
5b
kuvan D osoittamalla tavalla kulmakappaleisiin
1
.
Huomautus: Pidä aina huoli siitä, että asennat jaloteräksiset ripustuskulmat
5a
pitkillä
kyljillä ylempiin kulmakappaleisiin
1
.
Huomio: Tarkista, että kaikissa neljässä kulmassa
on sama laippasyvyys X (katso kuva C)!
Vaihe 6
Yhdistä alumiiniprofiilit
3
kulmakappaleilla
1
(katso kuva D). Tarkista, että alumiiniprofiilit
Q
Hävittäminen
Pakkaus koostuu ympäristöystävällisistä materiaaleista ja voit toimittaa sen
paikallisiin kierrätyspisteisiin.
Kysy lisätietoja käytöstä poistetun huonekalun hävittämisestä kunnan / kaupunginvirastolta.
Q
Valmistaja / Huolto
FeinHeim GmbH
Bischof-Otto-Str. 60
D-94486 Osterhofen
Service-Hotline: +49-9932-40 25 897
Email: [email protected]
Tietojen päivämäärä: 01 / 2011
Tunnistenro: 012011-3
Hyönteisverkko ikkunaan
Q
Johdanto
Tutustu tuotteeseen ennen kuin asennat sen. Lue huolellisesti seuraavat asennus- ja
turvaohjeet. Käytä tuotetta ainoastaan ohjeiden mukaan ja siinä mainittuihin
tarkoituksiin. Säilytä nämä ohjeet huolellisesti. Anna kaikki tätä tuotetta koskevat
paperit aina tuotteen mukana eteenpäin.
Q
Käyttötarkoitus
Tämä tuote on tarkoitettu yksityisasunnoissa suojaamaan hyönteisiltä, kuten esimerkiksi
kärpäsiltä. Muunlainen käyttö tai muutosten teko tuotteeseen on määräystenvastaista ja voi
aiheuttaa huomattavia loukkaantumisia ja / tai tuotteen vahingoittumisen. Valmistaja ei ota
mitään vastuuta määräystenvastaisesta käytöstä aiheutuneista vahingoista. Tuote ei ole tarkoitettu
ammattimaiseen käyttöön.
Q
Osien kuvaus
1
Kulmakappale
1a
Peitelevy
2
Lasikuitukudos
3a
Alumiiniprofiili H
3b
Alumiiniprofiili B
4
Pidike
5a
Jaloteräksinen ripustuskulma pitkällä kyljellä
5b
Jaloteräksinen ripustuskulma lyhyellä kyljellä
6a
Kiinnityslista H
6b
Kiinnityslista B
7
Harjatiiviste
Q
Tekniset tiedot
Ikkunan maksimimitat: 130 x 150 cm
Q
Toimitukseen kuuluu
Huomautus: Pidä pakkausta purkaessasi huoli siitä, ettet heitä vahingossa pois oleellisia
asennustarvikkeita. Tarkista välittömästi toimituksen purkamisen jälkeen, että toimitus on täy-
dellinen ja tuote sekä sen osat ovat moitteettomassa kunnossa! Älä missään tapauksessa
asenna tuotetta, ellei toimitus ole täydellinen.
4 kulmakappaletta
4 peitelevyä
1 lasikuitukudos
2 alumiiniprofiilia H
2 alumiiniprofiilia B
2 pidikettä
10 jaloteräksistä ripustuskulmaa pitkällä kyljellä
10 jaloteräksistä ripustuskulmaa lyhyellä kyljellä
2 kiinnityslistaa H
SE
Aluminium Window insect Screen
Q
introduction
Please familiarise yourself with the product prior to assembly. Carefully read the
following assembly instructions and safety tips. Only use the unit as described and
for the specified applications. Store these instructions in a safe place. If passing
this product on to a third party also include all documents.
Q
intended Use
This article is designed to provide protection against insects such as flies and is intended for
indoor use only. Any use other than previously mentioned or any product modification is pro-
hibited and can lead to injuries and / or product damage. The manufacturer is not liable for
any damages caused by any use other than for the intended purpose. The product is not
intended for commercial use.
Q
Description of parts and features
1
Corner connector
1a
Cap
2
Fibreglass fabric
3a
Aluminium profile H
3b
Aluminium profile B
4
Loop handle
5a
Stainless steel suspension bracket with long leg
5b
Stainless steel suspension bracket with short leg
6a
Click strip H
6b
Click strip B
7
Brush seal
Q
Technical data
Max. window dimensions: 130 x 150 cm
Q
included in delivery
Note: When opening the packaging, please make sure not to accidentally throw away
assembly materials. Please check immediately on unpacking that the delivery is complete
and that the product and all parts are in perfect condition. Do not under any circumstances
assemble the product if the delivery is incomplete.
4 Corner connectors
4 Caps
1 Fibreglass fabric
2 Aluminium profiles H
2 Aluminium profiles B
2 Loop handles
10 Stainless steel suspension brackets with long leg
10 Stainless steel suspension brackets with short leg
2 Click strips H
GB/IE
FI
FI
FI
FI
GB/IE
GB/IE
GB/IE
3
HYöNTEiSVErKKO iKKUNAAN
Asennus- ja turvaohjeet
iNSEKTSNÄT För FöNSTEr,
ALUMiNiUM
Monterings- och säkerhetsanvisningar
ViNDUE MED MYggENET AF
ALUMiNiUM
Montage- og sikkerhedsanvisninger
ALUMiNiUM WiNDOW
iNSECT SCrEEN
Assembly and safety advice
ALU-iNSEKTENSCHUTz-FENSTEr
Montage- und Sicherheitshinweise
You need · Tarvitset · Du behöver · Du skal bruge · Sie benötigen:
ø 2,5 mm
B
A
5 a
10 x
5 b
10 x
6a
2 x
6b
2 x
7
1 x
1
4 x
2
1 x
3a
2 x
3b
2 x
4
2 x
3 a
3 b
1.
2.
3.
4.
C
F
I
G
H
D
E
7
5
7
2
2
2
4
3 a
6 a
7
3b
X
X
H
h
b
4 x
1a
3 a
7
7
1
3 a
1a
6 a
6 b
1
5
6 b
3 b
7
K
J
7
5
5
61063_Alu-Insektenschutzfenster_LB3.indd 1
02.02.11 17:12