Powerfix WINDOW SECURITY BRACKET Benutzerhandbuch
Ac b d e
RO
RO
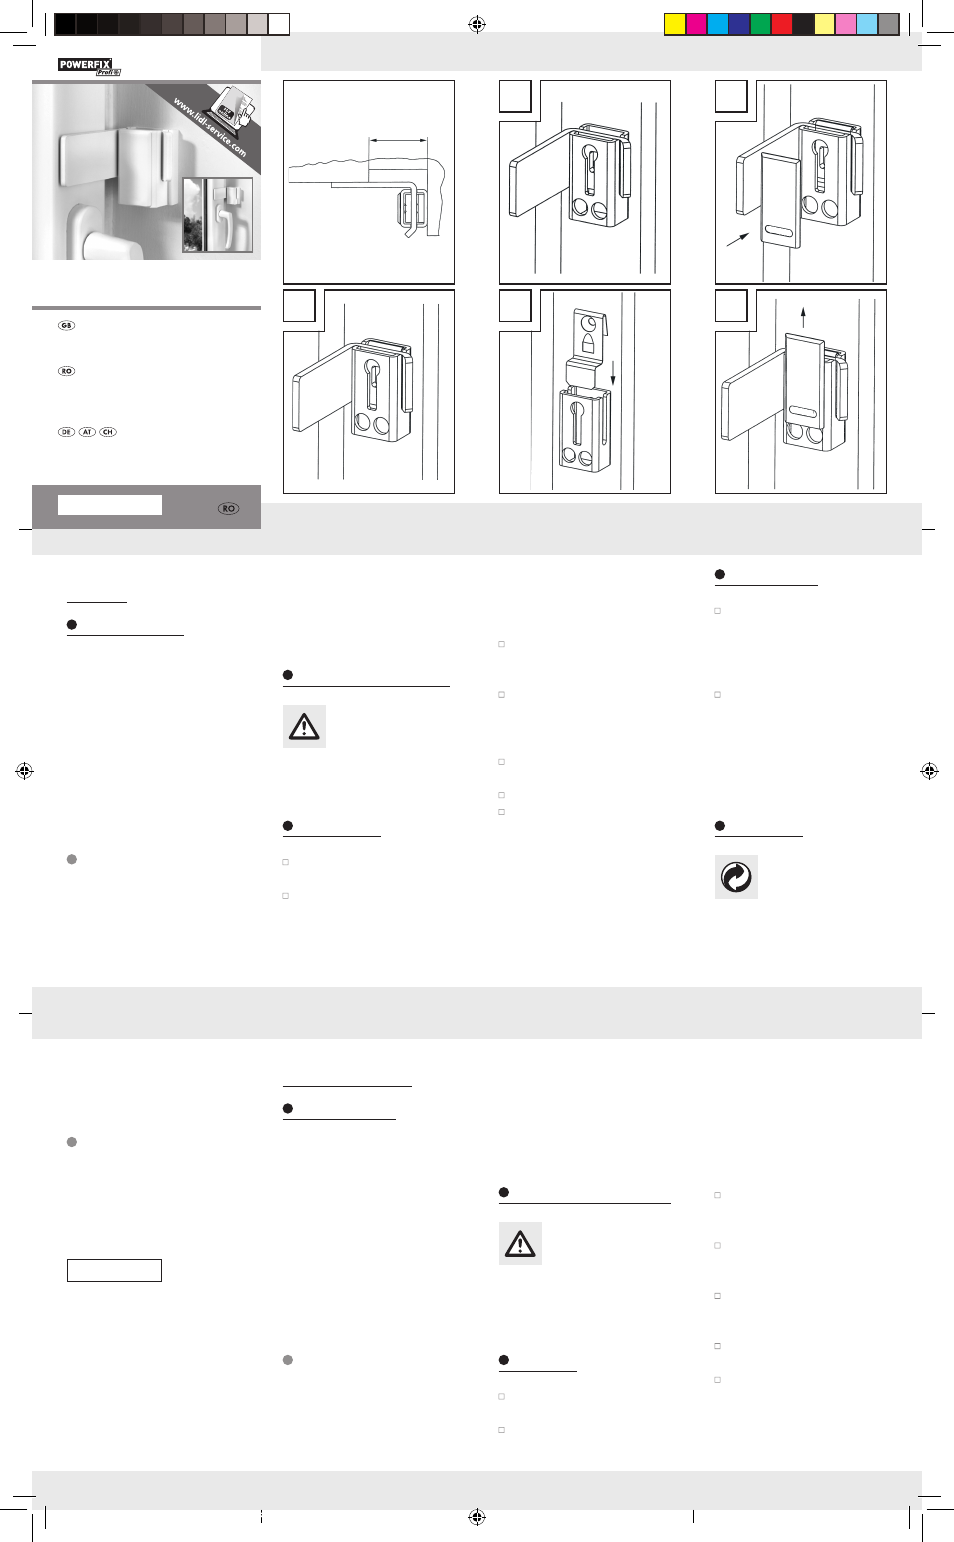
când exercită o contrepresiu-
ne pe aripa ferestrei (fig. A),
scoateţi unghiul ferestrei.
Marcaţi gaura inferioară
care indică spre fereastră și
gaura superioară și realizaţi
o gaură în zid cu diametrul
de 8 mm.
Introduceţi diblul și înfiletaţi
ţeava de blocare prin unul din
orificiile inferioare (fig. B).
Nu introduceţi 3 șuruburi de-
oarece acestea se pot deteri-
ora în funcţie de suprafaţa.
Introduceţi arcul de blocare
și înfiletaţi ţeava de blocare
(fig. C).
Așezaţi carcasa de protecţie
(fig. D).
Introduceţi bolţul și fixaţi-l.
Aveţi nevoie de următoa-
rele:
Șurubelniţă în cruce,
pe perete pe margine. Recoman-
dat pentru toate ferestrele / ușile cu
deschidere în interior cu o lăţime
a ramei între 28 mm și pâmă la
aprox. 60 mm pe partea mâneru-
lui. În cazul ferestrelor/ușilor înalte
se recomandă montarea a 2 bucăţi.
Indicaţii de siguranţă
ATENŢIE! PERICOL
DE ACCIDENTARE!
În cazul unui montaj
incorect există pericol de acciden-
tare. Piesele deteriorate pot influ-
enţa funcţionalitatea produsului și
pot duce la deteriorări.
Montaj
Stabiliţi poziţia de montare
pentru înălţimea dorită.
Introduceţi cornierul și așezaţi-l
pe ambrazura ferestrei până
Colţar de siguranţă
pentru fereastră
Introducere
Felicitări! Prin achiziţia dumnea-
voastră v-aţi decis pentru un pro-
dus de calitate. Înainte de montare
familiarizaţi-vă cu produsul. Citiţi
cu atenţie următoarele instrucţiuni
de montaj și indicaţiile de siguranţă.
Utilizaţi produsul doar conform
descrierii și în scopurile de utilizare
menţionate. Păstraţi aceste instruc-
ţiuni. Predaţi întreaga documentaţie
în cazul înstrăinării produsului
către terţi.
Utilizare conform
destinaţiei
Unghiul de siguranţă protejează
fereastra și ușile cu eficienţă împo-
triva ruperii și presiunii. Montarea
are loc pe un cadru îngust direct
Contact your local refuse dispos-
al authority for more details on
how to dispose of your worn-out
product.
Manufacturer /
Service
ATO GmbH
Wasserstraße 12
D-58300 Wetter
E-Mail: [email protected]
Hotline: +49 23 35 / 84 93 49 0
IAN 21989
Please have your receipt and the
article number (e.g. IAN 12345)
ready as your proof of purchase
when enquiring about your product.
Subject to technical changes with-
out notice. We assume no liability
for errors or misprints.
Operation
To remove the bar, slide the
cover up, press the stop
spring back through one of
the lower holes and remove
the angle bar (Fig. E).
Slide back the cover. The an-
gle bar will automatically lock
in when inserted.
Note: The manufacturer
assumes no liability for any
damages occurring from in-
stallation and improper use.
Disposal
The packaging is made
of environmentally
friendly materials. Dis-
pose of it at your local
recycling centre.
Mark the lower drill hole fac-
ing the window and the top
drill hole, and drill Ø 8 mm
into the masonry.
Insert the plug and screw on
the locking tube through one
of the lower drill holes (Fig. B).
Do not install 3 screws, as
they may destroy the surface,
depending on the surface
construction.
Insert stop spring and screw on
with the locking tube (Fig. C).
Press on the cover (Fig. D).
Insert the bar and allow to
latch in.
You will need:
Cross-tip screwdriver,
Power drill,
Masonry bit (Ø 8 mm)
opening to the inside with a handle
side frame width from 28 mm to
approx. 60 mm. We recommend
installing 2 pieces on high win-
dows / doors.
Safety instructions
CAUTION! RISK
OF INJURY! Incor-
rect assembly could
lead to injury. Damaged parts
may impact the functionality of
the product and result in injuries.
Assembly
Determine the installation po-
sition at the desired height.
Insert the angle bar and ap-
ply to the windows reveal,
push all the way against the
casement (Fig. A), remove
angle bar.
Window Security
Bracket
Introduction
Congratulations! You have pur-
chased a high-quality product.
Familiarise yourself with the prod-
uct prior to assembly. Carefully
read the following assembly in-
structions and safety advice. Only
use the product as described and
for the indicated purpose. Keep
these instructions in a safe place.
If passing this product on to a third
party also include all documents.
Intended use
The safety angle protects windows
and doors from being broken or
pushed open from outside. On
narrow frames, it is installed di-
rectly to the wall in the recess.
Suitable for all windows / doors
RO
GB
GB
GB
GB
GB
IAN 21989
WINDOW SECURITY BRACKET
Assembly, operating and safety instructions
COLŢAR DE SIGURANŢĂ
PENTRU FEREASTRĂ
Indicaţii de montaj-, utilizare- şi siguranţă
FENSTER-SICHERHEITSWINKEL
Montage-, Bedienungs- und Sicherheitshinweise
WINDOW
SECURITY BRACKET
28–60 mm
A
C
B
D
E
21989_pow_Fenster-Sicherheitswinkel_50x112_RO.indd 1
28.02.14 14:53