Powerfix Punch Pliers Set Benutzerhandbuch
Punch pliers set
GB/IE
GB/IE
GB/IE
GB/IE
SE
SE
Öljetter
Metallöljett, utan bricka, håldiameter ca 5 mm
Leveransomfattning
1 öljettång
1 håltång
200 öljetter
1 bruksanvisning
Säkerhetsinformation
Förvara tängerna och öljetterna utom räckhåll för barn. Barn kan skada sig med täng-
erna och svälja öljetterna.
Var alltid medveten om vad du gör och använd sunt förnuft när du arbetar med produkten.
Använd inte tängerna om du är trött eller påverkad av droger, alkohol eller läkemedel.
Ett ögonblick av ouppmärksamhet under användningen kan orsaka personskador.
Använd tängerna endast om de är i fullgott skick och utan skador. Skadade tänger kan
brytas vid användning och orsaka personskador.
Håll alltid i tången i handtagen och endast med en hand. Håll den andra handen utom
räckhåll för tången. Risk för klämskador i närheten av tångens mekanism.
Användning
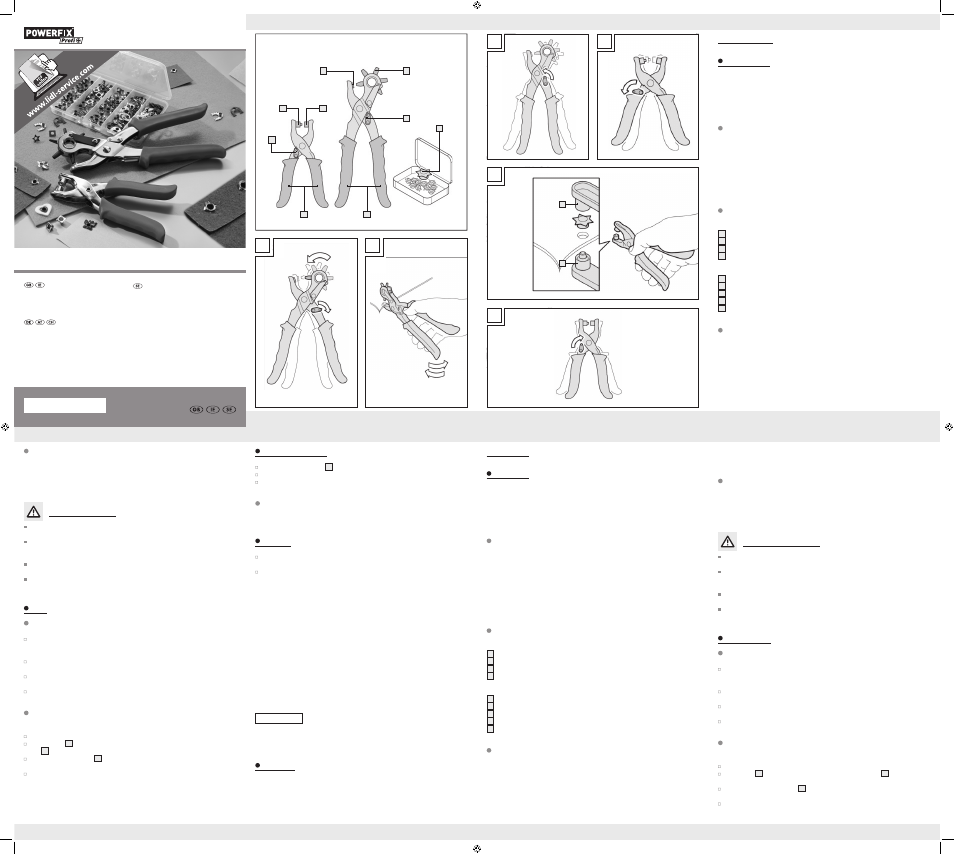
Hålstansning
Ställ in önskad håldiameter. Välj den största diametern 5 mm för de medföljande öljet-
terna (se bild A I).
Tips: Välj en mindre diameter för öljetter i grovmaskigt tyg.
Lås upp och öppna håltången (se bild A II).
Hänvisning: Låsa upp och låsa endast möjligt med arbetshuvudet i mellanläge.
Stansa hålet genom att trycka ihop tången hårt (se bild B).
Tips: Vid elastiskt material vrid den ihoptryckta tången hit och dit.
Stäng och lås håltången (se bild C).
Fastsättning av öljetter
Tips: Öva alltid hanteringen av öljettången på en kasserad bit.
Lås upp och öppna öljettången (se bild D).
För öljetten
9
igenom stanshålet. Placera öljetten mitt på stansen
1
. Tryck ihop öljett-
ången försiktigt (se bild E).
Kontrollera resultatet: Öljetten
9
har satts fast korrekt, när det bildats en jämn fläns på
undersidan.
Stäng och lås öljettången (se bild F).
Håltångsset
Inledning
Vi gratulerar dig till köpet av din nya produkt. Du har valt en produkt av hög kvalitet. Bruksan-
visningen är en del av produkten. Läs noga igenom denna handledning och beakta anvis-
ningarna. Denna handledning innehåller viktig information om produktens skötsel. Förvara
därför denna handledning lätt tillgänglig och låt den följa med produkten om den lämnas
vidare till tredje man.
Avsedd användning
Håltången är avsedd för att stansa hål i filt, läder, plastfolier och papp. Öljettången är till
för att sätta fast öljetter i stanshål.
Alla andra användningar är ej ändamålsenliga! En icke ändamålsenlig användning kan
t.ex. ha följande följder:
- Personskador för användaren och personer som befinner sig i närheten
- Materiella skador på produkt, arbetsstycke eller föremål i närheten av produkten
- Förlorade anspråk på garanti, ansvar och försäkringsersättning.
Tängerna är inte avsedda för yrkesmässig användning.
Beskrivning av delarna
Öljettång
1
Stämpel
2
Arbetshuvud
3
Handtag
4
Låsning
Håltång
5
Pipor
6
Låsning
7
Handtag
8
Arbetshuvud
9
Öljetter
Tekniska specifikationer
Öljettång
Endast för att sätta fast medföljande öljetter med en diameter på ca 5,0 mm
Håltång
För håldiameter ca 2,5–5,0 mm
Storage and Care
Store the pliers and rivets
9
clean and dry.
Dry clean the pliers with a brush.
Use sewing machine oil to keep moving parts free-moving.
Repairs
The pliers have no repairable parts.
Service
Store the product, instructions for use and, if applicable, accessories in their original
packaging. This will ensure all information and parts are always handy.
Securely pack the product or use the original packaging to prevent transport damage.
Abraham-Diederichs products are submitted to strict quality control. If a malfunction occurs,
however, please send the product to our service address. A brief description of the defect
will speed up troubleshooting and repairs. Please include the sales receipt with the product
during the warranty period. If the repair is not covered by warranty, we will invoice you for
the repair.
IMPORTANT! We expressly state that according to the Product Liability Act, we are not
liable for damages caused by our products, if these were caused by improper repair, or if
parts were replaced not using our original parts or parts approved by us.
Abraham Diederichs GmbH & Co. oHG
Customer service
Oberkamper Strasse 39
Warenannahme Tor 1
D-42349 Wuppertal
E-mail: [email protected]
IAN 102835
Please have your receipt and the article number (e.g. IAN 12345) ready as your proof of
purchase when enquiring about your product.
Disposal
The packaging is made of environmentally friendly materials, which may be disposed of
through your local recycling facilities. Please dispose of this product at the end of it‘s useful
life.
Scope of delivery
1 Rivet pliers
1 Punch pliers
200 Rivets
1 Instructions for use
Safety information
Keep the pliers and rivets away from children. Children could be hurt by the pliers and
swallow the rivets.
Remain alert at all times, pay attention to what you are doing and use common sense
in your work. Do not use the pliers when tired or under the influence of drugs, alcohol
or medications. One moment of carelessness when using the pliers can result in injuries.
Only use the pliers in flawless condition and undamaged. Damaged pliers can break
during use and result in injuries.
Only hold the pliers with one hand, and only by the handles. Keep the other hand
away from the pliers. You could pinch yourself near the pliers mechanism.
Use
Punching holes
Set the desired hole diameter. Use the largest diameter (5 mm) for the rivets included
(see Fig. A I).
Tip: Select a smaller diameter to attach rivets to wide-meshed fabric.
Unlock and open the punch pliers (see Fig. A II).
Note: Only unlocks and locks with the intermediate head position.
Punch the hole by sharply squeezing the pliers (see Fig. B).
Tip: Turn the squeezed pliers back and forth when working with stretchy materials.
Close and lock the hole pliers (see Fig. C).
Attaching rivets
Tip: Practice using the rivet pliers on a scrap piece.
Unlock and open the rivet pliers (see Fig. D).
Push the rivet
9
through the punched hole. Position the rivet on the centre of the rivet
tip
1
. Carefully squeeze the rivet pliers (see Fig E).
Check the result. The rivet
9
is correctly attached if even beading has formed on the
underside.
Close and lock the rivet pliers (see Fig. F).
Punch Pliers Set
Introduction
Congratulations on the purchase of your new product. You have selected a high quality
product. The user manual is a part of the product. Please read the complete instructions
and follow the notices. These instructions contain important care information. Keep these
instructions safe and if you pass on the product to anyone else please pass on the docu-
mentation as well.
Intended use
The punch pliers are intended for punch holes in felt, leather, textile, plastic film, and
cardboard. The rivet pliers are intended to attach rivets in punched holes. Any other use is
improper! Consequences of improper use can be:
- Injury to the user or persons nearby
- Damage to the product, the work piece or objects near the product
- Warranty, liability or insurance entitlements being voided.
The pliers are not intended for commercial use.
Parts description
Rivet pliers
1
Rivet tip
2
Anvil
3
Handles
4
Lock
Punch pliers
5
Punch
6
Lock
7
Handles
8
Anvil
9
Rivets
Technical Data
Rivet pliers
Only for attaching the included rivets, approx. 5.0 mm in diameter
Punch pliers
For hole diameters approx. 2.5–5.0 mm
Rivets
Metal rivet, without counter piece, hole diameter approx. 5 mm
HÅLTÅNGSSET
Bruksanvisning och säkerhetsanvisningar
LOCHZANGEN-SET
Bedienungs- und Sicherheitshinweise
IAN 102835
PUNCH PLIERS SET
PUNCH PLIERS SET
Operation and Safety Notes
B
C
F
D
E
2
1
9
3
7
4
1
2
8
5
6
A
II
I