JUNG WLAN-AC-POE-UAE Benutzerhandbuch
Bestimmungsgemäßer gebrauch, Allgemeines, Installation
WLAN Access Point PoE
Art.-Nr.: WLAN-AC-POE-UAE
Sicherheitshinweise
• Einbau und Montage elektrischer Geräte dürfen
nur durch Elektrofachkräfte erfolgen.
• Schwere Verletzungen, Brand oder Sachschäden
möglich.
• Anleitung vollständig lesen und beachten.
• Diese Anleitung ist Bestandteil des Produktes
und muss beim Endkunden verbleiben.
Bestimmungsgemäßer Gebrauch
Dieses Gerät kann entweder als Zugangspunkt
(Accesspoint) für drahtlos kommunizierende Geräte
verwendet werden oder als Verstärker, um die
Reichweite im WLAN-Netzwerk zu erhöhen (Access
Point WDS/Repeater).
Darüberhinaus kann es an Geräte angeschlossen
werden, die über keinen eigenen WLAN-Adapter
verfügen (Client WDS bzw. Client Relayed).
Benutzen Sie das Gerät zu keinem anderen Zweck.
Betreiben Sie das Gerät nur in Innenräumen.
Allgemeines
Der WLAN Access Point PoE erweitert die Nut-
zungsmöglichkeiten moderner, mobiler Netzwerk-
technologien bei geringer Leistungsaufnahme und
strahlungsarmer Funkemission.
Mit den Funktionseinstellungen optimieren Sie die
Abgrenzung unter einzelnen Accesspoints und ver-
meiden Überkopplungen der WLAN-Bereiche und
Einbußen bei den Datenraten.
Installation
Anschließen des Netzwerk-Kabels an die Schraub-
klemmleiste
1. Ziehen Sie das Kabel vorzugsweise von unten in
die Einbau dose ein.
2. Kürzen Sie das Kabel so, dass ca. 90
mm vom
Dosen boden an verbleiben.
3. Isolieren Sie das Kabel auf ca. 80 mm ab.
4. Ziehen Sie den 9-poligen Schraubklemmblock ab
und legen Sie die Adern nach dem folgenden
Farbcode auf.
»
Erhalten Sie die Paarschirmung und die Ver-
drillung der Paare so lang wie möglich!
»
Verdrillen Sie den Gesamtschirm (S) und ver-
wenden Sie ggf. eine 1-mm-Aderendhülse.
»
Beachten Sie die gleiche Belegung im Ran-
gierfeld und an der Dose!
5. Setzen Sie den Klemmblock auf die Schraub-
klemme.
Konfiguration
Für die Konfiguration beachten Sie bitte folgendes:
• SSID = jung
• Passwort = admin
• WLAN-Passwort = wireless123
• IP = 192.168.0.5
• Subnet: 255.255.255.0
Hinweise
Benutzen Sie für eine Änderung der SSID nur Buch-
staben (ohne ä, ö, ü, ß) und Zahlen.
Die WLAN-IP-Adresse des programmierenden Gerä-
tes muss dabei im Bereich 192.168.0.xxx liegen! (x
≥ 0 ≤ 255, x ≠ 5)
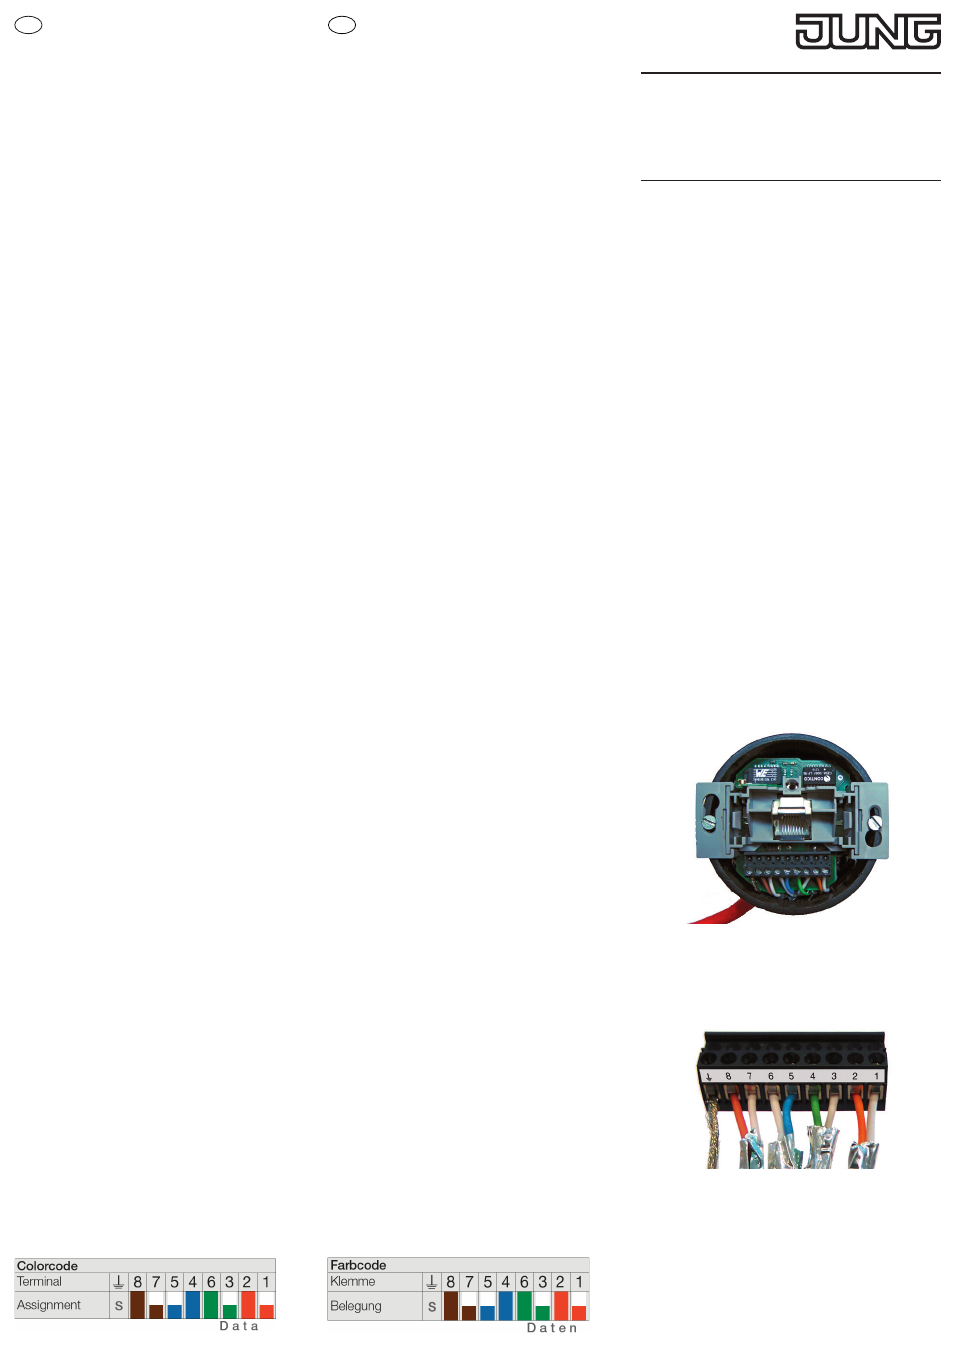
Farbcode
O: orange, WH: weiß, GN: grün, BL: blau, BN: braun
1: O/WH
2: O
3: GN/WH
4: BL
5: BL/WH
6: GN
7: BN/WH
8: BN
Safety Instructions
Electrial power supply!
Hazardous to life and fire danger due to electri-
cal voltage of 230 V!
• Work on the 230-V-supply may only be carried
out by authorized electricians!
• Disconnect the main voltage before installation
work!
Intended Use
This device can either be used as an Accesspoint for
devices communicating wirelessly or as a booster
in order to increase the WLAN network range (Ac-
cesspoint WDS/Repeater). It can also be connected
to devices that are not equipped with their own
WLAN adapter (Client WDS or Client Relayed).
Do not use the device for any other purpose.
Only use the device indoors.
General
The WLAN Access Point PoE extends the use of
modern mobile network technologies with low power
consumption and low-radiation emisson.
With the function settings you optimize the demar-
cation among individual Accesspoints and avoid
overcouplings of the wireless areas and losses of
data rates.
Installation
Connection of network cable to the screw terminal
block
1. Pull the cable preferably from top of the installa-
tion box.
2. Shorten the cable so that approx. 90 mm remain
from the installation box bottom.
3. Strip off the cable sheath to approx. 80 mm.
4. Pull off the 9-pole terminal block and connect the
wires according to the color code below.
»
Leave the wire pair shielding and the wire
twist for as long as possible!
»
Twist the shielding (S) and, if necessary, use
a 1 mm wire end sleeve.
»
Make sure the wires are connected according
to the color code in the patch panel and on
the jack!
Put the terminal block on the screw terminal
block.
Configuration
For the configuration, note the following:
• SSID = jung
• Password = admin
• WLAN password = wireless123
• IP = 192.168.0.5
• Subnet: 255.255.255.0
Notes
When changing the SSID, use standard letters and
numbers only.
The WLAN IP address of the device used for
programming must be within the address range
192.168.0.xxx (x ≥ 0 ≤ 255, x ≠ 5).
Colorcode
O: orange, WH: white, GN: green, BL: blue,
BN: brown
1: O/WH
2: O
3: GN/WH
4: BL
5: BL/WH
6: GN
7: BN/WH
8: BN
Bild 1
Bild 2
D
GB
ALBRECHT JUNG GMBH & CO. KG
Volmestraße 1
58579 Schalksmühle
Telefon: +49.23 55.8 06-0
Telefax: +49.23 55.8 06-2 04
www.jung.de
Kurzbedienungsanleitung/Quick Guide
293745 Stand 18.08.2014
J:0024073800