Eneo HDD-1080PV316 Benutzerhandbuch
Quick ins tall ation guide, English deutsc h, English
QUICK INS
TALL
ATION GUIDE
1/2.9“ HDCCTv DOME D
AY&NIGHT
, WDR
HDD-1080Pv316
ENGLISH
DEUTSC
H
For fur
ther languag
e ver
sions please visit www.eneo-secur
ity.com
Sold exclusively through specialised dealers.
eneo® is a registered trademark of Videor E. Hartig GmbH
Subject to technical modifi cations.
Videor E. Hartig GmbH
Carl-Zeiss-Straße 8 • 63322 Rödermark, Deutschland
Tel. +49 (0) 6074 / 888-0 • Fax +49 (0) 6074 / 888-100
www.videor.com
© Copyright by Videor E. Hartig GmbH 09/2013
www.eneo-security.com
1. Lens: 3.5~16mm D/N A/I Vari-focal lens for wide area monitoring.
2. Power: 12V DC input, power source from a DC 12V +/-10%. Use Certifi ed/
Listed Class 2 power source only. If using DC 12V power adaptor, use a
power supply capable of supplying 5 Watts.
3. Video: BNC connector used to connect the camera to a monitor, switcher,
etc.
1x Camera in housing
1x Instruction manual
1x Accessory kit for installing
1x Drilling guide label
1. Make mounting holes and cable hole in place (ceiling or wall) to which this
dome camera is installed using the drilling guide label.
2. To remove dome cover, turn the dome body counterclockwise until locators
reach end of travel and pull off . Push the liner on the sides where the pat-
terns are put in the teeth of a comb and pull it out.
3. Attach the housing to the ceiling using suitable fasteners, M6x35 tapping
screws are supplied only use if they are suitable. Turn the housing to the
right direction about 16 degrees to lock in place.
4. The assembly of the dome body and liner is in reverse order of disassembly.
Finally, lock dome body with locking screw (M3x5) from the accessory kit.
The
LENS menu is used to set the DC or Manual mode.
• DC: Select the DC mode
• MANUAL: Select the MANUAL mode.
Note: Choose when installed in an external DC mode of outdoor.
The
EXPOSURE menu is used to set the automatic light control method for the
camera. It provides the ability to adjust the SHUTTER speed, BRIGHTNESS,
AGC, DSS and ACE functions of the camera.
• SHUTTER: Select the SHUTTER speed level.
• BRIGHTNESS: Adjust the BRIGHTNESS level.
• AGC: Adjust the Auto Gain Control level.
• DSS: Select the Digital Slow Shutter level.
• ACE: Select the Adaptive Contrast Enhancer (D-WDR).
• DEFOG: Select the DEFOG mode
*When DEFOG is ON. ACE and WDR function can not turn on.
The screen color can be adjusted by using the
AWB (Auto White Balance) func-
tion. It compensates for deviations in the white color caused by changes in the
color temperature of the light source so that the colors are reproduced correctly.
• AUTO: Automatically adjust color temperature.
• AUTOext: Automatically extended range of color temperature adjustment.
• PRESET: Automatically readjust only by pressing PRESET.
• MANUAL: Manual mode. User can change Red and Blue gain value manual-
ly.
• BLC: Prevents such a back light eff ect to secure a clear image under all illu-
mination environmonents. Adjust the size of Back Light Compensation area.
The
DAY&NIGHT menu is used to confi gure the day and night related setting for
the camera.
•
D&N AUTO:
- Input Method SENSOR: DAY&NIGHT mode are changed according to
the sensor inputs.
- Input Method AGC: DAY&NIGHT mode are changed according to the
brightness of the image. Use only when the camera is installed in a dark
place but the camera is viewing a bright place. When used in normal ins-
tallation, hunting may occur.
•
D&N B&W: SMART IR and LEVEL
The
IMAGE menu provides the ability to adjust the CHROMA, SHARPNESS, EF-
FECT, STILL, SHADING, HLMASK, DZOOM, and GAMMA functions of the came-
ra.
• CHROMA: Adjust the CHROMA level.
• SHARPNESS: Adjust the SHARPNESS level.
• EFFECT: OFF, MIRROR, FLIP, ROTATE
• STILL: Select real or still mode.
• SHADING: Select the lens SHADING compensation.
• HLMASK: Mask the high light zone with specifi c color & level.
• DZOOM: Adjust the Digital Zoom level.
• GAMMA: Adjust the GAMMA level.
The
FUNCTION menu provides the ability to adjust the DNR, MOTION DET, PRI-
VACY, SHADING DET, DEFECT DET and PRESET functions of the camera.
• DNR: Select Digital Noise Reduction.
• MOTION: Detects the Motioned Object in the image.
• PRIVACY: Hide an area you want to hide on the screen.
• SHADING DET: Compensates for lens shading.
• DEFECT DET: Compensates for bad pixels.
The
SYSTEM menu provides the ability to adjust the CAM TITLE, DISPLAY, OUT
MODE, LANGUAGE, VERSION and RESET functions of the camera.
• CAM TITLE: Maximum of 10 characters are allowed.
• DISPLAY: Set the position of the camera ID & title.
• OUT MODE: Image output method
• LANGUAGE: OSD menu language.
• VERSION: Firmware version.
• RESET: Factory initialization of camera settings.
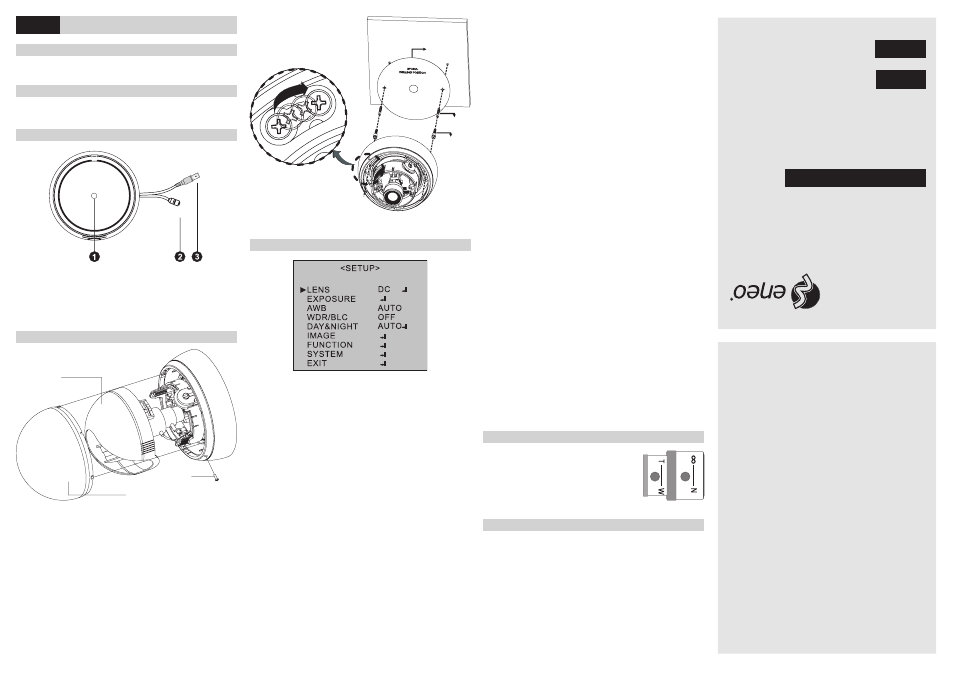
• Field of view: Adjust setting from Tele (T) to Wide
(W) fi eld of view.
• Focus: Adjust lens focus from Near (n) to Infi nity
(∞).
Please also pay attention to the enclosed safety instructions, and carefully
read through this instruction guide before initial operation.
NOTES ON SAFETY
SCOPE OF DELIvERY
CAMERA CONNECTIONS
INSTALLATION
LENS ADjUSTMENT
SETUP MENU
ENGLISH
ⓐ
ⓑ
ⓒ
ⓐ Liner, ⓑ Dome window, ⓒ Locking screw (M2x)
ⓐ
ⓑ
ⓒ
ⓐ Drilling guide label, ⓑ Plastic anchor, ⓒ Special screw (M4)
The
WDR/BLC menu is used to the ability to expand the dynamic range and to
prevent back lighting from the image.
• WDR: Select the Dynamic Range level.
* When WDR is ON, ACE and DEFOG function can not turn on.
FURTHER INFORMATION
The Full Manual and further language versions are available from the eneo web
site at www.eneo-security.com