Auriol Z30002 Benutzerhandbuch
Dc a b
SE
SE
SE
SE
SE
SE
SE
SE
SE
FI
FI
FI
FI
FI
FI
FI
FI
FI
FI
FI
FI
FI
FI
FI
FI
FI
FI
FI
GB/IE
GB/IE
GB/IE
GB/IE
GB/IE
GB/IE
GB/IE
GB/IE
GB/IE
GB/IE
GB/IE
GB/IE
GB/IE
GB/IE
GB/IE
GB/IE
GB/IE
GB/IE
GB/IE
GB/IE
Q
Scope of Delivery
1 x Multi-purpose alarm clock
2 x Battery
1 x Directions for use
Safety notes
Please read all safety information and instructions.
Failure to comply with the safety information and
instructions may result in, fire and / or severe injuries.
KEEP ALL THE SAFETY ADVICE AND INSTRUCTIONS
IN A SAFE PLACE FOR FUTURE REFERENCE!
Q
Displaying the
temperature in °C / °F
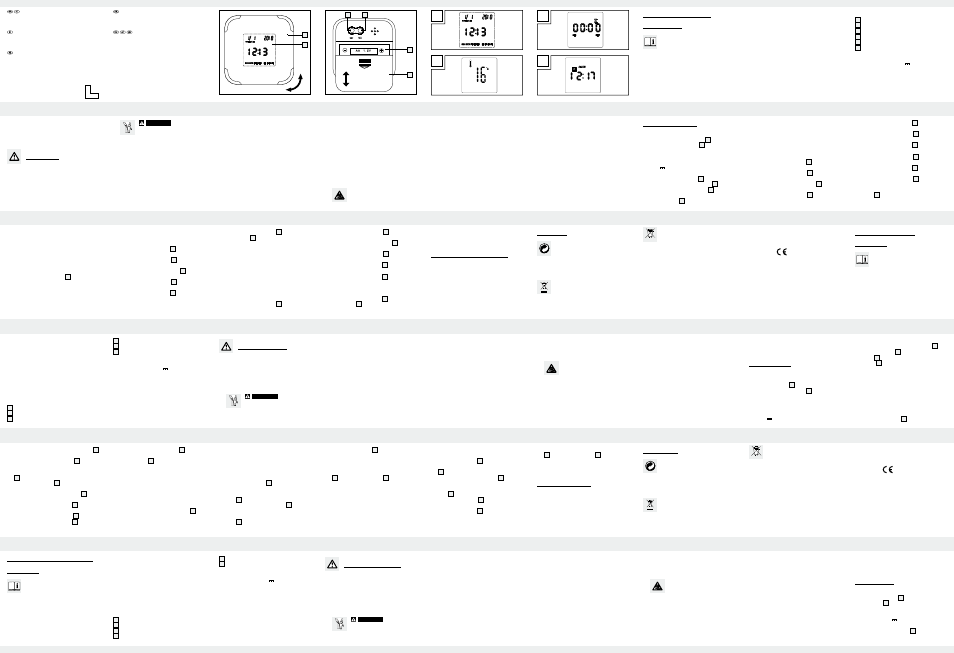
j
Turn the device vertically by 90° as often as
necessary until the room temperature display
(see Fig. B) appears.
Note: Every time you change the LC display,
a green and blue light will light up alternatively
3 times.
j
Press the set-up button “ADJ” 4 to set the °C
or °F display.
Q
Setting the timer
j
Turn the device vertically by 90° as often as
necessary until the timer display (see Fig. C)
appears.
päiväyksen ja huoneenlämpötilan °C ja °F. Monitoi-
miherätyskellossa on lisäksi vielä herätys- ja ajastin-
toiminto. Laite on tarkoitettu käytettäväksi ainoastaan
suljetuissa tiloissa ja normaalissa huoneenlämpötilassa.
Muunlainen käyttö tai muutosten teko laitteeseen on
määräystenvastaista ja siitä voi seurata tapaturmavaara
ja / tai laitteen vaurioituminen. Valmistaja ei ota mitään
vastuuta määräystenvastaisesta käytöstä aiheutuneista
vahingoista. Laite ei ole tarkoitettu ammattimaiseen
käyttöön.
Q
Osat
1
Monitoimiherätyskello
2
LC-näyttö
3
”SET“-painike
j
Aseta oikean kellonajan tunnit ”ADJ”-painiketta 4
painamalla.
j
Paina sen jälkeen ”SET“-painiketta 3 , jotta voit
asettaa minuutit.
j
Aseta oikean kellonajan minuutit ”ADJ”-painiketta
4
painamalla.
j
Paina ”SET“-painiketta 3 , jotta voit asettaa
kuukauden.
j
Aseta oikea kuukausi ”ADJ”-painiketta 4
painamalla.
j
Paina uudelleen ”SET“-painiketta 3 , jotta voit
asettaa päivän.
j
Aseta oikea päivä ”ADJ”-painiketta 4 painamalla.
j
Paina uudelleen ”SET“-painiketta 3 , jotta voit
asettaa vuoden.
Väckarklocka med multifunktion
Q
Inledning
Gör dig bekant med produkten innan du
använder den. Läs nedanstående säkerhets-
anvisningar och bruksanvisning. Använd
endast produkten i enlighet med beskrivningen och
för angivna ändamål. Förvara denna bruksanvisning
på säker plats. Se till att bruksanvisningen alltid finns
tillgänglig även vid vidare användning av tredje man.
Q
Avsedd användning
Väckarklockan med flera funktioner visar klockslaget i
12 / 24-timmarsläge (i timmar och minuter), veckodag,
J
WArNINg!
DANgEr TO
LIFE AND ACCIDENT HAZArD
FOr TODDLErS AND SMALL
CHILDrEN! Never allow children to play unsu-
pervised with the packaging material. There is a
danger of suffocation from the packaging material.
Children frequently underestimate the dangers.
Children should be kept away from the product
at all times. This product is not a toy!
J
Children or persons who lack the knowledge or
experience to use the device or whose physical,
sensory or intellectual capacities are limited
must never be allowed to use the device without
supervision or instruction by a person responsible
for their safety. Children must never be allowed
Note: Every time you change the LC display,
a green and blue light will light up alternatively
3 times.
j
Press the mode button “SET” 3 in order to be
able to set the minutes.
j
Press the set-up button “ADJ” 4 in order to set
the minutes you wish to have.
j
Then press the mode button “SET” 3 in order
to be able to set the seconds.
j
Press the set-up button “ADJ” 4 in order to set
the seconds you wish to have.
j
Press the mode button “SET” 3 to start the timer
function.
Note: When the set time has elapsed, an alarm
signal will sound.
4
Säätöpainike ”ADJ“
5
Paristolokero
6
Paristolokeron kansi
Q
Tekniset tiedot
Paristotyyppi: 2 x AA, 1,5 V
Jännite:
3 V
Lämpötila:
–5°C - 49°C
Q
Toimituksen sisältö
1 x monitoimiherätyskello
2 x paristo
1 x käyttöohje
j
Aseta oikea vuosi ”ADJ”-painiketta 4 painamalla.
j
Paina parametrien asettamisen jälkeen ”ADJ“-
säätöpainiketta 4 ja valitse 12- tai 24-tunnin
näyttömuoto.
Q
Lämpötilan näyttö: °C / °F
j
Käännä laitetta pystysuorassa 90°:een verran
niin monta kertaa, että näyttöön tulee huoneen-
lämpötilan näyttö (katso kuva B).
Huomautus: Joka kerran, kun muutat LCD-näytön,
syttyy vuorotellen 3 x vihreä ja sininen valo.
j
Aseta °C- tai °F-näyttö ”ADJ”-painiketta 4
painamalla.
datum och rumstemperatur i °C och °F. Väckarklockan
med flera funktioner är dessutom utrustad med en
väcknings- och timerfunktion. Produkten är endast
avsedd i torra slutna utrymmen med normal rumstem-
peratur. Varje annan användning gäller som icke
avsedd användning och kan medföra risk för person-
skador och / eller produktskador. Tillverkaren ansvarar
inte för skador vilka kan härledas ur felaktig hantering.
Produkten är endast avsedd för privat bruk.
Q
De olika delarna
1
Väckarklocka med flera funktioner
2
LC-display
3
Lägesknapp ”SET”
4
Inställningsknapp ”ADJ”
to play with the device.
m DANgEr TO LIFE! Batteries can be swallowed,
which may represent a danger to life. If a battery
has been swallowed, medical help is required
immediately.
J
Do not use the device if it is damaged. Damaged
devices represent a danger of death!
J
Do not expose the device to
- extreme temperatures,
- strong vibrations,
- heavy mechanical loads,
- direct sunlight,
- moisture.
Otherwise there is a danger that the device will
be damaged.
j
Press the mode button “SET” 3 or the set-up
button “ADJ” 4 to stop the alarm signal.
If another function of the clock is chosen during the
countdown the timer will be stopped. Upon returning
to timer mode the timer will restart the countdown.
Q
Setting the alarm
j
Turn the device vertically by 90° as often as neces-
sary until the alarm display (see Fig. D) appears.
Note: Every time you change the LC display,
a green and blue light will light up alternatively
3 times.
j
Press the mode button “SET” 3 in order to be
able to set the hours.
Turvallisuusohjeita
Lue kaikki turva- ja muut ohjeet! Turva- ja muiden oh-
jeiden laiminlyönti voi aiheuttaa sähköiskun, tulipalon
ja / tai vakavia loukkaantumisia.
SÄILYTÄ KAIKKI TURVA- JA MUUT OHJEET
TULEVAA TARVETTA VARTEN!
J
VArOLTuS!
HENgEN- JA
TAPATurMANVAArA PIKKuLAP-
SILLE JA LAPSILLE! Älä koskaan
jätä lapsia pakkausmateriaalien läheisyyteen
ilman valvontaa. Pakkausmateriaaleihin liittyy
Q
Ajastimen säätäminen
j
Käännä laitetta pystysuorassa 90°:een verran
niin monta kertaa, että näyttöön tulee ajastimen
näyttö (katso kuva C).
Huomautus: Joka kerran, kun muutat LCD-näytön,
syttyy vuorotellen 3 x vihreä ja sininen valo.
j
Paina ”SET“-painiketta 3 , jotta voit asettaa
minuutit.
j
Aseta haluamasi kellonajan minuutit ”ADJ”-paini-
ketta 4 painamalla.
j
Paina sen jälkeen ”SET“-painiketta 3 , jotta voit
asettaa sekunnit.
j
Aseta haluamasi kellonajan sekunnit ”ADJ”-paini-
ketta 4 painamalla.
5
Batterifack
6
Batterifackslucka
Q
Tekniska data
Batterityp:
2 x AA, 1,5 V
Spänning:
3 V
Temperatur: –5°C - 49°C
Q
Leveransens omfattning
1 x Väckarklocka med flera funktioner
2 x Batteri
1 x Bruksanvisning
J
Please note that the guarantee does not cover
damage caused by incorrect handling, non-compli-
ance with the operating instructions or interference
with the device by unauthorised individuals.
J
Under no circumstances should you take the
device apart. Improper repairs may place the
user in considerable danger. Repairs should only
be carried out by specialist personnel.
Q
Safety Instructions for Batteries
J
Remove the batteries from the device if they are
not going to be used for a prolonged period.
J
CAuTION! DANgEr OF EXPLO-
SION! The batteries must never be
recharged!
j
Press the set-up button “ADJ” 4 in order to set
the hours you wish to have.
j
Then press the mode button “SET” 3 in order to
be able to set the minutes.
j
Press the set-up button “ADJ” 4 in order to set
the minutes you wish to have.
j
Press the mode button “SET” 3 to activate the
alarm function.
j
Press the mode button “SET” 3 to deactivate
the alarm function.
Note: Once the set alarm time has been
reached, an alarm signal will sound.
j
Press the mode button “SET” 3 or the set-up
button “ADJ” 4 to stop the alarm signal.
tukehtumisvaara. Lapset aliarvioivat usein vaarat.
Pidä lapset aina loitolla tuotteesta.
J
Tätä tuotetta ei ole tarkoitettu sellaisten henkilöiden
(mukaan lukien lapset) käyttöön, joiden rajoitetut,
fyysiset, aistilliset tai henkiset kyvyt tai kokemuksen
ja / tai tiedon puute ovat esteenä käytölle, lukuun
ottamatta tilanteita, joissa heitä valvoo turvallisuu-
desta vastaava henkilö tai joissa he ovat saaneet
tältä ohjeita tuotteen käytöstä. Lapsia on valvottava
etteivät ne pääse leikkimään tuotteen kanssa.
m HENgENVAArA! Paristojen nieleminen voi
olla hengenvaarallista. Pariston nielleen henkilön
on välittömästi mentävä lääkärille.
J
Älä ota laitetta käyttöön, jos se on viallinen.
j
Paina ”SET“-painiketta 3 , jotta voit käynnistää
ajastintoiminnon.
Huomautus: Hälytys kuuluu, kun asetettu aika
on kulunut umpeen.
j
Sammuta hälytysääni painamalla ”SET“-painiketta
3
tai ”ADJ“-säätöpainiketta 4 .
Ajastin menee pois toiminnasta, jos sen toiminnan
aikana valitaan toinen toiminto. Ajan laskeminen
jatkuu, kun palataan ajastimen toimintoon.
Q
Herätyksen asettaminen
j
Käännä laitetta pystysuorassa 90°:een verran niin
monta kertaa, että näyttöön tulee herätysnäyttö
(katso kuva D).
Säkerhetsanvisningar
Läs alla säkerhetsinstruktioner och anvisningar!
Felhantering vid tillämpning av nedan angivna
säkerhetsinstruktioner och anvisningar kan medföra
elstötar, brand och / eller allvarliga skador.
FÖRVARA ALLA SÄKERHETSINSTRUKTIONER
OCH ANVISNINGAR FÖR FRAMTIDA BEHOV.
J
VArNINg!
rISK FÖr LIVS-
FArLIgA SKADOr FÖr SPÄD-
BArN OCH BArN! Låt inte barn
leka med förpackningsmaterialet. Kvävningsrisk
J
When inserting the batteries, ensure the correct
polarity! This is shown in the battery compartment.
J
If necessary, clean the batteries and device
contacts before inserting the batteries.
J
Remove spent batteries immediately from the
device. There is an increased danger of leaks!
J
Batteries must not be disposed of in the normal
domestic waste!
J
Every consumer is legally obliged to dispose of
batteries in the proper manner!
J
Keep batteries away from children; do not throw
them in the fire, short-circuit them or take them
apart.
J
If the above instructions are not complied with,
the batteries may discharge themselves beyond
You can also move the clock into another function
to stop the alarm signal.
Q
Cleaning and Maintenance
j
The device should only be cleaned on the outside
with a soft dry cloth.
j
Under no circumstances should you use liquids
or detergents, as these will damage the device.
J
Älä altista laitetta
- äärimmäisille lämpötiloille,
- voimakkaille värähtelyille,
- suurelle mekaaniselle kuormitukselle,
- suoralle auringonvalolle,
- kosteudelle.
Laite voi vioittua.
J
Huomaa, että takuu ei korvaa väärästä käsittelystä,
käyttöohjeen tietojen noudattamatta jättämisestä
tai valtuuttamattomien henkilöiden toimenpiteistä
aiheutuvia vikoja.
J
Älä koskaan pura laitetta osiin. Asiantuntematto-
masti tehdyt korjaukset voivat aiheuttaa käyttäjälle
huomattavia vaaratilanteita. Anna korjaukset vain
ammattiliikkeen tehtäväksi.
Huomautus: Joka kerran, kun muutat LCD-näytön,
syttyy vuorotellen 3 x vihreä ja sininen valo.
j
Paina ”SET“-painiketta 3 , jotta voit asettaa tunnit.
j
Aseta haluamasi kellonajan tunnit ”ADJ”-painiketta
4
painamalla.
j
Paina sen jälkeen ”SET“-painiketta 3 , jotta voit
asettaa minuutit.
j
Aseta haluamasi kellonajan minuutit ”ADJ”-paini-
ketta 4 painamalla.
j
Paina ”SET“-painiketta 3 , kun haluat aktivoida
herätystoiminnon.
j
Paina ”SET“-painiketta 3 , kun haluat deaktivoida
herätystoiminnon.
Huomautus: Herätyskello soi, kun asetettu
kellonaika on saavutettu.
föreligger vid hantering av förpackningsmaterialet.
Mindre barn förstår inte farorna som lurar. Håll
alltid mindre barn på avstånd.
J
Barn och personer med bristande kunskaper eller
erfarenhet samt personer med nedsatta fysiska,
motoriska hinder, handikappade personer eller
barn skall om möjligt inte använda proukten utan
uppsikt eller handledning av säkerhetsansvarig
person. Barn skall hållas under uppsikt och får
absolut inte använda produkten som leksak.
m LIVSFArA! Batterier är lätta att svälja vilket
innebär livsfara. Uppsök omedelbart läkare
om någon svalt ett batteri.
J
Använd aldrig en produkt som är skadad.
their end voltage. There is then a danger of leaking.
If the batteries have leaked inside your device,
you should remove them immediately in order to
prevent damage to the device!
J
Avoid contact with the skin, eyes and mucous
membranes. Any parts of the body coming into
contact with battery acid should be rinsed off
with copious amounts of water and / or a doctor
contacted if necessary!
J
Always replace all batteries at the same time
and only use the same type of batteries.
J
When not using the device for an extended
period, remove the batteries from the device.
Q
Disposal
The packaging is made entirely of recy-
clable materials, which you may dispose
of at local recycling facilities.
Contact your local refuse disposal authority for more
details of how to dispose of your worn-out product.
To help protect the environment, please
dispose of the product properly when it
has reached the end of its useful life and
not in the household waste. Information on
collection points and their opening hours
can be obtained from your local authority.
Q
Paristoja koskevia
turvallisuusohjeita
J
Ota paristot pois laitteesta, jos laitetta ei käytetä
pitkään aikaan.
J
VArO! rÄJÄHDYSVAArA! Älä
missään tapauksessa lataa paristoja
uudelleen!
J
Laita paristot laitteeseen aina oikein päin. Napojen
oikea suunta on merkitty paristolokeroihin.
J
Puhdista paristo- ja laitekosketus tarvittaessa,
ennen kuin laitat paristot lokeroon.
J
Ota käytetyt paristot pikaisesti pois laitteesta.
Paristot voivat vuotaa!
J
Paristoja ei saa hävittää tavallisen kotitalousjätteen
mukana!
j
Sammuta herätysääni painamalla ”SET“-painiketta
3
tai ”ADJ“-säätöpainiketta 4 .
Voit sammuuttaa herätysäänen myös kääntämällä
kellon toiseen modukseen.
Q
Puhdistus ja hoito
j
Puhdista laite vain ulkopuolelta pehmeällä,
kuivalla kankaalla.
j
Älä missään tapauksessa käytä nesteitä tai
puhdistusaineita, sillä ne vioittavat laitetta.
J
Utsätt inte produkten för
- extrema temperaturer,
- starka vibrationer,
- stark mekanisk påverkan,
- direkt solljus,
- fuktighet.
Risk för skador i produkten.
J
Garantin omfattar inte skador vilka kan härledas
till osakkunnig hantering, icke beaktande av
bruksanvisning eller otillåtet ingrepp av obehörig
person samt slitageskador.
J
Försök inte öppna produkten. Osakkunniga
reparationer av produkten kan innebära risker
för användaren. Låt endast behörig elektriker
reparera produkten.
Multi-purpose alarm clock
Q
Introduction
Familiarise yourself with the product before
using it for the first time. In addition please
refer carefully to the operating instructions
below and the safety advice. Use the product only as
described and for the indicated purpose. Keep these
instructions in a safe place. If you pass the product
on to anyone else, please ensure that you also pass
on all the documentation.
Q
Start of operation
Q
Inserting / replacing the batteries
j
Open the battery compartment 5 by pushing
the battery compartment lid 6 on the back of
the device off in the direction of the arrow mark.
j
Take out the insulation sheet for first use. When
later replacing batteries, insert two alkaline
1.5 V , AA batteries.
Note: Ensure correct polarity. This is indicated
in the battery compartment 5 .
j
Then close the battery compartment 5 . To do so,
push the battery compartment lid 6 in the direc-
tion of the arrow mark on the device. The battery
compartment lid 6 will audibly click into place.
Pb
Environmental damage through
incorrect disposal of the batteries!
Batteries must not be disposed off with domestic waste.
They may contain toxic heavy metals and are subject
to hazardous waste treatment rules and regulations.
The chemical symbols of the heavy metals are as
follows: Cd = cadmium, Hg = mercury, Pb = lead.
That is why you should dispose of used batteries at a
local collection point.
Product description:
Multi-purpose alarm clock
Model No.: Z30002
Version:
03 / 2011
J
Laki velvoittaa jokaista käyttäjää hävittämään
paristot määräysten mukaisesti!
J
Pidä paristot lasten ulottumattomissa, älä heitä
niitä tuleen, älä oikosulje niitä äläkä pura niitä.
J
Jos edellä mainittuja ohjeita ei noudateta, paristot
voivat tyhjentyä loppujännitettä tyhjemmiksi.
Se voi silloin alkaa vuotaa. Jos laitteessa olevat
paristot ovat vuotaneet, ota ne pois välittömästi
laitteen vioittumisen estämiseksi!
J
Vältä kosketusta ihoon, silmiin ja limakalvoihin. Jos
pariston happoa joutuu iholle, huuhtele kyseinen
kohta runsaalla määrällä vettä ja / tai mene
lääkäriin!
J
Vaihda aina kaikki paristot yhtä aikaa ja käytä
vain samantyyppisiä paristoja.
Q
Jätehuolto
Pakkaus on ympäristöystävällista
materiaalia, jonka voit viedä paikalliseen
kierrätyspisteeseen.
Saat lisätietoa käytettyjen tuotteiden jätehuoltomah-
dollisuuksista kunnan- tai kaupungintoimistosta.
Älä heitä käytettyä tuotetta talousjätteisiin.
Toimi ympäristöystäväl-lisesti toimittamalla se
asianmukaiseen jätehuoltoon. Paikallisesta
kunnan- tai kaupungintoimistosta saat lisä-
tietoa kierrätyspisteistä ja aukioloajoista.
Q
Säkerhetsanvisningar
för batterier
J
Ta ur batterierna om produkten inte skall användas
under längre tid.
J
OBSErVErA! EXPLOSIONSrISK!
Ladda aldrig batterierna!
J
Kontrollera att batteripolerna ligger åt rätt håll.
Dessa visas i batterifacken.
J
Rengör batteri- och apparatkontakter om
nödvändigt.
J
Ta alltid ur gamla eller förbrukade batterier
ur produkten. Risk för att batterisyra läcker ut
föreligger.
J
Kasta inte batterierna i hushållssoporna.
Q
Proper use
The multi-function alarm clock displays the time in
12 / 24-hour mode (in hours and minutes), the day
of the week, date and room temperature in °C und
°F. The multi-function alarm clock also has an alarm
and timer function. For changing the function turn the
clock onto different side. The clock is only suitable
for operation in enclosed spaces at normal room
temperature. Any other use or modification of the
device constitute improper use and may result in injury
and / or damage to the device. The manufacturer is
not liable for damage caused by improper use. The
device is not intended for commercial use.
Q
Setting the time / date
j
Turn the device vertically by 90° as often as
necessary until the time display (see Fig. A)
appears.
Note: Every time you change the LC display,
a green and blue light will light up alternatively
3 times.
j
Press the mode button “SET” 3 in order to be
able to set the hours.
j
Press the set-up button “ADJ” 4 in order to set
the current hours.
j
Then press the mode button “SET” 3 in order to
be able to set the minutes.
j
Press the set-up button “ADJ” 4 in order to set
the current minutes.
Last Information Update: 11 / 2010
Ident.-no.: Z30002112010-3
EMC
J
Ota paristot pois laitteesta, kun laite on pitemmän
aikaa käyttämättä.
Q
Käyttöönotto
Q
Paristojen asentaminen /
vaihtaminen
j
Avaa paristolokero 5 työntämällä laitteen takana
olevaa paristolokeron kantta 6 nuolen vastak-
kaiseen suuntaan.
j
Poista eristyskaista ennen kuin otat tuotteen käyttöön
ensimmäisen kerran. Kun haluat myöhemmin
vaihtaa paristot, aseta kaksi paristoa tyyppi AA,
1,5 V paristotilaan.
Pb
Paristojen väärä hävittäminen
aiheuttaa ympäristövahinkoja!
Paristoja ei saa hävittää talousjätteenä. Ne voivat
sisältää myrkyllisiä raskasmetalleja ja ne kuuluvat
ongelmajätekäsittelyyn. Raskasmetallien kemialliset
merkit ovat seuraavat: Cd = kadmium, Hg = elohopea,
Pb = lyijy. Toimita tästä syystä vanhat paristot kunnal-
liseen keräyspisteeseen.
Tuotenimike:
Monitoimiherätyskello
Malli nro.: Z30002
Versio:
03 / 2011
J
Varje användare är förpliktad att avfallshanteras
batterier enligt gällande miljöregler.
J
Se till att barn inte handskas med batterierna,
kasta inte batterierna i öppen eld, batterierna
får inte kortslutas eller öppnas.
J
Vid icke beaktande av dessa anvisningar kan
batterierna djupurladdas. Risk för läckage före-
ligger. Ta ur batterierna ur produkten om dessa
är tomma, annars kan produkten skadas.
J
Undvik kontakt med huden, ögonen och slemhinnor.
Spola omedelbart av den plats som kommit i
kontakt med batterisyran, använd rent vatten
och uppsök läkare.
J
Byt alltid alla batterierna samtidigt och använd
alltid batterier av samma typ.
Q
Description of Parts
1
Multi-purpose alarm clock
2
LC display
3
Mode button “SET”
4
Set-up button “ADJ”
5
Battery compartment
6
Battery compartment lid
Q
Technical Data
Battery type: 2 x AA, 1.5 V
Voltage:
3 V
Temperature: –5 °C - 49 °C
j
Press the mode button “SET” 3 in order to be
able to set the month.
j
Press the set-up button “ADJ” 4 in order to set
the current month.
j
Press the mode button “SET” 3 in order to be
able to set the day.
j
Press the set-up button “ADJ” 4 in order to set
the current day.
j
Press the mode button “SET” 3 in order to be
able to set the year.
j
Press the set-up button “ADJ” 4 in order to set
the current year.
j
After completing the setting press the set-up button
“ADJ” 4 to select 12- or 24-hour time display
mode.
Monitoimiherätyskello
Q
Johdanto
Tutustu laitteeseen ennen ensimmäistä
käyttöönottoa. Lue sitä varten tämä käyttö-
ohje ja turvallisuusohjeet. Käytä laitetta
ainoastaan kuvatulla tavalla ja mainitussa käyttötar-
koituksessa. Säilytä käyttöohje huolellisesti. Anna
kaikki asiakirjat laitteen mukana mahdolliselle uudelle
omistajalle.
Q
Määräystenmukainen käyttö
Monitoimiherätyskello näyttää kellonajan 12 / 24-
tuntinäytöllä (tunteina ja minuutteina), viikonpäivän,
Huomautus: Laita paristot laitteeseen aina oikein
päin. Navat on merkitty paristolokeroon 5 .
j
Sulje paristolokero 5 . Työnnä paristolokeron
kantta 6 nuolen osoittamaan suuntaan. Paristo-
lokeron 6 lukkiutuminen on tunnettavissa ja
kuultavissa.
Q
Kellonajan / päivämäärän
asettaminen
j
Käännä laitetta pystysuorassa 90°:een verran
niin monta kertaa, että näyttöön tulee kellonaika
(katso kuva A).
Huomautus: Joka kerran, kun muutat LCD-näytön,
syttyy vuorotellen 3 x vihreä ja sininen valo.
j
Paina ”SET“-painiketta 3 , jotta voit asettaa tunnit.
Päivitetty: 11 / 2010
Tunnistenro: Z30002112010-3
EMC
J
Ta ur batteriet ur produkten om den inte skall
användas under längre tid.
Q
Användning
Q
Sätta in / byta batterier
j
Öppna batterifacket 5 genom att skjuta batteri-
facksluckan 6 på baksidan mot pilens riktning.
j
Ta bort isoleringsremsan före första användning.
När du vill byta batterierna, lägg in två batterier
av typ AA, 1,5 V .
Obs: Kontrollera att polerna är korrekt placerade.
Detta visas på batterifacket 5 .
1
2
90°
D
C
A
B
5
6
3
4
MuLTI-PurPOSE ALArM CLOCK
Operation and Safety Notes
MuLTIFuNKTIONSWECKEr
Bedienungs- und Sicherheitshinweise
Z30002
3
VÄCKArKLOCKA
MED MuLTIFuNKTION
Bruksanvisning och säkerhetsanvisningar
MONITOIMIHErÄTYSKELLO
Käyttö- ja turvallisuusohjeet
MuLTIFuNKTIONS-VæKKEur
Betjenings- og sikkerhetshenvisninger