Ordex T13759 Benutzerhandbuch
Ordex Möbel
FI
GB/IE
FI
GB/IE
Q
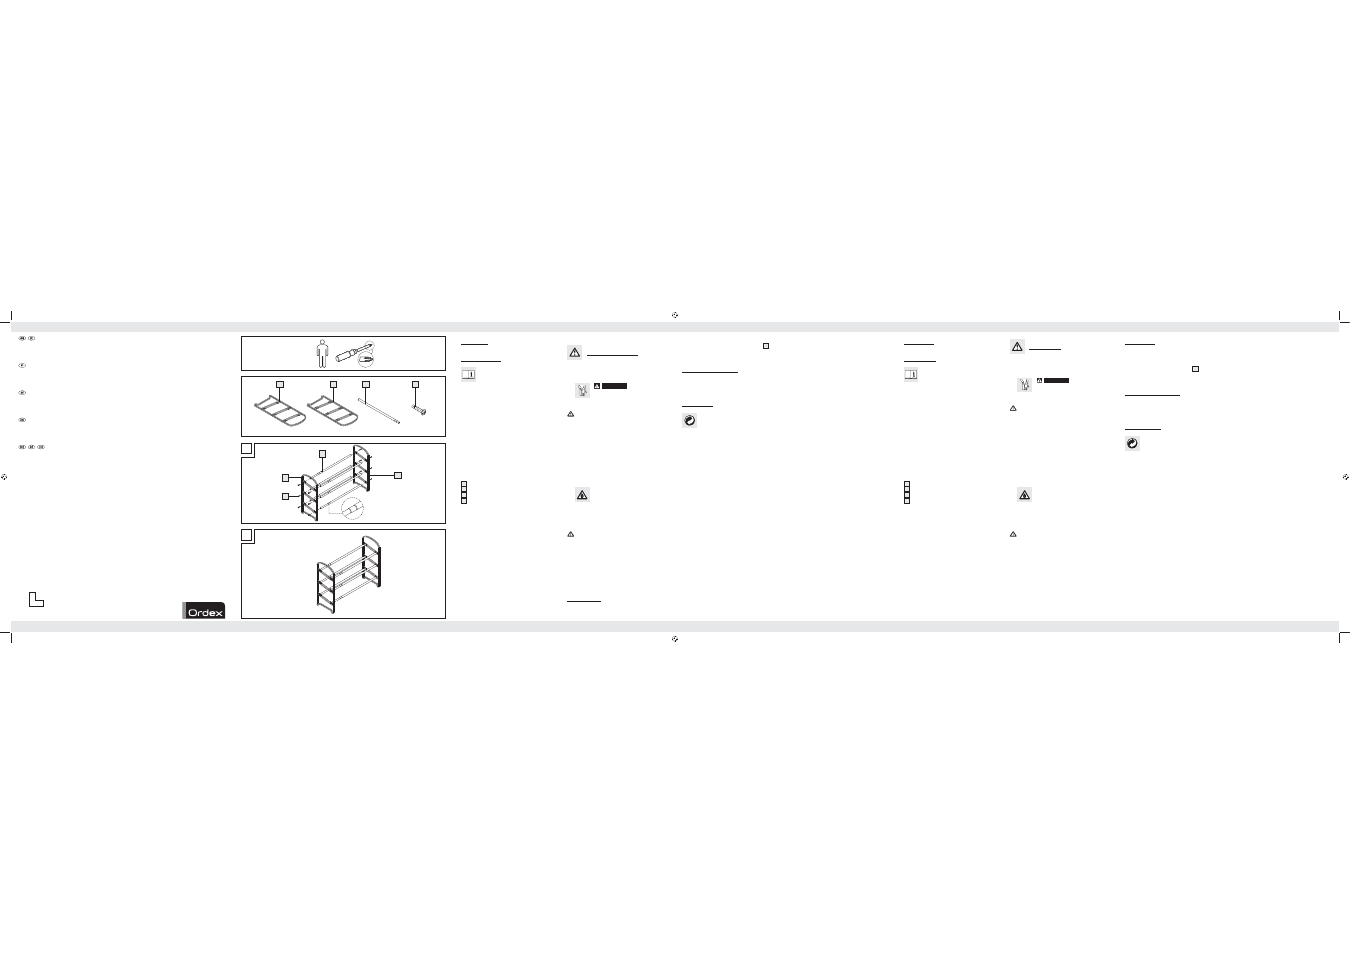
Asennus
j
Asenna kenkäteline kuvan A osoittamalla tavalla.
Huomautus: Voit säätää kenkätelineen leveyden
yksilöllisesti (64 – 119 cm).
j
Vedä tätä varten teleskooppitangot 3 ulos ja työnnä
ne yhteen.
Q
Puhdistus ja hoito
j
Käytä puhdistukseen ja hoitoon kuivaa nukkautuma-
tonta liinaa.
Q
Jätehuolto
Pakkaus koostuu ympäristöystävällisistä
materiaaleista ja voit toimittaa sen paikallisiin
kierrätyspisteisiin.
Voit tiedustella käytettyjen tuotteiden jätehuoltoa koske-
vista mahdollisuuksista kunnan tai kaupungin virastosta.
(64 – 119 cm).
j
In order to do so, pull the telescope bars 3 apart
or push them together.
Q
Cleaning and care
j
Use a dry, lint-free cloth to clean and take care of
the product.
Q
Disposal
The packaging is made entirely of recyclable
materials, which you may dispose of at local
recycling facilities.
Contact your local refuse disposal authority for more
details of how to dispose of your worn-out product.
Kenkähylly
Q
Johdanto
Tutustu tuotteeseen ennen kuin asennat sen.
Lue huolellisesti seuraavat asennus- ja turva-
ohjeet. Käytä tuotetta ainoastaan ohjeiden
mukaan ja siinä mainittuihin tarkoituksiin. Säilytä nämä
ohjeet huolellisesti. Anna kaikki tätä tuotetta koskevat
paperit aina tuotteen mukana eteenpäin.
Q
Käyttötarkoitus
Tuote on tarkoitettu kenkien säilytykseen kuivissa sisäti-
loissa. Tuotetta ei saa käyttää muulla kuin edellä kuvatulla
tavalla eikä sitä saa muuttaa. Se voi aiheuttaa loukkaan-
tumisia ja / tai tuotteen vanhinkoitumista. Valmistaja ei
vastaa virheellisestä käytöstä johtuneista vahingoista.
Tuote ei ole tarkoitettu ammattimaiseen käyttöön.
Q
Osaluettelo
1
Sivuosa 1
2
Sivuosa 2
3
Teleskooppitanko
4
Ruuvi
Q
Toimituksen sisältö
Tarkista heti avattuasi pakkaukset toimituksen täydellisyys
sekä tuotteen ja osien moitteeton kunto. Älä missään ta-
pauksessa asenna tuotetta, jos toimitus ei ole täydellinen.
1 x Sivuosa 1
1 x Sivuosa 2
6 x Teleskooppitanko
12 x Ruuvi
1 x Asennusohje
Q
Tekniset tiedot
Mitat:
n. 64 – 119 x 53 x 22.5 cm
(l x k x s)
Max. kuormitus:
4 kg tasoa kohti
Turvaohjeet
LUE ASENNUSOHJE LÄPI ENNEN TÖIHIN RYHTY-
MISTÄ! SÄILYTÄ ASENNUSOHJE HUOLELLISESTI
VASTAISUUDEN VARALTA!
J
VAROLTUS!
LAPSILLE HENGEN-
JA ONNETTOMUUSVAARA!
Älä
koskaan jätä lapsia pakkausmateriaalin
kanssa ilman aikuisten valvontaa. On olemassa
tukehtumisvaara. Pidä lapset pois tuotteen ulottuvilta.
VAROITUS! LOUKKAANTUMISVAARA! Var-
mista että, kaikki osat ovat vahingoitumattomia ja
asianmukaisesti asennettu. Ei asianmukainen asennus
merkitsee loukkaantumisvaaraa. Vanhingoittuneet
osat voivat vaikuttaa turvallisuuteen ja toimintaan.
J
VAROITUS!
Älä jätä lapsia ilman valvontaa! Tuote
ei ole kiipeämistä varten eikä leikkikalu! Huolehdi
siitä, ettei kukaan, erityisesti lapset, kiipeä tuotteelle
tai vedä sen avulla itseään ylös. Kenkähylly voi kaa-
tua. Tästä voi olla seurauksena loukkaantumisia ja /
tai aineellisia vahinkoja.
J
Varmistaudu, että tuote seisoo kiinteällä ja tasaisella
alustalla. Muussa tapauksessa voi seurata loukkaan-
tumisia ja / tai aineellisia vahinkoja.
J
VAROITUS! TULIPALOVAARA! Älä
milloinkaan sijoita tuotetta avoimen tulen
läheisyyteen.
J
Pidä tuote loitolla vedestä ja kosteudesta. Ne voivat
vaurioittaa tuotteen ja aiheuttaa aineellisia vaurioita.
J
Tuote on kuormitettava tasaisesti ja niin, ettei se pääse
kaatumaan.
J
Huolehdi siitä, ettei tuote pääse kaatumaan.
VAROITUS! LOUKKAANTUMISVAARA! Älä
koskaan käytä tuotetta, jossa se on viallinen.
J
Muista, että tuotteen saa asentaa ainoastaan am-
mattitaitoinen henkilö.
J
Älä kuormita tuotetta yli 4 kilolla tasoa kohti. Louk-
kaantumisvaara ja / tai tuotteen vaurioituminen ellei
tätä ohjetta noudateta.
J
Varmistaudu, että kaikki liitokset on kiinnitetty kunnolla
toisiinsa ja tarkista kaikkien liitoskohtien tukevuus.
Shoe rack
Q
Introduction
Please familiarise yourself with the pro duct
prior to assembly. Carefully read the following
assembly instructions and safety tips. Only use
the unit as described and for the specified applications.
Store these instructions in a safe place. If passing this
product on to a third party also include all documents.
Q
Intended use
This product is suitable for storing shoes in dry interior
rooms. Any use other than the aforementio ned or any
product modification is prohibited and can lead to injuries
and / or product damage. The manufacturer is not liable
for any damages caused by any use other than its intended
purpose. This product is not intended for commercial use.
Q
Description of parts
1
Side frame 1
2
Side frame 2
3
Telescope bar
4
Screw
Q
Includes
Immediately after unpacking please check the package
contents for completeness and if all parts and the product
are in good condition. Do not assemble the product if
the package contents are incomplete.
1 x Side frame 1
1 x Side frame 2
6 x Telescope bar
12 x Screw
1 x Assembly instruction
Q
Technical specifications
Dimensions: approx. 64 – 119 x 53 x 22.5 cm
(w x h x d)
Max. load: 4 kg per tier
Safety information
PLEASE READ THE ASSEMBLY INSTRUCTIONS BEFORE
USE! PLEASE KEEP THE ASSEMBLY INSTRUCTIONS
IN A SAFE PLACE!
J
WARNING!
RISK OF LIFE AND
ACCIDENTS IN INFANTS AND CHIL-
DREN!
Never leave children unattended
with the packaging material. Risk of suffocation. Keep
children away from the product.
CAUTION! RISK OF INJURY! Ensure all parts
are undamaged and correctly assembled. Incorrect
assembly poses the risk of injury. Damaged parts
may affect safety and function.
J
CAUTION!
Do not leave children without supervi-
sion. The product is not a climbing frame or toy.
Make sure that nobody stands on or climbs up the
product. This particularly applies to children. The
shoe rack may tip up. This can result in injury
and / or damage to property.
J
Make sure that the product is standing on a solid,
even surface. Injury and / or damage to property
may otherwise occur.
J
CAUTION! FIRE HAZARD! Do not
place the product near an open fire.
J
Keep the product away from water and damp,
otherwise damage to property may result.
J
Weight must be distributed evenly on the product to
prevent it from tipping up.
J
Make sure that the product cannot fall over.
CAUTION! RISK OF INJURY! Do not under any
circumstances use the product if it is damaged.
J
Make sure that the product is only assembled by a
competent person.
J
Do not load more than 4 kg onto each tier of the
product. Otherwise there is a risk of injury and / or
damage to the product.
J
Ensure that all connections are firmly connected
together and check that all joints are stable.
Q
Assembly
j
Assemble the shoe rack in line with Figure A.
Note:
You can adjust the width of the shoe rack
You need
Tarvitset · Du behöver
Du skal bruge · Sie benötigen:
1
1
1 x
2
1 x
3
6 x
4
12 x
B
A
3
2
1
4
T13759
SHOE RACK
Assembly and safety advice
KENKÄHYLLY
Asennus- ja turvaohjeet
SKOHYLLA
Monterings- och säkerhetsanvisningar
SKOREOL
Montage- og sikkerhedsanvisninger
SCHUHREGAL
Montage- und Sicherheitshinweise
3
75802_Shoe rack_LB3.indd 1
6/14/2012 6:15:00 PM