TA Triumph-Adler DC 2162 Benutzerhandbuch
Quick guide
QUICKGuide
DC 2162/2182
QUICKGuide
DC 2162/2182
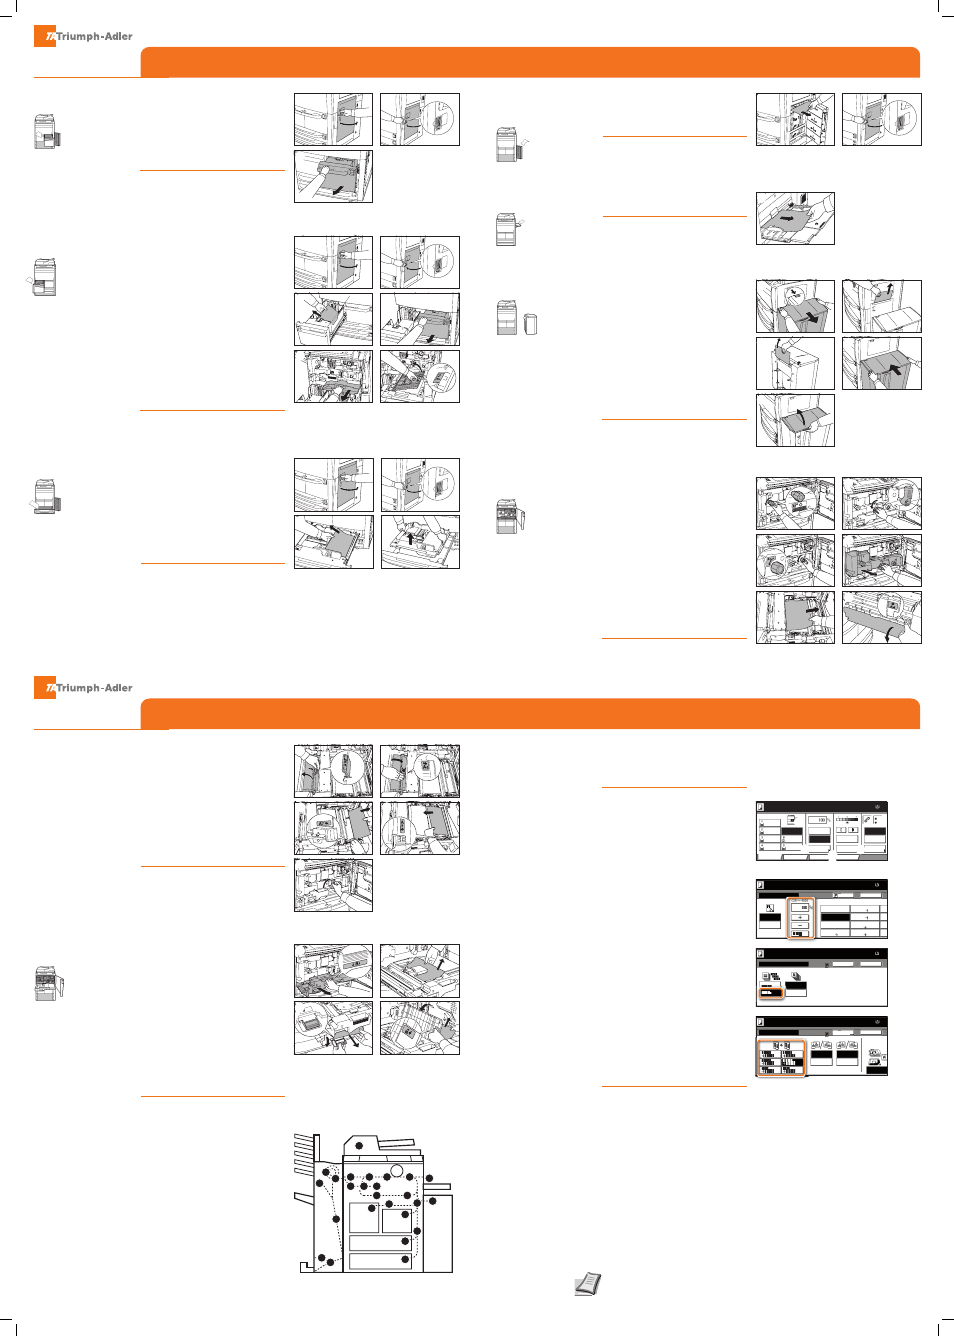
Clearing paper jams
Clearing paper jams
Clearing paper jams
Copy operations
➊
Open the right cover and remove
jammed paper from all areas.
➋
Push the indicated position to close
the right cover.
➊
Remove all paper from the MP tray.
➋
Reload the paper in the MP tray.
➊
Press the top button on the side
feeder and detach the side feeder
from the copier.
➋
Remove paper jammed in the
connecting slot of the side feeder.
➌
Remove paper jammed in the side
feeder.
➍
Attach the side feeder to the
copier.
➎
Open the top cover of the side
feeder and remove jammed paper.
➏
Close the top cover of the side
feeder.
➊
Open the front cover.
➋
Turn the knob A1 counter-
clockwise at least 20 times. Jammed
paper is pushed out to the output
tray; remove the paper.
➌
Turn lever A2 counter-clockwise.
➍
Turn knob A3 counter-clockwise
at least 8 times. Jammed paper is
pushed to the paper conveyor.
➎
Pull lever A2 and slowly pull out
the paper conveyor.
➏
Remove paper from above the
paper conveyor.
➐
Open cover A4 and remove
jammed paper. Close cover A4.
Inside the Right
Cover
MP Tray
Optional Side
Feeder
Paper Conveyor
①
②
②
③
④
⑤
③
①
①
②
⑤
⑦
④
⑥
➊
Open the right cover and remove
the jammed paper.
➋
Push the indicated position to close
the right cover.
➌
Pull out cassette 2 and remove the
jammed paper.
➍
While cassette 2 is out, pull out
cassette 1.
➎
Open the front cover and pull lever
C1 and remove the paper feeder.
➏
Open cover C2. Remove the
jammed paper.
➐
Close cover C2 and return the
paper feeder to its original position.
➑
Push cassettes 1 and 2 back in and
close the front cover.
➊
Open the right cover and remove
the jammed paper.
➋
Push the indicated position to close
the right cover.
➌
Pull out the cassette in use and
remove the jammed paper. If jammed
paper is left inside the copier, pull out
the cassette and remove the jammed
paper.
➍
Push in the cassette.
Cassette 2
Cassettes 3 and 4
➊
Open the right cover and remove
the jammed paper.
➋
Push the indicated position to close
the right cover.
➌
Pull out cassette 1 and remove the
jammed paper.
➍
Push in cassette 1.
Cassette 1
①
①
③
③
②
②
④
④
③
⑤
⑥
①
②
➊
Open the front cover.
➋
Pull lever B1 and pull out the
duplex unit.
➌
Remove any paper from above the
duplex unit.
➍
Open the lower cover of the duplex
unit (B2) and remove the jammed
paper. Close cover B2.
➎
Open cover B3 and remove the
jammed paper. Close cover B3.
➏
Replace the duplex unit to its
original position and push it back in
securely.
➐
Close the front cover.
A Cassette 1
B Cassette 2
C Cassettes 3 or 4
D MP Tray
E Inside the right cover
F Optional side feeder
G Paper conveyor
H Duplex unit
I Document processor
J Optional document fi nisher
Duplex Unit
Jam Location
Indicators
➑
Open cover A5 and remove
jammed paper.
➒
Push A6 and close cover A5.
❿
Open cover A7 and remove
jammed paper. Close cover A7.
⓫
Open cover A8 and remove
jammed paper. Close cover A8.
⓬
Restore the paper conveyor to its
original position.
⓭
Return lever A2 to its original
position and close the front cover.
G
G G H
H
H
G
G
G
J
J
B
D
F
I
B
J
J
A
C
C
J
E
E
J
B
2
⑧
⑨
⑪
⑩
⑬
④
⑤
②
③
➊
Place the originals on the platen or
in the document processor.
➋
Enter the number of copies with
the
TEN PAD
key.
1 Paper source
Select the desired paper source. If
the setting APS is active, the selected
cassette will automatically match
the original format. Special sizes or
papers should be used through the
multi purpose tray.
2 Reducing/Enlarging (Zoom)
Press
REDUCE/ENLARGE
button on the
touch screen. Select the original for-
mat and the target format or choose
the zoom factor. Start the copy with
green
START
button.
3 Sort mode
Press the tab
FUNCTION
. Select
SORT/
OFFSET
. Press
SORT ON
. As a result sets
of originals will be produced. Start
the copy with green
START
button.
4 Duplex copy
Press tab
FUNCTION
. Select
DUPLEX
.
Choose the desired duplex mode.
Start the copy with green
START
button.
5 Finishing (optional)
Press
STAPLE/PUNCH
button on the
touch screen. Select the desired
punch mode. Enter the number of
sets on the
TEN PAD KEY
. Press green
START
button to start copy.
Preparations
Optional settings
Ready to copy.
11x8½
Paper Size
Program
Function
User choice
Basic
11x8½"
Plain
11x8½"
Recycled
11x17"
Plain
8½x11"
Plain
11x8½"
Plain
MP tray
Plain
APS
Auto %
Reduce
100%
Exposure
Auto
Staple
Staple
Left Top
Staple Off
100%
/Enlarge
Mode
Exposure
/Punch
Ready to copy.
Back
Reduce/Enlarge
Standard
XY Zoom
Auto %
100%
400%
200%
8½x11" 11x17"
129%
8½x14" 11x17"
121%
8½x14" 8½x11"
78%
11x
64%
50%
25%
5½x8½" 8½x14"
11x
77%
# keys
11x8½
Paper Size
100%
5½x8½" 11x17"
154%
Shortcut
Zoom
11x
Sort/Offset
Ready to copy.
Sort:Off
Back
Paper Size
11x8½
On
Off
Sort:On
Sort
Offset
100%
Shortcut
The type of Copy output can be selec
by choosing either Sort or Group
2 sided mode.
11x8½
Paper Size
Back
1 sided
2 sided
1 sided
Top Edge
Book
2 sided
Book
Open from
Open from
Original
Finished
Open from
Open from
2 sided/Separation
100%
Select Original Im
Direction.
Left/Right
Left/Right
top
top
Shortcut
1 sided
2 sided
1 sided
1 sided
2 sided
2 sided
①
②
③
④
⑤
For more details refer to the Operation
Guide on the co-packed CD-ROM.