Aquapur 106332 Aluminium Rotary Clothes Dryer Benutzerhandbuch
Seite 2
1
2
3
!
mark
!
mark
A
B
ø 40 cm
90°
Beton
Béton
I
II
I
II
II
II
90°
2 x
II
1 x
1 x
1 x
1 x
1 x
IAN 106332
SicherheitShinweiSe
Diese wäschespinne ist nur zur wäschetrocknung für
den privaten Gebrauch bestimmt.
Achten Sie auf gleichmäßigen Behang. Nicht bei starkem Wind Wäsche auf-
hängen! Die Wäschespinne so platzieren, dass ein freies Drehen möglich ist.
Vor dem Schließen oder Wegräumen alle Wäscheklammern entfernen, da
das Standrohr sonst beschädigt werden könnte. Bei der Aufbewahrung der
Wäschespinne ein elastisches Band oder die Schutzhülle verwenden, damit
sich die Leinen nicht verheddern. Vorsicht: Darauf achten, dass Kinder die
wäschespinne nicht als turngerät bzw. als Karussell benutzen. (Gefahr
des Verwickelns in den Leinen – erstickungsgefahr! Dieses Produkt ist
kein Kinderspielzeug.) Nach Gebrauch Wäschespinne schließen. Diese ist mit
einem Bodenanker ausgestattet, damit sie nach Gebrauch sicher außerhalb der
Reichweite von Kindern weggeräumt werden kann. Deckel des Bodenankers
schließen, wenn Sie die Wäschespinne herausnehmen.
Die Pe-Verpackung ist kein Kinderspielzeug – erstickungsgefahr!
Verpackung sofort nach Öffnen in der wertstoffbox entsorgen. (PE ist
umweltfreundlich und ungiftig.)
Verschleiß an Aufspann-Seilzug zum Öffnen der
wäsche spinne:
Der Aufspann-Seilzug stellt bei allen Wäschespinnen ein wichtiges Konst-
ruktionsdetail dar und ist daher auf höchste Tragfähigkeit und Lebensdauer
ausgelegt. Trotzdem kann es im Laufe der Lebensdauer des Gerätes erforder-
lich sein, diesen Seilzug auszutauschen. Wenn an der Außenseite des Seilzugs
gerissene Fasern sichtbar werden (Ausfransen der Leine), ist dieser Seilzug
schnellstmöglich nur durch einen neuen Original-Seilzug auszutauschen. Sie
bekommen diese unter Angabe Ihrer Wäschepinnentype bei Ihrem Händler,
wenn dort nicht vorrätig, direkt bei uns. Ein defekter Seilzug kann bei Be-
nutzung plötzlich reißen, wobei Sie im schlimmsten Fall bei Benutzung das
Gleichgewicht verlieren können – Verletzungsgefahr.
Verschleiß am Standrohr:
Je nach Bodenverhältnissen ist das sich im Bodenanker drehende Standrohr
einem Verschleiß ausgesetzt. Kontrollieren Sie mindestens einmal jährlich
das Standrohr an der Stelle, wo es am Boden aus dem Bodenanker austritt,
auf Verschleiß. Obwohl das Standrohr auf mehrfache Sicherheit ausgelegt ist,
können Riefen an dieser Stelle zu einer Schwächung des Standrohrs führen.
Sobald Sie dort Riefen über den gesamten Umfang des Standrohres oder starke
Beulen bemerken, ist das Standrohr kurzfristig nur durch ein neues Original-
Standrohr auszutauschen. Durch starke Riefen am Standrohr oder starke Beulen,
z.B. beim Anfahren mit Rasenmäher oder Schubkarre wird dieses geschwächt
und kann bei Wind oder bei starker seitlicher Belastung umknicken und Men-
schen gefährden. Sie erhalten ein neues Standrohr entweder bei Ihrem Händler
unter Angabe der Wäschespinnentype oder direkt bei uns. Ersetzen Sie auch
weitere Konstruktionsteile wie Seilrollen, Nieten immer durch geprüfte Original-
Ersatzteile, nur diese gewähren die gefahrlose Funktion Ihrer Wäschespinne.
Sollten Sie an der Funktion Ihrer Wäschespinne irgendwelche Zweifel haben,
informieren Sie unseren Kundendienst, wir helfen Ihnen gerne bei allen Fra-
gen weiter. Unseren Kundendienst erreichen Sie … JUWEL H. Wüster GmbH,
Bahnhofstraße 31, D-82467 Garmisch Partenkirchen, Tel. 0049-8821-1679
Beigeben: Kopie des Kaufbeleges und Beschreibung des Defektes.
3 Jahre Garantie, Verschleißteile (Leinen, Wetterhülle) ausgenommen.
Vor dem Aufbau Anleitung lesen und für spätere Ver-
wendung aufbewahren.
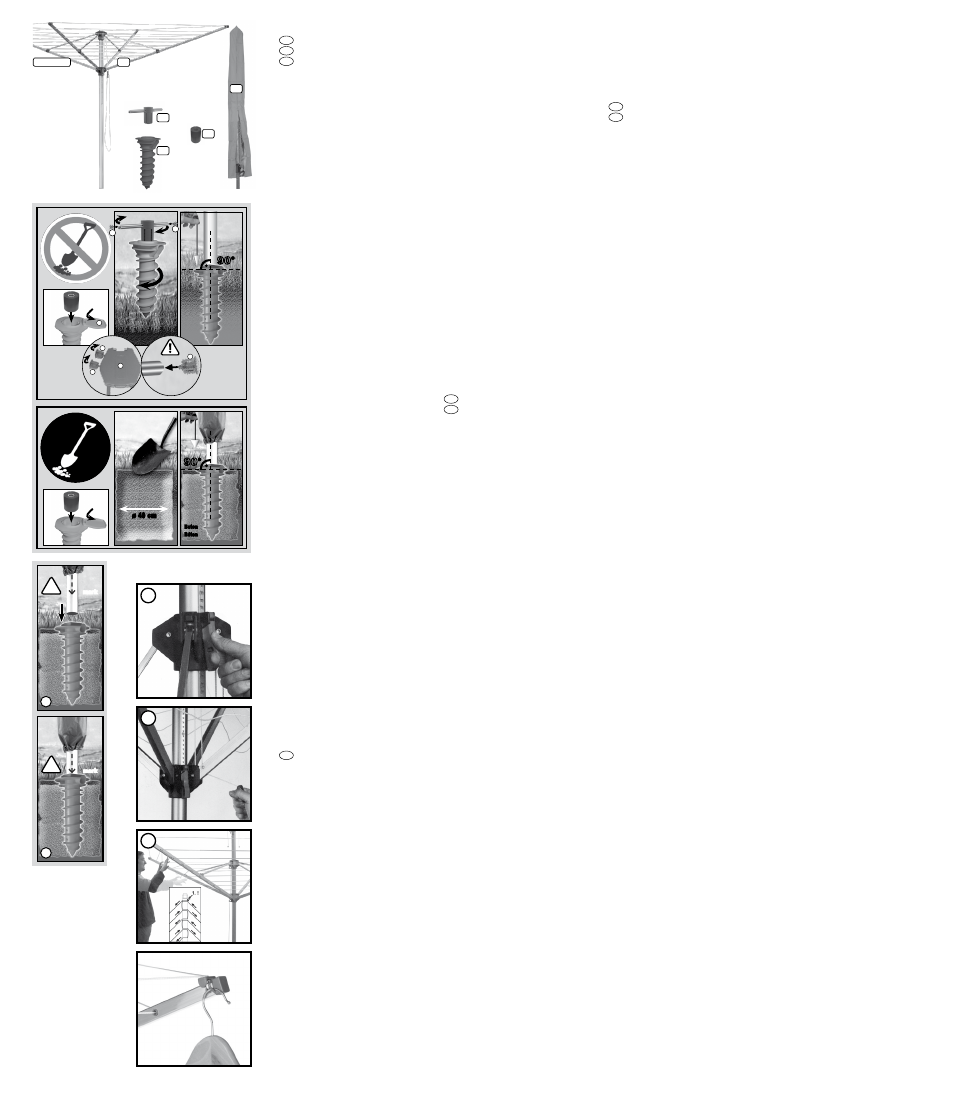
Montage des Bodenankers:
Montieren Sie den Deckel. Nun können Sie die Eindreh-Bodenhülse an den
dafür vorgesehenen Standort mit Hilfe des Eindreh-Werkzeuges in den Boden
eindrehen, bis der oberste Ring mit dem Boden möglichst bündig ist. Entfernen
Sie eventuell eingedrungene Erde aus dem Bodenanker und schieben Sie das
mitgelieferte Distanzstück ganz in den Bodenanker ein. Falls der Boden nicht
geeignet ist (zu steinig oder zu sandig), heben Sie ein Loch mit Ø ca. 40 cm
aus und betonieren den Bodenanker ein. Stellen Sie vor dem Erhärten des
Betons die Wäschespinne in den Bodenanker, und kontrollieren Sie mit einer
Wasserwaage die senkrechte Stellung. Achtung: Bohrungen am unteren Ende
mit Zeitungspapier abdecken, damit die Löcher frei von Beton bleiben und das
Wasser nach unten ablaufen kann.
Achtung! Die wetterschutzhülle ist kein Spielzeug – aus dem Bereich
von Kindern entfernen – erstickungsgefahr!
BeDienunGSAnLeitunG
Wir bedanken uns, dass Sie sich für ein Qualitätsprodukt entschieden haben.
Beachten Sie nachfolgende Bedienungsanleitung.
1) Öffnen der wäschespinne und höheneinstellung:
Durch das Lösen der oberen, roten Grifftaste können Sie die Wäschespinne
am Standrohr in der Höhe verstellen. Damit wird die gewünschte
Arbeitshöhe angepasst. Zum Öffnen vorerst am oberen Sternteil die
Arme aus ihrer Rastung herausziehen.
2) Aufspannen mit Seilzug:
Durch Ziehen am Handgriff öffnet sich die Wäschespinne, gleichzeitig
werden die Leinen gespannt, besonders leicht geht dies durch den
eingebauten Flaschenzug. Zum Schließen den unteren, roten Griffhebel
betätigen, die Wäschespinne schließt sich.
3) nachspannen der Leinen:
(LEINENKLEMMEN am Ende der Arme möglichst NIE öffnen – nur im Falle
eines Leinentausches!)
1. Öffnen Sie die Wäschespinne, bis der untere Sternteil in die Zahnschiene
einrastet.
2. Verteilen Sie die lockere Wäscheleine auf allen 4 Seiten möglichst
gleichmäßig auf alle Leinenkreise durch leichtes Ziehen der Leine.
3. Öffnen und verteilen Sie die Leine Schritt für Schritt weiter, bis die
Gebrauchsstellung erreicht, bzw. der äußerste Leinenkreis gespannt
ist. (WICHTIG! Gebrauchsstellung: Abstand zwischen den Sternteilen
30-35 cm!)
Pflegehinweise: ihr Qualitätsprodukt ist aus witterungsbeständigen
Materialien gefertigt und kann ohne weiteres mit einem Garten-
schlauch abgespritzt werden. nicht mit scharfen, rauen Gegenständen
oder aggressiven reinigungsmitteln reinigen.
SAfety inforMAtion
this clothes dryer is made for drying clothes for private
use only.
Pay attention that you distribute the washing evenly when hanging it. Do not
hang up washing during strong wind! Position the rotary clothesline so that
it can turn freely. Before closing or putting it away, please remove all pegs as
the central pole could otherwise be damaged. When storing the clothesline
use an elastic band or the protective cover so that the lines do not get mixed
up. note: Please take care that children do not use the clothesline as
gym equipment or carousel. (Danger of getting caught in the lines –
this product is not a child’s toy). Close the clothesline after use. The line
is equipped with a ground sleeve, so that it can be stored away securely out
of reach of children after use. Close the lid of the ground mounting when you
remove the clothesline.
this Pe-packaging is not a toy! risk of suffocation! Please dispose
the packaging into the sorting station for plastic immediately after
unpacking. (PE is non-polluting and non-toxic.)
wear and tear of pulley cords that open the rotary dryer:
The cords are an important design detail on all rotary dryers and are therefore
designed for greatest strength and serviceable life. Nevertheless it may be
necessary to replace these cords over the course of the life of the equipment.
If torn fibres are visible on the outside of the pulley cords (frayed cord) the
pulley cord must be replaced as soon as possible with a new original pulley
cord. You can obtain this from your dealer, giving details of your rotary dryer
model. If the cord is not in stock it can be obtained directly from us. A defective
pulley cord can rip suddenly when used, and in the worst case could result in
you losing your balance.
wear and tear of the pole:
The pole that rotates in the ground spike or ground socket is exposed to wear
and tear depending on the conditions of the ground. Please check the area of
the pole where it comes out of the ground socket/ground spike for wear and
tear at least once a year. Although the pole has been designed to be extremely
safe, grooves in this area can result in weakening of the pole. The pole should
be replaced by a new original pole as quickly as possible if you notice grooves
that go right round the pole or any severe dents. Deep grooves on the pole or
severe dents, for example caused by a lawnmower or wheelbarrow, can weaken
the pole so that it is at risk of falling over in wind or when subjected to strong
load from the side; this represents a danger to people. You can obtain a new
pole either from your dealer, giving details of your rotary dryer, or alternatively
directly from us. Please also always replace other parts of the construction such
as pulleys and rivets with original spare parts – only these guarantee the safe
operation of your dryer.
Should you have any doubts about the function of your rotary dryer, please
inform our customer service; we will be pleased to help you if you have any
queries. You can contact our customer service under … JUWEL H. Wüster GmbH,
Bahnhofstraße 31, D-82467 Garmisch Partenkirchen, Tel. 0049-8821-1679
Please enclose: copy of purchase docket and description of the defect.
3 year warranty, wear-and-tear parts (lines, weather cover) excluded.
Before erecting, please read the instructions and then
keep them for further reference.
twist-in ground socket with spacer:
Assemble the ground socket cover. The one-twist ground socket can then be
twisted into the ground in the designated location with the aid of a broomstick
or similar until the uppermost ring is as level with the ground as possible.
Remove any earth that may have got into the ground socket and completely
slide the supplied spacer into the ground socket. If the ground is not suitable
(too stony or sandy) dig a hole with diameter of approx. 40 cm and concrete
the ground socket in place. Before the concrete is hard place the rotary dryer
in the ground socket and use a spirit level to check that the pole is in a vertical
position. Warning: cover the drill holes at the bottom with newspaper so that
these remain free from concrete and allow water to escape.
Attention! the protection cover is not a toy! Please keep out of reach
of children – Danger of suffocation!
oPerAtinG inStructionS
Thank you for having chosen a quality product. Please observe the following
operating instructions.
1) opening the clothes dryer and height adjustment:
By releasing the upper red grip key, you can adjust the height of the
dryer at the main standard and perfectly adapt it to your desired working
height. To open, first pull the arms out of their catches at the upper part
of the holder.
2) opening with the rope tackle block:
When the handle is pulled, the clothes dryer opens while the lines are
tautened at the same time; this is especially easy thanks to the built-in
tackle block. To close, pull the lower red handle; the dryer will close.
3) retautening the lines:
(If possible, NEVER open the LINE STOPPERS on the end of the arms - only
if you want to exchange your clothes line!)
1) Open your clothes dryer until the lower collar engages in the toothed rail.
2) Divide the loose clothes line on all 4 sides as regularly as possible on all
4 line circles by pulling the clothes line lightly.
3) Open the clothes dryer gradually and divide the clothes line step by step
until you have reached your using height or until the outermost line
circle is tight. (IMPORTANT! Using height: Distance between the collars
30 - 35 cm!)
care instructions: this quality product is made of weatherproof materi-
als and can be washed down with a garden hose. Do not clean with
sharp or rough objects or with aggressive detergents.
reMArQueS en MAtière De Sécurité
ce séchoir parapluie est exclusivement destiné au sé-
chage du linge dans le cadre d'un usage privé.
Veillez à un étendage régulier. Ne pas étendre le linge par vent fort ! Placer le
séchoir-parapluie de façon à ce qu'il puisse tourner librement. Avant de le fermer
ou de le ranger, veuillez retirer toutes les pinces à linge car, dans le cas contraire,
la tige pourrait être endommagée. Pour ranger le séchoir-parapluie, utiliser un
élastique ou une housse de protection afin que les cordes ne s'emmêlent pas.
Attention : veillez à ce que les enfants n'utilisent pas le séchoir-para-
pluie pour faire du sport ou comme manége. (risque d'enroulement
dans les cordes – ce produit n'est pas un jouet pour enfants.) Après
utilisation, fermer le séchoir-parapluie. Celui-ci est équipé d'une douille de
sol afin qu'il puisse être rangé en toute sécurité hors de portée des enfants.
Fermer le couvercle de l'ancrage au sol lorsque vous retirez le séchoir-parapluie.
cet emballage en Pe n'est pas un jouet – risque d'étouffement ! Après
l'ouverture, jetez l'emballage immédiatement dans la poubelle réser-
vée au plastique. (Le PE est écologique et non toxique).
usure des cordes servant à l'ouverture du séchoir :
Les cordes servant à l'ouverture des séchoirs constituent un élément de
construction important pour tous les séchoirs et sont conçues pour être très
solides et d'une durée de vie optimale. Il peut quand même s'avérer néces-
saire de changer cette corde pendant la durée de vie du séchoir. Quand des
fibres déchirées commencent à apparaître à l'extérieur de la corde (la corde
s'effiloche), il faut la changer le plus rapidement possible par une nouvelle
corde originale. Vous pourrez la trouver chez votre commerçant en donnant
le nom de votre séchoir-parapluie ou s'ils n'en ont pas en stock, directement
chez nous. Lorsque la corde servant à l'ouverture du séchoir est abîmée, elle
peut se couper soudainement lors de l'utilisation. Dans ce cas, vous risquez au
pire de perdre l'équilibre.
usure du mât :
Selon la nature du sol, le mât tournant dans l'ancrage ou dans la douille de sol
s'use. Veuillez contrôler au moins une fois par an l'usure du mât à l'endroit où
il sort de la douille de sol ou de l'ancrage au sol. Bien que le mât soit fabriqué
selon des standards de sécurité très stricts, il est possible que des cannelures
contribuent à affaiblir le mât à cet endroit-là. Dès que vous remarquez des
cannelures sur tout le tour du mât ou de grosses bosses, il est urgent de
changer le mât contre un autre mât original. De profondes cannelures ou de
grosses bosses causées par une tondeuse à gazon ou une brouette peuvent
affaiblir le mât. Celui-ci peut alors se plier par grand vent ou si le linge n'est
pas étendu régulièrement et ainsi représenter un danger. Vous obtiendrez
un nouveau mât soit chez votre commerçant en donnant le nom du séchoir
soit directement chez nous. Merci de ne changer d'autres pièces comme des
poulies ou des rivets que par des pièces de rechange originale contrôlées - ce
ne sont qu'elles qui garantissent une utilisation sans danger de votre séchoir.
Si vous avez un doute quelconque concernant le fonctionnement de votre
séchoir-parapluie veuillez vous adresser à notre service après-vente, nous
répondrons avec plaisir à vos questions. Vous pouvez joindre notre service
après-vente … JUWEL H. Wüster GmbH, Bahnhofstraße 31, D-82467 Garmisch
Partenkirchen, Tél. 0049-8821-1679
Veuillez joindre une copie du ticket de caisse et une description du défaut.
3 ans de garantie, à l'exception des pièces d'usure (cordes, housse de protection).
nous vous remercions de votre achat, vous avez fait
le bon choix en optant pour un séchoir de grande
qualité.
Douille de sol à visser avec cale :
Monter le couvercle. Vous pouvez maintenant visser la douille dans le sol dans
l'endroit prévu à l'aide d'un manche à balai ou d'un objet comparable jusqu'à
ce que l'anneau supérieur soit en contact avec le sol. Enlever éventuellement
de la douille la terre y ayant pénétré et insérer complètement la cale livrée
dans la douille. Si le sol n'est pas approprié (trop pierreux ou trop sablonneux),
creuser un trou d'env. 40 cm de diam. et bétonner la douille dedans. Mettre
le séchoir parapluie dans la douille avant que le béton n'ait durci et contrô-
ler avec un niveau à eau qu'il soit bien vertical. Attention : couvrir les trous
à l'extrémité inférieure avec du papier journal pour éviter que du béton ne
pénètre dans les trous et pour que l'eau puisse sécouler vers le bas.
Attention ! ne pas laisser les enfants jouer avec la housse de protection.
risque d'étouffement !
MoDe D'eMPLoi
Nous vous remercions d'avoir choisi un produit de qualité. Nous vous prions de
bien vouloir suivre les conseils d'utilisation ci-après.
1) réglage de la hauteur :
En débloquant de sa manette le noyau étoilé supérieur peut être déplacé
sur la crémaillère vers le haut et le bas. Enclenchez le à la hauteur souhai-
tée. Avant d'ouvrir l'étendage, libérez les bras en les tirant vers l'extérieur.
2) ouverture avec corde de tirage :
L'ouverture du séchoir se fait sans aucun effort grâce à un palan dans
le bras - tirez lentement la poignée rouge attachée à la corde de tirage
dans le męme sens que le bras situé à droite, le noyau étoilé inférieur
coulisse vers le haut puis se bloque de lui-męme dans la crémaillère. Afin
de déployer encore plus facilement vous pouvez coincer la corde dans
l'entaille de la poignée de tirage et tirer ainsi jusqu'à ce que le séchoir soit
complètement ouvert et la corde d'étendage bien tendue.
3) tension de la corde :
(Si possible, n'ouvrez JAMAIS les PINCES SERRE-CORDE à l'extrémité des
bras - sauf si vous voulez remplacer la corde, et uniquement dans ce cas !)
1) Ouvrez le séchoir jusqu'à ce que le noyau étoilé inférieur soit encliqueté
dans la crémaillère.
2) Répartissez la corde à linge de manière à ce qu'elle reste lâche, si possible
régulièrement, sur chacun des 4 côtés, sur tous les tours de corde en tirant
légèrement sur la corde.
3) Ouvrez le séchoir parapluie et répartissez la corde, étape par étape,
De
At
ch
GB
Litho-Nr. 545-04-14 · Anl.-Nr. 09141759
it
ch
jusqu'à obtenir la position d'utilisation ou jusqu'à ce que le tour de corde
extérieur soit bien tendu. (IMPORTANT ! Position d'utilisation : distance
entre les noyaux étoilés 30 à 35 cm !)
nous vous prions de bien vouloir suivre les conseils d'utilisation ci-
dessous, afin que votre séchoir-parapluie devienne pour vous une
aide indispensable.
inDicAzioni Di SicurezzA
il presente stendibiancheria a ombrello è destinato solo
ad asciugare biancheria per uso privato..
Fare attenzione a che la biancheria sia distribuita in modo uniforme. Non
appendere panni qualora soffiasse un forte vento! Porre lo stendibiancheria
in modo tale che sia possibile girarlo liberamente. Togliere tutte le mollette
prima di chiudere o di rimuovere lo stendibiancheria, poiché in tal caso la base
potrebbe esserne danneggiata. Per la conservazione dello stendibiancheria
utilizzare un nastro elastico o un telo protettivo, così che le corde non si at-
torciglino. Attenzione: fare attenzione a che i bambini non utilizzino
lo stendibiancheria quale attrezzo da ginnastica o come una specie
di giostra (vi è il pericolo di rimanere impigliati tra le corde – questo
prodotto non è un giocattolo per bambini). Chiudere lo stendibiancheria
dopo averlo utilizzato. Esso è fornito di un piantone affinché dopo il suo utilizzo
possa essere riposto in un luogo sicuro lontano dalla portata dei bambini.
Quando lo stendibiancheria viene estratto, chiudere il coperchio dell’ancoraggio
per pavimenti.
La confezione in Pe non è un giocattolo – pericolo di soffocamento!
Smaltire la confezione subito dopo l’apertura nell’apposito conteni-
tore per i materiali riciclabili. (Il PE è ecologico e non velenoso.)
usura presso i fili elevatori atti all'apertura del ragno
stendibiancheria:
In tutti i ragni stendibiancheria, i fili elevatori rappresentano un importante
dettaglio costruttivo e sono quindi progettati in vista di portate e di durata
di vita massimizzate. Ciò malgrado, nel corso della durata utile dell'unità può
risultare necessaria la sostituzione di tale filo elevatore. Se appaiono visibili
delle fibre lacerate presso il lato esterno del filo elevatore (sfrangiatura del
filo), lo stesso dovrà essere sostituito al più presto esclusivamente con un
nuovo elemento originale. Esso è disponibile - indicando il tipo di ragno
stendibiancheria - presso il vostro rivenditore di fiducia oppure, se in tale sede
non reperibile a stock, direttamente presso di noi. Un filo elevatore difettoso
può strapparsi improvvisamente durante l'uso, fatto questo per cui - nel caso
peggiore - è possibile una perdita dell'equilibrio in fase di utilizzo.
usura presso la colonna montante:
a seconda delle condizioni del terreno, la colonna montante che ruota entro
l'ancoraggio di fondo oppure entro la guaina di fondo è soggetta ad una certa
usura. Si prega di controllare quanto meno una volta l'anno l'usura della colonna
montante nel punto del suolo in cui essa esce dalla guaina/dall'ancoraggio
di fondo. Sebbene detta colonna sia realizzata secondo molteplici criteri di
sicurezza, le scanalature che si formano in tale posizione possono provocare un
indebolimento della colonna montante. Non appena si notano in tale posizione
delle scanalature lungo l'intera circonferenza della colonna oppure delle forti
ammaccature di questa, essa dovrà essere al più presto sostituita solo con una
nuova colonna originale. A causa di marcate scanalature presso la colonna mon-
tante, oppure di forti ammaccature provocate ad es. dal passaggio di tosaerba
o di carriole, la colonna subisce un indebolimento e, in caso di vento o di intensa
sollecitazione laterale, può spezzarsi ponendo a repentaglio l'integrità della
persona. Una nuova colonna montante è reperibile presso il vostro rivenditore di
fiducia - indicando il tipo di ragno stendibiancheria - oppure direttamente da noi.
Raccomandiamo di effettuare la sostituzione di altri elementi costruttivi,
quali rulli portafune e rivetti, sempre ricorrendo a ricambi originali di qualità
collaudata - solo questi componenti assicurano un funzionamento privo di
rischi del vostro asciugatore.
In caso di dubbi sul funzionamento dello stendibiancheria, informare subito
il nostro Servizio Clienti, siamo a disposizione per rispondere a ogni tipo di
domande. E’ possibile mettersi in contatto con il nostro Servizio Clienti al
numero … JUWEL H. Wüster GmbH, Bahnhofstraße 31, D-82467 Garmisch
Partenkirchen, Tel. 0049-8821-1679
Si prega di allegare una copia dello scontrino di acquisto e una descrizione del
difetto osservato.
3 anni di garanzia, ad eccezione dei pezzi soggetti a usura (corde, telo di
copertura a protezione del maltempo).
Prima del montaggio, leggere le istruzioni e conser-
varle per un utilizzo successivo.
Manicotto filettato di fondo, completo di distanziale:
Assemblare il coperchio. Ora è possibile avvitare nel terreno, presso il punto
previsto in proposito, il manicotto filettato di fondo servendosi di un manico
di scopa o simile, e ciò sinché l‘anello superiore si pone per quanto possibile a
paro con il terreno. Rimuovere dalla guaina di fondo la terra eventualmente
penetrata ed inserire integralmente in essa il distanziale fornito a corredo.
Se il terreno non risulta idoneo (ossia eccessivamente pietroso o sabbioso),
praticare un foro avente Ø di ca. 40 cm e cementarvi il manicotto di fondo.
Prima che il calcestruzzo faccia presa posizionare il ragno stendibiancheria
nel manicotto di fondo e verificare con una livella a bolla d‘aria la posizione
ortogonale. Attenzione: ricoprire con carta da giornale i fori presso il terminale
inferiore, in modo tale che detti fori restino privi di calcestruzzo e l‘acqua possa
defluire verso il basso.
iStruzioni Per L'uSo
Grazie di aver optato per un prodotto di qualità. Raccomandiamo di tenere ben
presenti le istruzioni d‘uso che seguono.
1) Apertura dello stendibiancheria e regolazione dell'altezza:
Per sollevare o abbassare lo stendibiancheria fino alla posizione desidera-
ta, occorre allentare l'impugnatura a ghiera superiore e quindi spostarla
fino all'altezza desiderata. Per aprire lo stendibiancheria, staccare i bracci
dalla crociera superiore.
2) Apertura con paranco:
Lo stendibiancheria si apre tirando l'impugnatura verso l'alto. Un paranco
integrato rende ancora piú facile questo processo. Allo stesso tempo le
corde si tendono. Per chiudere lo stendibiancheria, allentare l'impugna-
tura sulla crociera inferiore.
3) regolazione della tensione delle corde:
(Mai apprire le morsetti tendicorde che si trovano alle estremità dei bracci
salvo lo cambiamento della corda!)
1) aprire lo stendibiancherie fin che la ghiera inferiore é incastrato.
2) Distribuire la corda su tutti i quattro lati regolarmente
3) Ripetere questa misura a ogni passo fin che la corda é ben teso.
(Importante: Nella posizione finale la distanza tra le due ghiere deve essere
30-35 cm!)
note di preservazione: questo prodotto di qualità è realizzato in
materiali resistenti agli agenti atmosferici e può essere senz‘altro
irrorato con un tubo flessible di irrigazione. non pulire con oggetti
acuminati o scabri oppure con detergenti aggressivi.
fr
ch