Auriol Z30299A_B_D Benutzerhandbuch
Auriol Chronograph
Se till att barn inte handskas med batterierna,
kasta inte batterierna i öppen eld, batterierna får
inte kortslutas eller öppnas.
Undvik kontakt med huden, ögonen och slem-
hinnor. Spola omedelbart av den plats som
kommit i kontakt med batterisyran, använd rent
vatten och uppsök läkare.
©
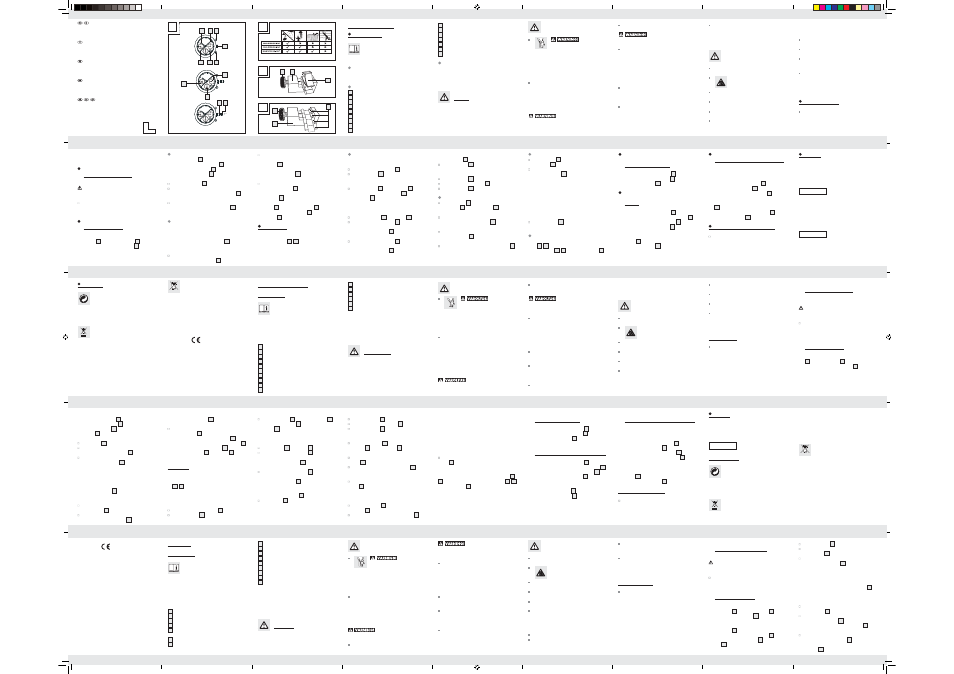
Vattentäthet
Denna klocka är vattentät till fem bar (engelska:
5 bar water resistant) enligt DIN 8310. Bild B vi-
sar ytterligare användningsområden. Observera
att vattentätheten inte är en permanent egenskap.
Vattentätheten bör kontrolleras en gång om året,
speciellt vid belastning eftersom de inbyggda
tätningskomponenternas funktion försämras i
dagligt bruk.
Säkerhetsanvisningar
för batterier
Ta ur batterierna om produkten inte skall användas
under längre tid.
OBSERVERA! EXPLOSIONS-
RISK! Ladda aldrig batterierna!
Kontrollera att batteripolerna ligger åt rätt håll.
Dessa visas i batterifacken.
Rengör batteri- och apparatkontakter om nöd-
vändigt.
Ta omedelbart bort ett tomt batteri ur produkten.
Risk för att batteriet läcker föreligger.
Om detta inte beaktas kan batteriet laddas ur
utöver förekommande spänning. Risk för läckage
föreligger. Om batteriet läcker inne i produkten,
ta ur det omedelbart för att undvika skador på
produkten.
Kasta inte batterierna i hushållssoporna.
Varje användare är förpliktad att avfallshanteras
batterier enligt gällande miljöregler.
Använd inte produkten på sjuk-
hus eller i närheten av medicinsk utrustning. Detta
kan medföra funktionsstörningar i livsuppehål-
lande utrustning.
Utsätt inte produkten för
– extrema temperaturer,
– starka vibrationer,
– stark mekanisk påverkan,
– direkt solljus,
– fuktighet.
Risk för skador i produkten.
Se till att apparathuset inte gnids för häftigt mot
textil. Detta kan medföra statisk uppladdning
och påverka mätresultatet.
Garantin omfattar inte skador vilka kan härledas
till osakkunnig hantering, icke beaktande av
bruksanvisning eller otillåtet ingrepp av obehörig
person samt slitageskador.
Försök inte öppna produkten. Osakkunniga
reparationer av produkten kan innebära risker för
användaren. Låt endast behörig elektriker repa-
rera produkten.
Allmänna
säkerhetsanvisningar
RISK FÖR LIVS-
FARLIGA SKADOR FÖR SPÄD-
BARN OCH BARN! Låt inte barn
leka med förpackningsmaterialet. Kvävningsrisk
föreligger vid hantering av förpackningsmateria-
let. Mindre barn förstår inte farorna som lurar.
Håll alltid mindre barn på avstånd. Produkten
är ingen leksak.
Barn och personer med bristande kunskaper
och eller erfarenhet samt personer med nedsatta
fysiska, motoriska hinder, handikappade personer
eller barn skall om möjligt inte använda produkten
utan uppsikt eller handledning av säkerhetsan-
svarig person. Barn skall hållas under uppsikt och
får absolut inte använda produkten som leksak.
LIVSFARA! Batterier är lätta att
svälja vilket innebär livsfara. Uppsök omedel-
bart läkare om någon svalt ett batteri.
Använd aldrig en produkt som är skadad. Skadad
produkt kan medföra elstötar och livsfara.
8
24h-indikering (visar tiden i 24-timmarsformat)
9
Tidtagningsur minutvisare
10
Sekundvisare
11
Position 1
12
Position 2
13
Spänne
14
Segment
15
Reparationssats för modell D
16
Mothåll för modell D
©
Leveransens omfattning
1 kronograf
1 reparationssats för modell D
1 knappbatteri
1 bruksanvisning
Säkerhet
FÖRVARA ALLA SÄKERHETSINSTRUKTIONER
OCH ANVISNINGAR FÖR FRAMTIDA BEHOV.
Kronograf
©
Inledning
Förvara denna bruksanvisning på säker
plats. Se till att bruksanvisningen alltid finns
tillgänglig även vid vidare användning av
tredje man.
©
Avsedd användning
Kronografen visar tid och datum och kan användas
som stoppur.
©
De olika delarna
1
Timvisare
2
Minutvisare
3
Start- / Stopp-knapp (tidtagningsfunktion)
4
Krona
5
Knapp (för mellantid / återställning av mellan-
tid /reset)
6
Datumindikering
7
Tidtagningsur sekundvisare
EMC
Tuotenimike:
Kronografi-rannekello
Malli nro.: Z30299A / B / D
Versio:
08 / 2011
Tietojen päivämäärä: 07 / 2011
Tunnistenro: Z30299A / B / D072011-3
SE
SE
SE
SE
SE
SE
SE
SE
FI
FI
Huolto
FI
Huolto Suomi
Tel.:
010309 3582
e-mail: milomex@lidl.fi
IAN 66976
©
Jätehuolto
Pakkaus on ympäristöystävällista materi-
aalia, jonka voit viedä paikalliseen kierrä-
tyspisteeseen.
Saat lisätietoa käytettyjen tuotteiden jätehuoltomah-
dollisuuksista kunnan- tai kaupungintoimistosta.
Älä heitä käytettyä tuotetta talousjätteisiin.
Toimi ympäristöystäväl-lisesti toimittamalla
se asianmukaiseen jätehuoltoon. Paikalli-
sesta kunnan- tai kaupungintoimistosta saat
©
Käyttö 5000 metrin
kilpajuoksussa (väliaikamittaus):
Tämä toiminto tarjoaa mahdollisuuden ajanoton ai-
kana mitata väliaikatulos normaalin ajanoton käy-
dessä edelleen.
Start: Paina Start / Stop -näppäintä 3
.
Väliaika: Paina näppäintä 5
.
Väliaika-vapautus: Paina näppäintä 5
uudelleen.
Huomautus: Voit väliaikanäppäimellä 5
ottaa
väliajan ja suorittaa väliajan vapautuksen niin usein
kuin haluat.
Menettelyn päättäminen: Paina Start / Stop
-näppäintä 3 .
Palautus: Paina näppäintä 5
.
©
Puhdistus ja hoito
Puhdista tuote vain ulkopuolelta pehmeällä, kui-
valla liinalla.
©
Käyttö100 metrin kilpajuoksussa
(vakio ajanmittaus):
Start: Paina Start / Stop -näppäintä 3 .
Stop: Paina Start / Stop -näppäintä 3
uudelleen.
Palautus: Paina näppäintä 5 .
©
Käyttö koripallo-ottelussa
(akkumulatiivinen ajanmittaus):
Start: Paina Start / Stop -näppäintä 3 .
Stop / aikalisä: Paina Start / Stop -näppäintä 3
.
Uusi startti: Paina Start / Stop -näppäintä 3
.
Stop: Paina Start / Stop -näppäintä 3
.
Huomautus: Ajanottokellon uusi startti ja stop voi-
daan suorittaa niin usein kuin vain halutaan paina-
malla start / stop -näppäintä 3 .
Palautus: Paina näppäintä 5
.
Huomautus:
– Päivämäärä voidaan asettaa vain myötäpäivään
kiertämällä.
– Päivämäärää ei tulisi asettaa kello 21:00 ja 01:00
välille, koska se ei silloin mahdollisesti vaihdu oi-
kein. Mikäli päivämäärä kuitenkin on asetettava
tälle ajalle, aseta kellonaika tätä ennen johonkin
muuhun aikaan. Korjaa kellonaika vasta päivä-
määrän asetuksen jälkeen.
Kun olet asettanut päivämäärän, paina nuppikruu-
nu 4 takaisin kuoreen.
©
Ajanottokellon käyttö
Mitattu aika näytetään ajanottokellon näytöissä 7 ,
9
. Nämä liikkuvat tunti- ja minuuttiviisareista 1 , 2
ja sekuntiviisarista 10 riippumatta. Ajanottokello voi
näyttää korkeintaan 59 minuutin ja 59,8 sekunnin
aikavälin.
Ajanottokello näyttää väliajan:
Paina näppäintä 5 .
Paina Start / Stop -näppäintä 3 .
Paina näppäintä 5 uudelleen.
©
Kellonajan asetus
Vedä nuppikruunu 4 kuoresta varovasti asen-
toon 2 12, kun sekuntiviisari 10 on asennossa
”0“ (kello 12 ).
Aseta haluttu minuutti ja tunti kiertämällä nuppikruu-
nua 4 myötäpäivään.
Varmistaudu, että 24 tunnin näytössä 8 näyte-
tään oikea aika. Aseta aika tarvittaessa 12 tuntia
edelle.
Kun olet asettanut kellonajan, paina nuppikruu-
nu 4 takaisin kuoreen. Kello käynnistyy nyt
halutulla kellonajalla.
©
Päivämäärän asetus
Vedä nuppikruunu 4 varovasti kuoresta asen-
toon 1 11.
Aseta haluttu päivämäärä nuppikruunua 4 myö-
täpäivään kiertämällä.
Ajanottokello seisoo:
Paina näppäintä 5 tai vedä nuppikruunu 4
varovasti asentoon 1 11 kuoresta ja paina näp-
päintä 5 .
Ellei mikään ajanottokellon viisari ole
asennossa ”0“:
Vedä
nupista
4
asentoon 2 12 asti.
Paina Start- / Stop -painiketta 3 2 sekuntia.
Ajanottokellon minuuttiviisari kiertää koko kier-
roksen. Paina painiketta 5 , kun haluat asettaa
ajanottokellon minuuttiviisarin asentoon ”60“.
Paina Start- / Stop -painiketta 3 2 sekuntia.
Ajanottokellon sekuntiviisari kiertää koko kierrok-
sen. Paina painiketta 5 , kun haluat asettaa
ajanottokellon sekuntiviisarin asentoon ”12“.
Huomautus: Ajanottokellon viisarit liikkuvat
nopeasti, jos painiketta 5 pidetään painettuna.
Paina
nuppi
4
taas kellon koteloon.
Huomautus: Mikäli haluat poistaa useampia
yhteen kuuluvia niveliä 14 riittää, kun poistat
vain kummankin ulommaisen sokan.
Kokoa taas kellon ranneke yhteen yhdistämällä
irralliset nivelet 14 sokalla. Paina tämä nuolen
suuntaa vastaan yhdistettyihin niveliin 14.
Huomautus:
Yhden tai useamman nivelen 14
poistamiseksi välittömästi lukolta 13 paina jousi-
tappi yhteen luistilla 16, poista lukko 13 ja jatka
ylläkuvatulla tavalla.
©
Käyttö
Huomautus: Ennen kuin voit asettaa kellonajan
tai päivämäärän on säädettävä ajanottokellon näy-
töt 7 , 9 asentoon ”0“ (kello 12).
©
Ajanottokellojen näytön asetus
asentoon ”0“ (kello 12)
Ajanottokello käy vielä:
Paina Start / Stop -näppäintä 3 .
Paina näppäintä 5 .
©
Lukon säätö (kuva C)
Huomautus: Lukko 13 pidetään paikallaan
jousitapilla. Pane lukon 13 säätämiseksi krono-
grafi korjaussettiin 15 ja paina jousitappi yhteen
luistilla 16.
Avaa lukko 13.
Pidä jousitappia yhteenpuristettuna (kuten ylem-
pänä kuvattu) ja säädä lukko 13 kuten haluat.
Päästä jousitappi irti, jotta se voi lukittua takaisin
lähtöasentoonsa. Lukko 13 on nyt kiinnitetty.
©
Nivelten poisto (kuva D)
Huomautus: Nivelet, jotka voidaan poistaa, on
merkitty nuolella (katso kuva D). Ne on kiinnitetty
toisiinsa sokilla. Nämä voidaan työntää ulos nuolen
suuntaan korjaussetillä 15. Ota tarvittaessa pinsetti
avuksesi sokkien poistossa.
Aseta miesten kronografi numerotaulu alaspäin
korjaussettiin 15.
Poista sokat nivelistä, jotka haluat poistaa (kuten
ylempänä kuvattu) ja ota nivel 14 pois paikoiltaan.
©
Kellon rannekkeen säätäminen
(mallien Z30299A / B)
Huomautus: Tähän työvaiheeseen tarvitset reikä-
pihdit.
HUOMIO PURISTUMISEENJOUTUMIS-
VAARA! Varo, etteivät sormesi tai kehon muut
kehon osat joudu reikäpihtien väliin.
Lävistä kellon rannekkeen säätämiseksi reipäpih-
deillä uusi reikä kellon rannekkeen tarvittavaan
kohtaan.
©
Kellon rannekkeen lyhentäminen
(mallin Z30299D)
Huomautus: Kellon ranneke voidaan lyhentää lu-
kon 13 säädöllä tai nivelten 14 poistolla. Käytä tähän
toimituksen sisältämää korjaussetttiä 15.
Paristoja ei saa hävittää tavallisen kotitalousjätteen
mukana!
Laki velvoittaa jokaista käyttäjää hävittämään
paristot määräysten mukaisesti!
Pidä paristot lasten ulottumattomissa, älä heitä
niitä tuleen, älä oikosulje niitä äläkä pura niitä.
Vältä kosketusta ihoon, silmiin ja limakalvoihin.
Jos pariston happoa joutuu iholle, huuhtele
kyseinen kohta runsaalla määrällä vettä ja / tai
mene lääkäriin!
©
Vesitiiviys
Tämä kello on vesitiivis viiteen bariin asti (englan-
niksi: 5 bar water resistant) DIN 8310 mkaises-
ti. Kuva B näyttää sallitut käyttöalueet. Huomaa,
ettei vesitiiviys ole mikään pysyvä ominaisuus.
Se tulisi tarkistaa vuosittain ja ennen erityisiä
kuormituksia, koska sisäänasennettujen tiiviste-
elementtien toiminto heikkenee jokapäiväisessä
käytössä.
huomattavia vaaratilanteita. Anna korjaukset vain
ammattiliikkeen tehtäväksi.
Paristoja koskevia
turvallisuusohjeita
Ota paristot pois laitteesta, jos laitetta ei käytetä
pitkään aikaan.
VARO! RÄJÄHDYSVAARA! Älä
missään tapauksessa lataa paristoja
uudelleen!
Laita paristot laitteeseen aina oikein päin. Na-
pojen oikea suunta on merkitty paristolokeroihin.
Puhdista paristo- ja laitekosketus tarvittaessa,
ennen kuin laitat paristot lokeroon.
Tyhjentynyt paristo on poistettava välittömästi
laitteesta. Se voi vuotaa paristotilaan!
Ellei näitä ohjeita noudateta, paristo voi tyhjentyä
yli loppujännitteensä. Silloin on olemassa vaara,
että akku vuotaa. Jos laitteesi paristo on päässyt
vuotamaan, poista se välittömästi, näin vältät
laitteen vaurioitumisen!
Älä ota laitetta käyttöön, jos se on viallinen.
Vioittuneet laitteet merkitsevät sähköiskun aiheut-
tamaa hengenvaaraa.
Älä käytä laitetta sairaaloissa tai
muissa lääketieteellisissä laitoksissa. Tämä voi
johtaa elintoimintoja ylläpitävien laitteiden toimin-
tahäiriöihin.
Älä altista laitetta
– äärimmäisille lämpötiloille,
– voimakkaille värähtelyille,
– suurelle mekaaniselle kuormitukselle,
– suoralle auringonvalolle,
– kosteudelle.
Laite voi vioittua.
Älä anna laitteen kotelon hankautua voimakkaasti
kankaita vasten. Se voi johtaa staattiseen latau-
tumiseen ja vaikuttaa mittaustulokseen.
Huomaa, että takuu ei korvaa väärästä käsittelystä,
käyttöohjeen tietojen noudattamatta jättämisestä
tai valtuuttamattomien henkilöiden toimenpiteistä
aiheutuvia vikoja.
Älä koskaan pura laitetta osiin. Asiantuntematto-
masti tehdyt korjaukset voivat aiheuttaa käyttäjälle
Yleiset turvaohjeet
HENGEN- JA
TAPATURMANVAARA PIKKU-
LAPSILLE JA LAPSILLE! Älä kos-
kaan jätä lapsia pakkausmateriaalien läheisyy-
teen ilman valvontaa. Pakkausmateriaaleihin liit-
tyy tukehtumisvaara. Lapset aliarvioivat usein
vaarat. Pidä lapset aina loitolla tuotteesta. Tuote
ei ole lasten leikkikalu.
Tämä laite ei ole tarkoitettu sellaisten henkilöiden
(lapset mukaan luettuina) käyttöön, joiden fyysinen,
aistimuksellinen tai henkinen kunto on rajoittunut
tai joilla ei ole kokemusta / tietoja laitteen käytöstä.
He saavat käyttää laitetta ainoastaan turvalli-
suudesta vastuussa olevan henkilön valvonnassa
tai jos heille on annettu opastusta laitteen käytössä.
Lapsia on valvottava ja pidettävä huoli siitä, ett-
eivät he pääse leikkimään laitteen kanssa.
HENGENVAARA! Paristojen
nieleminen voi olla hengenvaarallista. Pariston niel-
leen henkilön on välittömästi mentävä lääkärille.
11
Asento 1
12
Asento 2
13
Lukko
14
Nivel
15
Mallin D korjaussetti
16
Mallin D luisti
©
Toimitukseen kuuluu
1 kronografi-rannekello
1 mallin D korjaussetti
1 nappiparisto
1 käyttöohje
Turvallisuus
SÄILYTÄ KAIKKI TURVA- JA MUUT OHJEET
TULEVAA TARVETTA VARTEN!
Kronografi-rannekello
©
Johdanto
Säilytä käyttöohje huolellisesti. Anna kaik-
ki asiakirjat laitteen mukana mahdolliselle
uudelle omistajalle.
©
Määräystenmukainen käyttö
Kronografi näyttää ajan ja päivämäärän ja sitä voi-
daan käyttää ajanottokellona.
©
Osien kuvaus
1
Tuntiviisari
2
Minuuttiviisari
3
Start- / stop -näppäin (ajanottotoiminto)
4
Nuppikruunu
5
Näppäin (väliaika / väliajan vapautus / reset)
6
Päivämääränäyttö
7
Ajanottokello sekuntiviisari
8
24h-näyttö (näyttää ajan 24-tunnin perusteella)
9
Ajanottokello minuuttinäyttö
10
Sekuntiviisari
FI
FI
FI
FI
FI
FI
FI
FI
FI
FI
FI
FI
FI
FI
FI
GB/IE
GB/IE
GB/IE GB/IE GB/IE GB/IE GB/IE GB/IE GB/IE GB/IE GB/IE
GB/IE
GB/IE
GB/IE
GB/IE
GB/IE
Pb
Environmental damage through
incorrect disposal of the batteries!
Batteries may not be disposed of with the usual do-
mestic waste. They may contain toxic heavy metals
and are subject to hazardous waste treatment rules
and regulations. The chemical symbols for heavy
metals are as follows: Cd = cadmium, Hg = mercury,
Pb = lead. That is why you should dispose of used
batteries at a local collection point.
EMC
Product description:
Chronograph Watch
Model No.: Z30299 A / B / D
Version:
08 / 2011
Last Information Update: 07 / 2011
Ident no.: Z30299A / B / D072011-3
Disposal
The packaging is made entirely of recy-
clable materials, which you may dispose
of at local recycling facilities.
Contact your local refuse disposal authority for more
details of how to dispose of your worn-out product.
To help protect the environment, please
dispose of the product properly when it
has reached the end of its useful life and
not in the household waste. Information
on collection points and their opening
hours can be obtained from your local
authority.
Faulty or used batteries must be recycled in accord-
ance with Directive 2006 / 66 / EC. Please return
the batteries and / or the device to the available col-
lection points.
Service
GB
Service Great Britain
Tel.:
0871 5000 720
(0,10 GBP/Min.)
e-mail: [email protected]
IAN 66976
IE
Service Ireland
Tel:
1890 930 034
(0,08 EUR/Min. (peak)
0,06 EUR/Min. (off peak))
e-mail: [email protected]
IAN 66976
Operation during a 5000-Meter
Race (split time measurement):
This function offers you the possibility of timing an in-
termediate result while you are timing the main race,
with the standard timing continuing in the background.
Start: press the start / stop button 3
.
Split time: press the button 5
.
Split time release: press the button 5
again.
Note: the split time and split time release can be
performed as often as you wish by pressing the but-
ton 5 .
Final Stop: press the start / stop button 3
.
Reset: press the button 5
.
Cleaning and maintenance
Clean the product on the outside only with a soft,
dry cloth.
Operation during a
100-Meter Race (standard
time measurement):
Start: press the start / stop button 3 .
Stop: press the start / stop button 3
again.
Reset: press the button 5
.
Operation for Basketball
(accumulative time measure-
ment):
Start: press the start / stop button 3 .
Stop / time-out: press the start / stop button 3
.
Re-start: press the start / stop button 3
.
Stop: press the start / stop button 3
.
Note: a re-start and stop of the stopwatch can be
performed as often as you like by pressing the start /
stop button 3 .
Reset: press the button 5
.
Setting the Date
Pull the crown 4 carefully out of the housing to
position 1 11.
Adjust the chronograph to the desired date by
turning the crown 4 in a clockwise direction.
Note:
–
The date can only be set by turning in a clockwise
direction.
–
The date should not be adjusted between 9 p.m.
and 1 a.m., as it is possible that it will not turn
over correctly. If the date has to be adjusted
during this period, change the time beforehand
to a different period. You should only correct
the time after adjusting the date.
Press the crown 4 back into the housing after
adjusting the date.
Using the Stopwatch
The time measured is shown by the stopwatch dis-
plays 7 , 9 . These move independently of the hour
and minute hand 1 , 2 and the second hand 10.
The stopwatch can display a maximum period of
59 minutes and 59.8 seconds.
Note: The stop watch hands move quickly if you
keep button 5 pressed.
Press the crown 4 back into the housing.
The stopwatch shows the split time:
Press the button 5 .
Press the start / stop button 3 .
Press the button 5 again.
Adjusting the Time
Pull the crown 4 carefully out of the housing to
position 2 12 if the second hand 10 is in the “0”
(12 o’clock) position.
Adjust the chronograph to the desired minutes
and hours by turning the crown 4 in a clockwise
direction.
Please ensure that the correct time is shown in
the 24 h display 8 . Move the time 12 hours
forward if necessary.
After you have set the time, press the crown 4
back into the housing. The watch now starts with
the desired time.
Resetting the Stopwatch
Displays to “0” (12 o’clock)
The stopwatch is still running:
Press the start / stop button 3 .
Press the button 5 .
The stopwatch is not running:
Press the button 5 or pull the crown 4 carefully
out of the housing to position 1 11 and press
the button 5 .
If none of the stop watch hands is in the
“0” position:
Pull out the crown 4 to position 2 12.
Press the start / stop button 3 for about 2 sec-
onds. The stopwatch minute hand makes a full
revolution. Press button 5 to set the stop watch
minute hand to “60”.
Press the start / stop button 3 for about 2 sec-
onds. The stopwatch second hand makes a full
revolution. Press button 5 to set the stop watch
second hand to “12”.
Remove the pins of the segment that you wish to
remove (as described above) and take out the
segment 14.
Note: If you would like to take out more than one
consecutive segment 14, it is sufficient to remove
the two outer pins.
Connect the watch strap together again by joining
the loose segments 14 with a pin. Press this pin
against the direction of the arrow into the adjacent
segments 14.
Note: In order to remove one or more seg-
ments 14 directly on the fastener 13, press out
the spring bar with the slider 16, remove the
fastener 13 and proceed as described above.
Operation
Note: Before you can adjust the time or date, the
stopwatch displays 7 , 9 have to be reset to “0”
(12 o’clock).
Adjusting the Fastener (Fig. C)
Note: The fastener 13 is held in position by a spring
bar. In order to adjust the fastener 13, place the
chronograph in the repair set 15 and press the spring
bar together with the slider 16.
Open the fastener 13.
Keep the spring bar squeezed together (as
described above) and adjust the fastener 13 as
desired.
Release the spring bar so that it can snap back
into the original position. The fastener 13 is now
fixed in place.
Removing Segments (Fig. D)
Note: The segments which can be removed are
marked with an arrow (see Fig. D). They are connected
together with pins. These can be pushed out in the
direction of the arrow with the repair set 15. Use a pair
of tweezers if necessary in order to remove the pins.
Place the chronograph with the dial facing
downwards in the repair set 15.
special conditions, as the function of the inbuilt
sealing elements diminishes with daily use.
Adjusting the watch strap
(models Z30299A / B)
Note: For this step you need a hole punch.
CAUTION – DANGER OF CRUSHING!
Please ensure that you do not put your fingers or
other parts of the body between the hole punch.
In order to be able to adjust the size of the
watch strap, punch a new hole at the required
position in the watch strap with the hole punch.
Shortening the watch strap
(model Z30299D)
Note: The watch strap can be shortened by adjusting
the fastener 13 or removing segments 14. To this
purpose you should use the repair set 15 supplied.
battery has leaked inside your device, you
should remove it immediately in order to prevent
damage to the device!
Batteries must not be disposed of in the normal
domestic waste!
Every consumer is legally obliged to dispose of
batteries in the proper manner!
Keep batteries away from children. Do not throw
batteries into a fire. Never short-circuit them or
take them apart.
Avoid contact with the skin, eyes and mucous
membranes. Any parts of the body coming into
contact with battery acid should be rinsed off
with copious amounts of water and / or a doctor
contacted if necessary!
Watertightness
This watch is watertight to 5 bar in accordance
with DIN 8310. Figure B shows the permissible
areas of use. Please note that the watertightness
is not a permanent feature. It should be checked
annually and particularly before subjecting it to
Under no circumstances should you take the device
apart. Improper repairs may place the user in
considerable danger. Repairs should only be
carried out by specialist personnel.
Safety Instructions
for Batteries
Remove the battery from the device if it is not
going to be used for a prolonged period.
CAUTION! DANGER OF EXPLO-
SION!
The batteries must never be
recharged!
When inserting the battery, ensure the correct
polarity! This is shown in the battery compartment.
If necessary, clean the battery and device contacts
before inserting the battery.
Remove a spent battery immediately from the
device. There is an increased danger of leaks!
If the above instructions are not complied with,
the battery may discharge itself beyond its end
voltage. There is then a danger of leaking. If the
Do not use the device if it is damaged. Dam-
aged devices represent a danger of death!
Do not use the device in hospitals
or medical facilities, as otherwise this may result
in malfunctions of life-support systems.
Do not expose the device to
– extreme temperatures,
– strong vibrations,
– heavy mechanical loads,
– direct sunlight,
– moisture.
Otherwise there is a danger that the device will
be damaged.
Please prevent the housing of the device from
rubbing to strongly against textiles. This may result
in static charges and affect the results of the
measurements.
Please note that the guarantee does not cover
damage caused by incorrect handling, non-
compliance with the operating instructions or in-
terference with the device by unauthorised indi-
viduals.
General Safety
Information
DANGER TO
LIFE AND ACCIDENT HAZARD
FOR TODDLERS AND SMALL
CHILDREN!
Never allow children to play un-
supervised with the packaging material. There is
a danger of suffocation from the packaging
material. Children frequently underestimate the
dangers. Children should be kept away from the
product at all times. This is not a toy.
Children or persons who lack the knowledge or
experience to use the device or whose physical,
sensory or intellectual capacities are limited
must never be allowed to use the device without
supervision or instruction by a person responsible
for their safety. Children must never be allowed
to play with the device.
DANGER TO LIFE! Batteries
can be swallowed, which may represent a danger
to life. If a battery has been swallowed, medical
help is required immediately.
10
Second hand
11
Position 1
12
Position 2
13
Fastener
14
Segment
15
Repair set for model D
16
Slider for model D
Scope of delivery
1 chronograph watch
1 tooling kit for model D
1 button cell
1 directions for use
Safety
KEEP ALL THE SAFETY ADVICE AND INSTRUC-
TIONS IN A SAFE PLACE FOR FUTURE REFER-
ENCE!
Chronograph Watch
Introduction
Keep these instructions in a safe place. If
you pass the product on to anyone else,
please ensure that you also pass on all
the documentation.
Proper Use
The chronograph shows the date and time and can
be used as a stopwatch.
Description of Parts
1
Hour hand
2
Minute hand
3
Start / stop button (stopwatch function)
4
Crown
5
Button (for split time / split time release / reset)
6
Date display
7
Stopwatch second hand
8
24 h display (shows the time on a 24-hour basis)
9
Stopwatch minutes display
GB/IE
CHRONOGRAPH WATCH
Operation and Safety Notes
KRONOGRAF
Bruksanvisning och säkerhetsanvisningar
KRONOGRAFI-RANNEKELLO
Käyttö- ja turvallisuusohjeet
KRONOGRAF
Betjenings- og sikkerhetshenvisninger
CHRONOGRAPH
Bedienungs- und Sicherheitshinweise
Z30299A / B / D
3
Öppna spännet 13.
Håll fjädern sammantryck (enligt ovan) och jus-
tera spännet 13 som önskat.
Släpp fjädern så att den återgår till sin utgångs-
position. Spännet är nu 13 fast.
©
Ta bort segment (bild D)
Obs: De segment som kan tas bort är markerade
med en pil (se bild D). Dessa sitter ihop med stift.
Man kan skjuta ut dem med reparationssatsen 15.
i pilens riktning. Ta hjälp av en pincetter för ta bort
stiften.
Lägg herrkronografen med urtavlan nedåt i repa-
rationssatsen 15.
Ta bort stiftet i det segment du vill ta bort (se ovan)
och ta bort segmentet 14.
Obs: Om du vill ta bort flera segment 14
, räck-
er det att ta bort de båda yttre stiften.
Sätt ihop armbandsklockan igen genom att sätta
ihop de lossade segmenten 14 med ett stift.
Tryck in det i motsatt riktning mot pilen i nästa
segment 14.
©
Anpassa armbandsklocka
(modeller Z30299A / B)
Obs: Du behöver en håltång för detta arbetssteg.
OBSERVERA RISK FÖR KLÄMSKADOR!
Stoppa inte in fingrarna eller andra kroppsdelar
i håltången.
Stansa ett nytt hål på önskad plats i klockans
armband om du vill anpassa armbandsklockan.
©
Förkorta armbandsklocka
(modell Z30299D)
Obs: Armbandsklockan kan förkortas genom att
justera spännet 13 eller ta bort segment 14. Använd
medlevererad reparationssats 15.
©
Justera spänne (bild C)
Obs: Spännet 13 hålls i rätt position med en fjäder.
Placera kronografen i reparationssatsen 15 och
tryck ihop fjädern med mothållet 16 för att justera
spännet 13.
15
45
24H
04
08
20
16
12
40
10
50
20
15
45
24H
04
08
20
16
12
40
10
50
20
15
45
24H
04
08
20
16
12
40
10
50
20
A
B
10
2
1
3
11 12
4
8
5
6
9
7
C
13
15
Z30299D
16
D
14
15
Z30299D
16
lisätietoa kierrätyspisteistä ja aukioloajoista.
Vie paristot ja / tai laite keräyspisteeseen.
Vialliset ja käytetyt paristot on toimitettava kierrätyk-
seen direktiivin 2006 / 66 / EC mukaisesti. Palauta
paristot ja / tai laite tarjolla olevaan keräyslaitokseen.
Pb
Akkujen väärä hävittäminen
aiheuttaa ympäristövahinkoja!
Paristoja ei saa hävittää talousjätteenä. Ne voivat sisäl-
tää myrkyllisiä raskasmetalleja ja ne kuuluvat ongel-
majätekäsittelyyn. Raskasmetallien kemialliset merkit
ovat seuraavat: Cd = kadmium, Hg = elohopea,
Pb = lyijy. Toimita tästä syystä vanhat paristot kun-
nalliseen keräyspisteeseen.
66976_aur_Chronograph_A_B_D_Content_LB3.indd 1
28.07.11 17:00