Powerfix ALUMINIUM INSECT SCREEN BLIND Benutzerhandbuch
Dg h e f, Ab c, Kl m
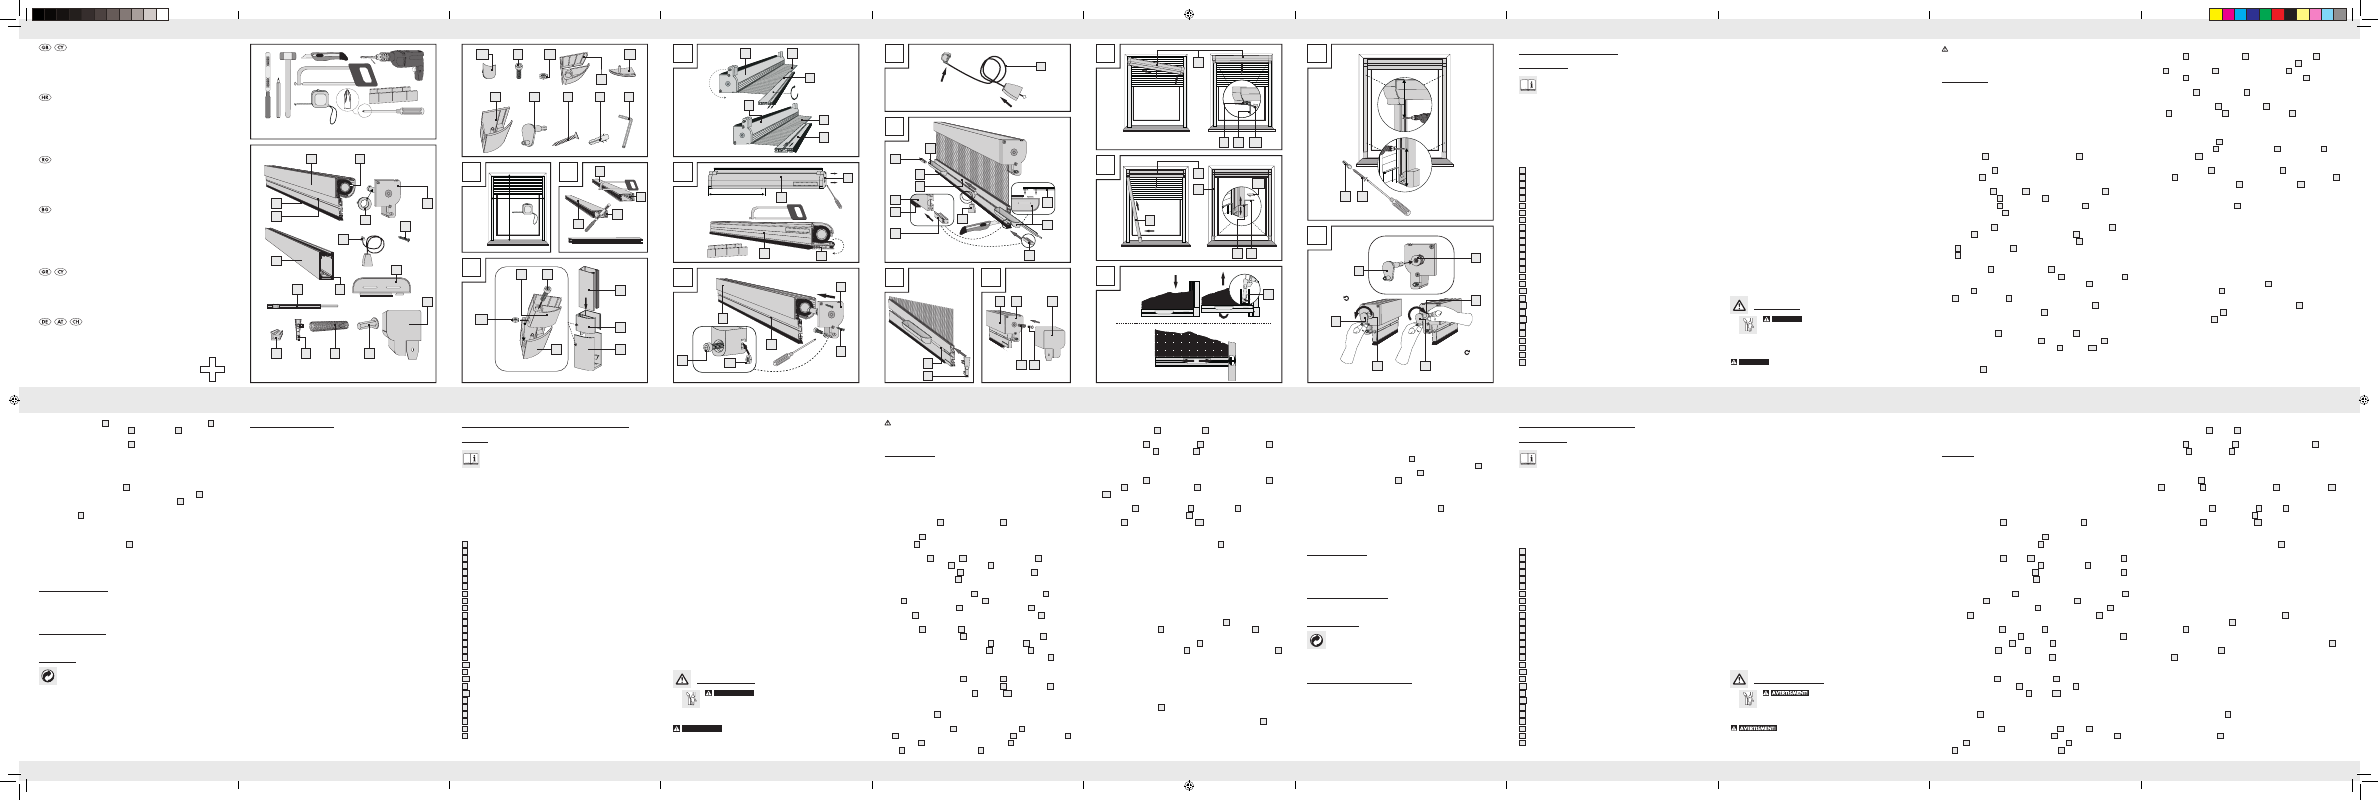
Pasul 9
Puneţi capacele terminale
9
pe mâner
1d
(vezi fi g. I).
Pasul 10
Puneţi arcurile
10
cu ştifturile de fi xare
11
în adâncitura capacului de carcasă
1a
şi puneţi
capacele fi nale
12
pe cutia de rulou
1
(vezi fi g. J).
Indicaţie: pentru următorii paşi de lucru solicitaţi ajutorul altei persoane, care vă ajută la
montarea ruloului de protecţie contra insectelor în ambrazura ferestrei.
Pasul 11
Aşezaţi cutia de rulou
1
în ambrazura ferestrei şi fi xaţi-o prin strângerea şuruburilor de fi xa-
re
13
în cutia de rulou
1
cu cheia hexagonală de interior
19
. Apoi puneţi capacele
12 a
(vezi fi g. K).
Pasul 12
Introduceţi şinele de ghidaj
2
sus în cutia ruloului
1
şi fi xaţi-le
2
în ambrazura ferestrei.
Fixaţi şinele prin strângerea şuruburilor de fi xare
13
la picioarele de fi xare cu ajutorul cheii
hexagonale de interior
19
. Apoi puneţi capacele
14 a
(vezi fi g. L).
Q
Blocarea, deschiderea şi închiderea ruloului
Dacă se trage ruloul de tot în jos, agăţaţi cârligul de închidere
7
. Pentru a desprinde ruloul,
apăsaţi-l uşor în jos şi în afară. Cârligele de închidere se desprind şi ruloul se poate deschide,
vezi fi g. M (I).
Atunci când mânerele se împing în exterior în stare montată, ruloul este fi xat. Dacă mânerele
se împing în interior, ruloul este liber. Ruloul poate fi fi xat la orice înălţime dorită, vezi fi g. M (II).
Q
Montajul alternativ (înşurubat)
Puteţi înşuruba de asemenea ruloul în ambrazura ferestrei (vezi fi g.N).
j
Pentru aceasta efectuaţi toţii paşii de la 1 până la 11. Măsuraţi apoi din partea de sus
şi cea de jos câte cca. 12 cm şi marcaţi pe şinele de ghidaj
2
orifi ciile de găurire.
j
Scoateţi din nou şinele de ghidaj
2
şi găuriţi cu un burghiu de 4 mm orifi ciile în şinele
de ghidaj
2
.
j
Marcaţi de asemenea pe ambrazura ferestrei orifi ciile de găurire şi găuriţi cu un burghiu
de 6 mm diametru pentru piatră. Curăţaţi orifi ciile de găurire şi introduceţi diblurile
18
.
j
Introduceţi şinele de ghidaj
2
apoi în ambrazura ferestrei ca în fi g. K şi fi xaţi-le cu şuru-
buri
17
.
Reglarea arcului de înfăşurare:
Indicaţie: Citiţi cu atenţie acest pas înainte de montaj şi priviţi fi gura O.
Tensionarea arcului de înfăşurare:
Ruloul de protecţie contra insectelor pentru fereastră este prevăzut din fabrică cu 23 de rotaţii
de manivelă. Dacă această reglare vi se pare prea redusă, puteţi mări tensionarea arcului
de înfăşurare. Pentru aceasta procedaţi după cum urmează:
j
Desprindeţi fi letul de siguranţă
20
cu o jumătate de rotaţie contrar sensului acelor de
ceasornic.
Atenţie: Nu eliberaţi manivela! Filetul de siguranţă iasă în afară. Întoarceţi
acum cu 5 rotaţii în aceeaşi direcţie. După ce aţi efectuat tensionarea, trebuie să fi xaţi
din nou fi letul de siguranţă
20
cu o jumătate de rotaţie în sensul acelor de ceasornic.
Atenţie: Nu apăsaţi cu putere!
ATENŢIE! PERICOL DE ACCIDENTARE! Asiguraţi ca toate componentele să fi e
nedeteriorate şi montate corect. În cazul unui montaj incorect există pericol de accidentare.
Componentele deteriorate pot infl uenţa siguranţa şi funcţionalitatea.
Q
Montaj
j
Asiguraţi-vă înainte de montaj că ambrazura ferestrei dvs. corespunde acestui produs şi nu
depăşeşte dimensiunea maximă. Aveţi nevoie de min. 6,5 cm de adâncime în ambrazură.
La nevoie solicitaţi ajutorul unei alte persoane la montaj.
Pasul 1
Măsuraţi înălţimea (H) şi lăţimea (B) ambrazurii ferestrei dvs. (vezi fi g.A).
Atenţie: luaţi în vedere eventualele diferenţe de lungime între ambrazura dreaptă şi stângă.
Pasul 2
Poziţionaţi barele de blocare
3
, care sunt împinse în şinele de ghidaj
2
, pe partea de tăiere
ulterioară astfel încât, să se îmbine cu muchia profi lului. Scădeţi din înălţimea măsurată H
6,5 cm şi aplicaţi măsura pe şinele dvs. de ghidaj
2
. Tăiaţi şinele cu un fi erăstrău pentru
fi er.
Atenţie: aveţi grijă ca barele de blocare
3
să nu se deplaseze (vezi fi g. B).
Pasul 3
Montaţi şurubul de strângere
13
cu piuliţa
13 a
în părţile interioare ale piciorului de fi xare
14
.
Îmbinaţi partea interioară a piciorului de fi xare
14
şi piciorul de fi xare
15
. Aveţi grijă ca lim-
ba din partea interioară a piciorului de fi xare
14
să intre în canalul de la piciorul de fi xare
15
.
Apoi îmbinaţi ambele părţi cu şina de ghidaj
2
(vezi fi g. C).
Pasul 4
Scoateţi ţesătura din fi bră de sticlă
1e
un pic în afară şi înfăşuraţi-o în jurul cutiei de rulou
1
astfel încât, ţesătura
1e
să nu poată intra înapoi în cutia de rulou
1
. La nevoie solicitaţi aju-
torul unei alte persoane. Trageţi acum mânerul
1d
de pe ţesătura din fi bră de sticlă
1e
. Întoar-
ceţi mânerul
1d
cu 180° şi împingeţi-l din nou pe ţesătura din fi bră de sticlă
1e
(vezi fi g. D).
Pasul 5
Demontaţi capacul carcasei
1a
al cutiei de rulou
1
pe partea de tăiere (marcată cu un au-
tocolant de mărime). Rabataţi mânerul
1d
, aşa cum se ilustrează în fi g. E , cu cutia de rulou
1
.
Atenţie: aveţi grijă ca mânerul
1d
şi cutia de rulou
1
să se îmbine pe partea de tăiere.
Tăiaţi acum cutia de rulou
1
şi mânerul
1d
la mărimea B -1,5 cm (vezi fi g. E). Finisaţi apoi
muchiile de tăiere cu o pilă.
Atenţie: cutia de rulou
1
poate fi scurtată datorită arcului de
înfăşurare la maxim 70 cm.
Pasul 6
Montaţi capacul carcasei
1a
din nou pe cutia de rulou
1
(vezi fi g. F). Aveţi grijă ca ciocul
ghidajului de la capacul de carcasă
1a
cât şi ciocul adaptorului
1b
să intre în canalul rolei
de ţesătură. Montaţi şurubul de strângere
13
cu piuliţa
13 a
în ambele capace de carcasă
(vezi fi g. F).
Pasul 7
Montaţi frânghia
4
, cum se ilustrează în fi g. G.
Pasul 8
Împingeţi mai întâi frânghia
4
şi apoi scoicile de mâner
5
cu cursorii
6
(din ambele
părţi) în canalul prevăzut pentru aceasta al mânerului
1d
. Scurtaţi etanşarea cu perii
8
al
mânerului
1d
cu în total 5 cm. Împingeţi cârligul de închidere
7
pe ambele părţi ale mâne-
rului
1d
în acelaşi canal în care se afl ă etanşarea cu perii
8
(vezi fi g. H).
Q
Specifi caţii tehnice
Dimensiuni maxime a ambrazurii ferestrei: 130 x 160 cm (Lx Î)
Q
Pachet de livrare
Indicaţie: În timpul despachetării aveţi grijă să nu aruncaţi din greşeală material de montaj.
După despachetare controlaţi dacă, pachetul de livrare este complet şi dacă, produsul şi
toate componentele sunt într-o stare ireproşabilă. Nu montaţi produsul în niciun caz dacă,
pachetul de livrare este incomplet.
1 Cutie de rulou cu mâner şi etanşare cu perii
1 Capac carcasă cutie de rulou (parte de tăiere)
2 Şuruburi pentru capacul de carcasă
1 Ţesătură din fi bră de sticlă
2 Şine de ghidaj
2 Bare de blocare
1 Frânghie
2 Scoici mâner
2 Cursoare
2 Cârlige de închidere
2 Capace terminale mâner
2 Arcuri
2 Ştifturi de fi xare
2 Capace fi nale cutie rulou
2 Capace şuruburi pentru capacul fi nal
4 Şuruburi de strângere pentru cutia de rulou şi şină de ghidaj
4 Piuliţe pentru şurubul de fi xare
2 Părţi interioare picior de fi xare
2 Capace şuruburi pentru partea interioară picior de fi xare
2 Picioare de fi xare
1 Manivelă
4 Şuruburi (montaj alternativ)
4 Dibluri (montaj alternativ)
1 Cheie hexagonală de interior
1 Manual de montaj
Indicaţii de siguranţă
J
PERICOLE DE MOARTE ŞI DE ACCIDENTARE
PENTRU SUGARI ŞI COPII! Nu lăsaţi niciodată copii nesupravegheaţi
în apropierea materialului de ambalaj şi produsului. Există pericol de asfi xiere
datorită materialului de ambalaj şi pericol de moarte prin ştrangulare. Deseori copii suba-
preciază pericolul. Nu păstraţi produsul la îndemâna copiilor. Acest produs nu este o jucărie.
PERICOL DE MOARTE! În timpul montajului, demontajului sau
curăţării nu vă aplecaţi prea mult în afara ferestrei.
Plasă împotriva insectelor tip rulou
Q
Introducere
Înainte de montare informaţi-vă cu privire la produs. Pentru aceasta citiţi cu atenţie
următoarele instrucţiuni de montaj şi indicaţiile de siguranţă. Folosiţi produsul
numai în modul descris şi numai în domeniile de utilizare indicate. Păstraţi bine
aceste instrucţiuni. În caz că, daţi produsul mai departe la terţi, înmânaţi de asemenea şi
documentaţia acestuia.
Q
Utilizare corespunzătoare
Acest articol este prevăzut ca protecţie contra insectelor şi muştelor în domeniul locativ privat.
Alte utilizări sau modifi cări la produs se consideră utilizare necorespunzătoare şi pot cauza
pericole ca de exemplu vătămări şi deteriorări. Producătorul nu îşi asumă răspunderea pentru
daunele rezultate din utilizarea necorespunzătoare. Produsul nu este proiectat pentru utilizare
industrială.
Q
Descrierea componentelor
1
Cutie rulou
1a
Capac carcasă cutie de rulou (parte de tăiere)
1b
Adaptor (montat pe capacul de carcasă)
1c
Şurub pentru capacul de carcasă
1d
Mâner
1e
Ţesătură din fi bră de sticlă
2
Şină de ghidaj
3
Bară de blocare
4
Frânghie
5
Scoică mâner
6
Cursor
7
Cârlig de închidere
8
Etanşare perie mâner
9
Capac terminal mâner
10
Arc
11
Ştift de fi xare
12
Capac fi nal cutie rulou
12 a
Capac şurub pentru capacul fi nal
13
Şurub de strângere pentru cutia de rulou şi şina de ghidaj
13 a
Piuliţă pentru şurubul de fi xare
14
Parte interioară picior de fi xare
14 a
Capac şurub pentru parte interioară picior de fi xare
15
Picior de fi xare
16
Manivelă
17
Şuruburi (montaj alternativ)
18
Diblu (montaj alternativ)
19
Cheie hexagonală de interior
20
Filet de siguranţă (montat la capacul carcasei (vezi fi g.O))
Uputa: Prethodno namještenim okretajima možete dodati ukupno 7 okretaja u suprot-
nome smjeru vrtnje kazaljke sata, kako bi postigli maksimalni napon pera za namotava-
nje (30 okretaja) (vidi prik. O).
Otpuštanje pera za namotavanje ako je previše zategnut:
j
Za to otpustite kao prvo opet sigurnosni navoj
20
sa pola okretaja u suprotnome smjeru
vrtnje kazaljke sata.
Pozor: Ne otpuštajte obrtaljku! Izvucite sigurnosni navoj
20
obr-
taljkom cca. 2 cm i zahvatite sad sigurnosni navoj
20
palcem i kažiprstom.
Pozor: Ne otpuštajte sigurnosni navoj
20
ni u kojem slučaju, jer se pero za namotavanje
inače potpuno opusti.
j
Izvodite sad željene okretaje u smjeru vrtnje kazaljke sata, kako bi ponovno zategli
pero. Pero se možete u prethodno namještenome stanju otpustiti za maks. 7 okretaja.
Nakon otpuštanja, trebate oprezno ugurati sigurnosni navoj
20
u kutiju roletne i blokirati
sa pola okretaja u suprotnome smjeru vrtnje kazaljke sata (vidi prik. O).
Pozor: Ne priti-
skajte naknadno silom!
Uputa: Ako Vam sigurnosni vijak ipak isklizne iz ruke, trebate
pero za namotavanje sukladno odlomku »Zatezanje pera za namotavanje« ponovno
zategnuti.
Q
Čišćenje i njega
J
Ne rabite ni u kojem slučaju nagrizajuća ili ribajuća sredstva za čišćenje.
j
Čistite tkaninu od staklenih vlakana i okvir lagano navlaženom krpom, bez sitnih vlakanaca.
j
Rabite eventualno blago sredstvo za čišćenje.
Q
Video za sastavljanje
Video za sastavljanje na www.feinheim.de
Q
Zbrinjavanje
Ambalaža i materijal ambalaže se sastoje isključivo od materijala prikladnih za
okoliš. Zbrinite ih u lokalnim posudama za reciklažu.
Mogućnosti za zbrinjavanje korištenog komada namještaja možete saznati od vaše općinske
ili gradske uprave.
Q
Proizvođač / Servisna služba
FeinHeim GmbH
Bischof-Otto-Str. 60
D-94486 Osterhofen
Telefonska servisna služba: +49-9932-40 25 897
Email: [email protected]
Stanje informacija: 02 / 2011
Ident.-No.: 022011-7
RO
RO
RO
RO
HR
HR
HR
HR
HR
GB/CY
GB/CY
GB/CY
Korak 9
Nataknite završne poklopce
9
na zahvatnu letvicu
1d
(vidi prik. I).
Korak 10
Utaknite tlačne opruge
10
sa steznim elementima
11
u udubljenje poklopca kućišta
1a
i
postavite završne poklopce
12
na kutiju roletne
1
(vidi prik. J).
Uputa: Za slijedeće radne korake zatražite pomoć od druge osobe, koja Vam može pomoći
pri montaži roletne za zaštitu od insekata u niši prozora.
Korak 11
Ukliještite kutiju roletne
1
u nišu prozora i učvrstite kutiju, pritezanjem steznih vijaka
13
na
kutiji roletne
1
šesterobridnim usadnim ključem
19
. Nakon toga postavite završne poklop-
ce
12 a
(vidi prik. K).
Korak 12
Udijenite tračnice
2
odozgo u kutiju roletne
1
i pritegnite tračnice
2
u niši prozora.
Učvrstite tračnice, pritezanjem steznih vijaka
13
na steznim elementima šesterobridnim usad-
nim ključem
19
. Nakon toga postavite poklopce
14 a
(vidi prik. L).
Q
Zapiranje, otvaranje i zatvaranje roletne
Ako se roletnu potegne potpuno prema dolje, zaporne kuke
7
se zakvače. Kako bi otpustili
roletnu, pritisnite je lagano prema dolje i vani. Zaporne kuke se otpuste i roletnu se može
otvoriti, vidi prik. M (I).
Ako se držke u ugrađenom stanju gurne prema vani, roletnu se učvrsti. Gurne se držke ponovno
prema unutra, roletna je slobodna. Roletnu se može na učvrstiti na bilo kojoj visini, vidi prik.
M (II).
Q
Alternativna montaža (vijčano pričvršćenje)
Roletnu za prozor možete također vijčano pričvrstiti u niši prozora (vidi prik. N).
j
Za to izvodite sve korake od 1 do 11. Nakon toga izmjerite na gornjoj i donjoj strani
po cca. 12 cm i ucrtajte mjesto za bušotine na tračnicama
2
.
j
Ponovno izvadite tračnice
2
i izbušite svrdlom od 4 mm rupe u tračnice
2
.
j
Ucrtajte na niši prozora također mjesta za bušotine i izbušite rupe svrdlom za kamen od
ø 6 mm. Pročistite bušotine i umetnite usadice
18
.
j
Nakon toga ponovno postavite tračnice
2
sukladno prik. K u niši i pričvrstite ih vijcima
17
.
Namještanje pera za namotavanje:
Uputa: Prije montaže pomno pročitajte ovaj korak i točno pogledajte prik. O.
Zatezanje pera za namotavanje:
Roletna za zaštitu od insekata je tvornički opremljena sa 23 okretaja obrtaljke. Ako Vam je
to namještanje premalo, možete povećati napon pera za namotavanje. Postupite za to na
slijedeći način:
j
Otpustite sigurnosni navoj
20
sa pola okretaja u suprotnome smjeru vrtnje kazaljke
sata.
Pozor: Ne otpuštajte obrtaljku! Sigurnosni navoj vidljivo istupi. Okrećite sad u
istome smjeru 5 okretaja dalje. Nakon što je se stvorio napon, sigurnosni navoj
20
treba
ponovno oprezno zaglaviti sa pola okretaja u smjeru vrtnje kazaljke sata.
Pozor: Ne
pritiskajte naknadno silom!
OPREZ! OPASNOST OD OZLJEDA! Osigurajte, da su svi dijelovi neoštećeni i
stručno montirani. U slučaju nestručne montaže prijeti opasnost od ozljeda. Oštećeni dijelovi
mogu utjecati na sigurnost i funkciju.
Q
Sastavljanje
j
Prije montaže, uvjerite se u to da je niša Vašeg prozora prikladna za ovaj proizvod, te
da ne prekoračuje maksimalne mjere. Potrebno Vam je najm. 6,5 cm u dubinu niše. Za
montažu zatražite eventualno pomoć od druge osobe.
Korak 1
Izmjerite visinu (H) i širinu (B) niše Vašeg prozora (vidi prik. A).
Pozor: Vodite računa o mogućim razlikama duljine između lijeve i desne niše prozora.
Korak 2
Usmjerite zaporne letvice
3
, koje su ugurane u tračnice
2
, na kasnijoj strani rezanja tako
da točno priliježu zu rub profi la. Oduzmite od izmjerene visine H 6,5 cm i prenesite mjeru
na Vaše tračnice
2
. Izrežite tračnice čeličnom pilom.
Pozor: Vodite računa o tome, da se
zaporne letve
3
ne pomaknu (vidi prik. B).
Korak 3
Ugradite stezni vijak
13
sa maticom
13 a
u unutranji dio steznog elementa
14
. Sastavite
unutarnji dio steznog elementa
14
i stezni element
15
. Vodite računa o tome, da vezica na
unutarnjem dijelu steznog elementa
14
upadne u utor steznog elementa
15
. Nakon toga
spojite oba elementa sa tračnicom
2
(vidi prik. C).
Korak 4
Izvucite malo tkaninu od staklenih vlakana
1e
i zamotajte ju oko kutije roletne
1
, kako se
tkanina
1e
nebi ponovno uvukla u kutiju roletne
1
. Zatražite eventualno pomoć od druge
osobe. Skinite sad zahvatnu letvicu
1d
sa tkanine od staklenih vlakana
1e
. Zaokrenite za-
hvatnu letvicu
1d
za 180° i gurnite je ponovno u tkaninu od staklenih vlakana
1e
(vidi prik. D).
Korak 5
Skinite poklopac
1a
sa kutije roletne
1
na strani rezanja (označeno naljepnicom sa nazna-
kom mjere). Sklopite zahvatnu letvicu
1d
, sukladno prik. E, sa kutijom roletne
1
.
Pozor: Vodite računa o tome, da zahvatna letvica
1d
i kutija roletne
1
točno priliježu jedno
zu drugo na strani rezanja. Izrežite sad kutiju roletne
1
i zahvatnu letvicu
1d
na mjeru B -1,5 cm
(vidi prik. E). Nakon toga izbrusite rezne rubove turpijom.
Pozor: Kutiju roletne
1
može
se zbog pera za namotavanje maksimalno skratiti na 70 cm.
Korak 6
Ponovno montirajte poklopac kućišta
1a
na kutiju roletne
1
(vidi prik. F). Vodite računa o
tome, da nos tračnice koja se nalazi na poklopcu kućišta
1a
kao i nos adaptera
1b
zahvate
u utoru svitka tkanine. Ugradite stezni vijak
13
sa maticom
13 a
u oba poklopca kućišta (vidi
prikaz F).
Korak 7
Sastavite poteznu vrpcu
4
, sukladno prik. G.
Korak 8
Kao prvo gurnite poteznu vrpcu
4
i nakon toga zahvatne školjke
5
sa posmičnim zapori-
ma
6
(s obje strane) u za to predviđeni utor zahvatne letvice
1d
. Skratite kefasto brtvilo
8
zahvatne letvice
1d
za najmanje 5 cm. Gurnite zaporne kuke
7
na obim stranama zahvatne
letvice
1d
u isti utor u kojoj leži kefasto brtvilo
8
(vidi prik. H).
Q
Tehnički podaci
Maks. mjere niše prozora: 130 x 160 cm (š x v)
Q
Opseg pošiljke
Uputa: Tijekom otpakiranja vodite računa o tome, da ne bacite nehotice montažni material.
Odmah nakon otpakiranja provjerite potpunost opsega pošiljke, kao i besprijekorno stanje
proizvoda i svih pripadajućih dijelova. Ne montirajte proizvod ni u kojem slučaju, ako opseg
pošiljke nije potpun.
1 kutija roletne sa zahvatnom letvicom i kefastim brtvilom
1 poklopac kućišta kutije roletne (strana rezanja)
2 vijka za poklopac kućišta
1 tkanina od staklene vune
2 tračnice
2 zaporne letvice
1 potezna vrpca
2 zahvatne školjke
2 posmična zapora
2 zaporne kuke
2 završna poklopca zahvatne letvice
2 tlačne opruge
2 stezna elementa
2 završna poklopca kutije roletne
2 poklopca za vijak završnog poklopca
4 stezna vijka kutije roletne i tračnice
4 matice za stezni vijak
2 unutarnja stezna elementa
2 poklopca za vijke unutarnje dijela steznog elementa
2 stezna elementa
1 obrtaljka
4 vijka (alternativna montaža)
4 usadice (alternativna montaža)
1 šesterobridni usadni ključ
1 uputstvo za montažu
Sigurnosne upute
J
UPOZORENJE!
OPASNOST PO ŽIVOT I OD NEZGODE
ZA DJECU! Ne ostavljajte djecu nikad bez nadzora u blizini omotnog ma-
terijala i proizvoda. Prijeti opasnost od zagušenja omotnim materijalom i
opasnost po život od davljenja. Djeca često podcjenjuju opasnosti. Držite djecu uvijek
podalje od proizvoda. Proizvod nije igračka.
UPOZORENJE!
OPASNOST PO ŽIVOT! Pri montaži, demontaži ili čišćenju, ne
naslanjajte se predaleko kroz prozor.
Aluminijski rolo za prozor sa zaštitom od insekata
Q
Uvod
Upoznajte se s proizvodom prije montiranja. Pažljivo pročitajte sljedeće upute za
montiranje te sigurnosne upute. Koristite ovaj proizvod u skladu s navedenim
uputama te u navedene svrhe. Sačuvajte ove upute vrlo dobro. Ukoliko proizvod
dajete nekoj drugoj osobi, predajte toj osobi također i sve upute.
Q
Namjena
Ovaj proizvod je namijenjen kao zaštita protiv insekata, kao npr. muha u stambenom prostoru.
Svaka druga uporaba, koja odstupa od prethodno opisane, ili promjena proizvoda nije
dozvoljena i može prouzročiti ozljede i / ili oštećenje proizvoda. Proizvođač ne preuzima
nikakvu odgovornost za štete nastale od nenamjenske uporabe. Proizvod nije namijenjen za
komercijalne svrhe.
Q
Opis dijelova
1
kutija roletne
1a
poklopac kutije roletne (strana rezanja)
1b
adapter (ugrađen za poklopcu kućišta)
1c
vijak za poklopac kućišta
1d
zahvatna letvica
1e
tkanina od staklenih vlakana
2
tračnica
3
zaporna letvica
4
potezna vrpca
5
zahvatna školjka
6
posmični zapor
7
zaporna kuka
8
kefasto brtvilo zahvatne letvice
9
poklopac zahvatne letvice
10
tlačna opruga
11
stezna nožica
12
završni poklopac kutije roletne
12 a
poklopac vijka za završni poklopac
13
stezni vijak kutije roletne i tračnice
13 a
matica za stezni vijak
14
unutarnji dio steznog elementa
14 a
poklopac vijka za stezni element
15
stezni element
16
obrtaljka
17
vijci (alternativna montaža)
18
usadica (alternativna montaža)
19
šesterobridni usadni ključ
20
sigurnosni navoj (ugrađen na poklopcu kućišta (vidi prik. O))
Q
Manufacturer / Service
FeinHeim GmbH
Bischof-Otto-Str. 60
D-94486 Osterhofen
Service hotline: +49-9932-4025 897
E-mail: [email protected]
Last Information Update: 02 / 2011
Ident no.: 022011-7
j
Release the locking thread
20
through a half-turn anticlockwise using the crank
16
.
Attention: Do not let go of the crank
16
. The locking thread
20
can be seen to move
out. Now turn the crank 5 turns in the same direction. After successfully tensioning the
spring, you must turn the locking thread
20
carefully through a half-turn clockwise to
lock it again.
Attention: Do not use too much force when relocking.
Note: You can add 7 turns anticlockwise to the preset 23 turns to bring the retractor
spring to its maximum tension (30 turns) (see Fig. O).
Detensioning the retractor spring if it has too much tension:
j
To do this, release the locking thread
20
again through a half-turn anticlockwise using
the crank.
Attention: Do not let go of the crank. Draw the locking thread
20
approx.
2 cm outwards using the crank and then grip the locking thread
20
between your
thumb and index fi nger.
Attention: Do not, under any circumstances, let go of the
locking thread
20
, otherwise the retractor spring will become completely detensioned.
j
Now turn the crank the desired number of turns clockwise to reduce the tension in the
retractor spring. From the factory preset tension, you can turn the crank a maximum
number of 7 turns clockwise to detension the spring. After successfully reducing the tension,
you must now move the locking thread
20
carefully into the roller blind cassette and
then lock it by turning it through a half-turn anticlockwise (see Fig. O).
Attention: Do
not use too much force when relocking.
Note: If the locking thread slips out of your fi n-
gers, then you must retension the retractor spring as described in the section “Tensioning
the retractor spring”.
Q
Cleaning and care
J
Do not under any circumstances use corrosive or abrasive cleaning agents.
j
Clean the fi breglass fabric and frame with a lint-free, slightly damp cloth.
j
Use a mild cleaning agent where necessary.
Q
Installation video
For installation video visit www.feinheim.de.
Q
Disposal
The packaging is made entirely of recyclable materials, which you may dispose
of at local recycling facilities.
Contact your local refuse disposal authority for more details of how to dispose of your
worn-out product.
Step 8
Slide the cord
4
fi rst and then the handles
5
along with the sliding stop bars
6
(from
both ends) into the slot provided for that purpose in the handle profi le
1d
. Shorten the brush
seal
8
of the handle profi le
1d
by a total of 5 cm. Push the clips
7
on both ends of the
handle profi le
1d
into the same slot as the one in which the brush seal sits
8
(see Fig. H).
Step 9
Place the end caps
9
on the handle profi le
1d
(see Fig. I).
Step 10
Insert the compression springs
10
and the friction pins
11
into the recess of the cassette end
cover
1a
and place the end caps
12
on to the roller blind cassette
1
(see Fig. J).
Note: Call in a second person capable of helping you with the next few steps in the instal-
lation of the insect screen window roller blind into the window reveal.
Step 11
Clamp the roller blind cassette
1
into the window reveal and fi x the cassette in place by
tightening the clamping bolts
13
on the roller blind cassette
1
using the Allen key
19
. Then
put on the end caps
12 a
(see Fig. K).
Step 12
Thread the guide channels
2
top into the roller blind cassette
1
and clamp the guide
channels
2
in the window reveal. Fix the channels in place by tightening the clamping bolts
13
to the clamping ends using the Allen key
19
. Then put on the end caps
14 a
(see Fig. L).
Q
Stopping, opening and closing the blind
If the blind is pulled down fully, the clips
7
engage. To release the blind, press it downwards
and outwards (towards the window). The clips release and the blind can be opened, see
Fig. M (I).
Sliding the handles towards the sides of the blind (with reference to the blind in the installed
position) fi xes the blind in position. Sliding the handles inwards from the sides of the blind
again releases the blind. The blind can be stopped at any intermediate height, see Fig. M (II).
Q
Alternative installation (screwed)
You can also screw the window roller blind into the window reveal (see Fig. N).
j
To do this, follow Steps 1 to 11. Then measure approx. 12 cm in from the top and bottom
and mark the hole positions on the guide channels
2
.
j
Remove the guide channels
2
again and drill the holes in them using a 4 mm drill bit.
j
Mark the positions of the holes on the window reveal and drill the holes with a ø 6 mm
masonry drill bit. Clean out the drilled holes and insert the dowels
18
.
j
Then put the guide channels
2
back into the reveal as shown in Fig. K and fasten them
in place with the screws
17
.
Setting the retractor spring:
Note: Read through this step carefully and refer closely to Fig. O.
Tensioning the retractor spring:
The insect screen window roller blind is set in the factory with 23 crank rotations. If you fi nd
this setting is too low, you can increase the tension of the retractor spring. To do this, proceed
as follows:
CAUTION! RISK OF INJURY! Ensure that all parts are undamaged and have
been assembled appropriately. Risk of injury exists if assembled incorrectly. Damaged
parts can eff ect safety and function.
Q
Installation
j
Check before installation that your window reveal is suitable for this product and does
not exceed the maximum allowable dimensions. The depth of the reveal must not be less
than 6.5 cm. If necessary, have a second person help you with the installation.
Step 1
Measure the height (H) and width (B) of your window reveal (see Fig. A).
Attention: Take into account any diff erences in length between the left and right window
reveal.
Step 2
Align the stop strips
3
, which are inserted into the guide channels
2
, on the later sawn end
fl ush with the profi le edge. Subtract 6.5 cm from the measured height H and transfer this value
on to the guide channels
2
. Cut the channels to length using a hacksaw.
Attention: Ensure
that the stop strips
3
do not become displaced (see Fig. B).
Step 3
Insert the clamping bolt
13
and the nut
13 a
into the clamping end internal part
14
. Put the
clamping end internal part
14
and clamping end
15
together. Ensure that the lug on the
clamping end internal part
14
slides into the slot in the clamping end
15
. Then push the two
parts on to the guide channel
2
(see Fig. C).
Step 4
Pull the fi breglass fabric
1e
slightly out and wrap it around the roller blind cassette
1
, so
that the fabric
1e
cannot move back into the roller blind cassette
1
. If necessary, obtain
the assistance of a second person. Now pull off the handle profi le
1d
from the fi bre glass
fabric
1e
. Turn the handle profi le
1d
through 180° and slide it back on to the fi breglass
fabric
1e
(see Fig. D).
Step 5
Take off the end cover
1a
of the roller blind cassette
1
from the cut end (identifi ed with
self-adhesive measurement label). Bring the handle profi le
1d
and the roller blind cassette
1
together as shown in Fig. E.
Attention: Ensure that the handle profi le
1d
and the roller
blind cassette
1
are fl ush with one another on the cut end. Now cut the roller blind cas-
sette
1
and the handle profi le
1d
to the length B -1.5 cm (see Fig. E). Then remove any
burrs from the sawn edges using a fi le.
Attention: The roller blind cassette
1
has a retractor
spring, which means that the roller blind cassette
1
can be sawn no shorter than 70 cm in
length.
Step 6
Fix the cassette end cover
1a
back on to the roller blind cassette
1
(see Fig. F). Ensure that
the tab of the locator on the cassette end cover
1a
and the tab on the adapter
1b
engage
in the slot of the blind fabric roll. Insert the clamping bolt
13
and the nut
13 a
into both the
cassette end covers (see Fig. F).
Step 7
Assemble the cord
4
as shown in Fig. G.
Q
Technical data
Max. dimensions of the window reveal: 130 x 160 cm (W x H)
Q
Included in delivery
Note: When opening the packaging, please make sure not to accidentally throw away
assembly materials. Please check immediately on unpacking that the delivery is complete
and that the product and all parts are in perfect condition. Do not under any circumstances
assemble the product if the delivery is incomplete.
1 Roller blind cassette with handle profi le and brush seal
1 Cassette end cover (cut end)
2 Screws for cassette end cover
1 Fibreglass fabric
2 Guide channels
2 Stop strips
1 Cord
2 Handles
2 Sliding stop bars
2 Clips
2 Handle profi le end caps
2 Compression springs
2 Friction pins
2 Cassette end caps
2 Bolt covers for end cap
4 Clamping bolts for roller blind cassette and guide channel
4 Nuts for clamping bolt
2 Clamping end internal parts
2 Bolt covers for clamping end internal parts
2 Clamping ends
1 Crank
4 Screws (alternative installation)
4 Dowels (alternative installation)
1 Allen key
1 Installation instructions
Safety advice
J
WARNING!
RISK OF FATAL INJURY AND RISK OF ACCI-
DENTS FOR INFANTS AND CHILDREN! Never leave children unattend-
ed with the packaging material or the product. There is a risk of suff ocation
from the packaging materials and a risk of fatal injury by strangulation. Children often
underestimate dangers. Always keep children away from the product. The product is not
a toy.
WARNING!
RISK OF LOSS OF LIFE! Do not lean too far out of the window when
you are installing, removing or cleaning the product.
Aluminium Insect Screen Blind
Q
Introduction
Please familiarise yourself with the product prior to assembly. Carefully read the
following assembly instructions and safety tips. Only use the unit as described and
for the specifi ed applications. Store these instructions in a safe place. If passing
this product on to a third party also include all documents.
Q
Intended Use
This article is designed to provide protection against insects such as fl ies and is intended for
indoor use only. Any use other than previously mentioned or any product modifi cation is pro-
hibited and can lead to injuries and / or product damage. The manufacturer is not liable for
any damages caused by any use other than for the intended purpose. The product is not
intended for commercial use.
Q
Description of parts and features
1
Roller blind cassette
1a
Cassette end cover (cut end)
1b
Adapter (placed on cassette end cover)
1c
Screw for cassette end cover
1d
Handle profi le
1e
Fibreglass fabric
2
Guide channel
3
Stop strip
4
Cord
5
Handle
6
Sliding stop bar
7
Clip
8
Brush seal handle profi le
9
Handle profi le end cap
10
Compression spring
11
Friction pin
12
Cassette end cap
12 a
Bolt cover for end cap
13
Clamping bolt for roller blind cassette and guide channel
13 a
Nut for clamping bolt
14
Clamping end internal part
14 a
Bolt cover for clamping end internal part
15
Clamping end
16
Crank
17
Screws (alternative installation)
18
Dowel (alternative installation)
19
Allen key
20
Locking thread (installed in cassette end cover (see Fig. O))
GB/CY
GB/CY
GB/CY
ALU-INSEKTENSCHUTZ-
FENSTERROLLO
Montage- und Sicherheitshinweise
ALUMINIJSKI ROLO ZA
PROZOR SA ZAŠTITOM OD
INSEKATA
Napomene za montažu i sigurnosne napomene
ΠΡΣΤΑΤΕΥΤΙΚΟ ΕΝΤΟΜΩΝ
ΠΑΡΑΘΥΡΟΥ, ΣΕ ΡΟΛΟ
Οδηγίες συναρμολόγησης και ασφάλειας
PLASĂ ÎMPOTRIVA INSECTELOR
TIP RULOU
Instrucţiuni de montare şi de siguranţă
АЛУМИЕВА ЩОРА ЗА
ПРОЗОРЕЦ ПРОТИВ
НАСЕКОМИ
Инструкции за монтаж и безопасност
ALUMINIUM INSECT SCREEN
BLIND
Assembly and safety advice
7
3 m
1
1 x
1c
2 x
5
2 x
12
2 x
6
2 x
7
2 x
10
2 x
11
2 x
9
2 x
1b
1 x
3
1 x
1 e
1 x
8
1 x
2
2 x
4
1 x
1a
1 x
1d
1 x
D
G
H
E
F
12 a
2 x
4 x
13 a
2 x
4 x
13
2 x
15
1 x
16
4 x
17
4 x
18
1 x
19
2 x
14
14 a
3 m
A
B
C
2
3
1d
1e
8
7
4
8
7
1d
1d
1a
1d
3
14
15
13
9
1d
15
13 a
13
2
2
1
1
1 e
1
1d
1d
4
7
6
5
5
1
1c
10
12
1
1a
11
1
1a
14
H
H - 6,5 cm
180°
B
min. 70 cm
B - 1,5 cm
13 a
I
J
ø 4 mm
ø 6 mm
K
L
M
12 a
19
13
1
1
14 a
19
13
(I)
(II)
2
2
7
-
+
N
O
18
17
ca. 12 cm
ca. 12 cm
max. 7
max. 7
16
20
20
16
16
20
You need · Potrebno Vam je · Aveţi nevoie de următoarele
Необходими са Ви · Χρειάζεστε · Sie benötigen:
61065_Insektenschutz-Fensterrollo_Content_LB7.indd 1
25.02.11 15:09