Multi-Contact MA265 Benutzerhandbuch
Seite 7
Advanced Contact Technology
Advanced Contact Technology
12 / 16 www.multi-contact.com
www.multi-contact.com
13 / 16
19
20
(ill. 19)
Nachdem der Anpressvorgang beendet ist kann der Druck-
stempel wieder in seine Ausgangsposition gebracht werden�
Das komplette Hilfswerkzeug muss nun senkrecht nach oben
angehoben werden bzw� das PV-Modul senkrecht nach unten
abgesenkt werden� Der Absenk- bzw� Anhebeweg muss min�
20 mm betragen, damit die Paneldose aus Ihrer Aufnahme
befreit ist� Erst jetzt darf das komplette Hilfswerkzeug oder das
PV-Modul seitlich weggeschwenkt werden�
(ill.19)
When the pressing-on process is completed, the pressure pad
can be returned to ist starting position� The complete auxiliary
tool must now be lifted vertically, or the PV module lowered ver-
tically. The raising or lowering distance must be at least 20 mm
in order fully to release the junction box from ist mounting�
Only now may the complete auxiliary tool or the PV module be
pivoted away to the side�
Wichtiger Hinweis zur Klebeverbindung
Important note on the adhesive bond
Nach dem korrekten Aufsetzen der Paneldose benötigt die
Klebeverbindung ca� 72 Stunden zum vollständigen Abbinden�
Erst nach dieser Zeit hat die Klebeverbindung ihre endgültige
Festigkeit und darf der Umgebungsfeuchtigkeit ausgesetzt
oder Reinigungsarbeiten unterzogen werden�
Normales Handling (Transport etc�) ist schon kurz nach der
Klebung möglich.
After the junction box has been correctly fixed in place, the ad-
hesive bond needs approximately 72 hours to cure completely�
Only after this time does the bond have the necessary imperme-
ability so that it can be exposed to environmental moisture or
subjected to cleaning operations� Normal handling (transport) is
already possible a short time after bonding�
Auch nach Ablauf dieser 72 h ist darauf zu achten, dass die
Anschlussdose keinem übermässigen und/oder dauerhaftem
Druck/Schub durch horizontales oder vertikales Stapeln der
Module oder Zug/Druck durch die Anschlusskabel ausgesetzt
sind� Bitte beachten Sie dazu auch die Sicherheitshinweise auf
Seite 2 dieser Montageanleitung�
Even after 72 hours, make sure that the junction box is not sub-
jected to excessive and/or sustained pressure/pushing as a result
of horizontal or vertical stacking of the module or tension/pres-
sure from connecting cables� Please note all the safety instruc-
tions on page 2 of these assembly instructions�
Hinweise zur Montage der Paneldose auf das
PV-Modul ohne Zuhilfenahme des MC Hilfs-
werkzeugs PV-JB-WZ LC SP
Notes on the fixing of the junction box on the PV
module without the use of the MC auxiliary tool
PV-JB-WZ LC SP
Wir empfehlen für die sachgerechte Montage der Paneldosen
unbedingt die Verwendung des MC Hilfswerkzeugs
PV-JB-WZ LC SP� Dieses Hilfswerkzeug wurde speziell
entwickelt, um bei der Montage die richtige Position der Pa-
neldose relativ zum Austritt der Kontaktbändchen zu erzielen�
Nur durch die genaue Einhaltung der auf den Seiten 5 bis
10 angegebenen Vorgehensweise und der dort angegebe-
nen Einrichtmasse kann eine korrekte Montage garantiert
werden�
For the correct mounting of the junction boxes we recommend
that the MC tool
PV-JB-WZ LC SP should always be used�
This tool has been specially developed to ensure that the junc-
tion box is correctly positioned in relation to the contact ribbon
outlet� Correct mounting cannot be guaranteed unless the
instructions on pages 5 to 10 and the setup dimensions stated
there are carefully observed�
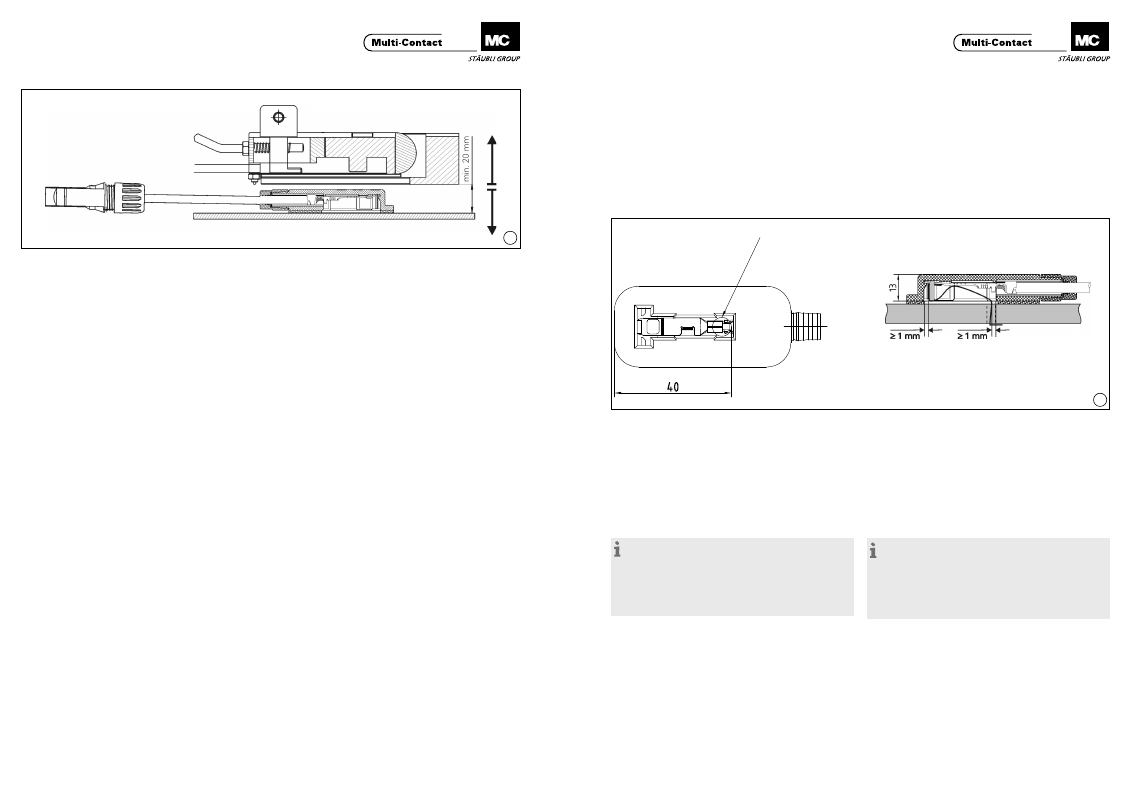
(ill. 20)
Ill� 20 zeigt die Geometrie der Dose un d des Kontaktbänd-
chenaustritts im montierten Zustand, wenn die Montage
gemäss den Seiten 5 bis 10 dieser Anleitung durchgeführt
wurde�
(ill. 20)
Ill� 20 shows the geometry of the junction box and the contact
ribbon outlet after the junction box has been fixed in place, if
this has been done in accordance with pages 5 to 10 of these
instructions�
Für den Fall, dass Sie dennoch auf das MC Hilfswerkzeug
verzichten und ein eigenes Verfahren / eigenes Hilfswerkzeug
zur Anwendung bringen möchten, soll Ihnen ill. 20 als Orien-
tierung dienen�
If you nevertheless decide to work without the special MC tool
and to use your own method or an auxiliary tool of your own,
you can use ill� 20 as a guide�
Hinweis:
Die Länge des Kontaktbändchens muss auf das Montage-
verfahren abgestimmt sein.
Nach der Montage der Paneldose darf das Kontaktbändchen
keine Berührung mit der Klebefolie haben. Der Abstand
muss mindestens 1 mm betragen.
Stellen Sie sicher, dass die Bändchen im Doseninneren
keinen Kurzschluss verursachen.
Note:
The length of the contact ribbon must be adapted to the
installation procedure.
After the junction box has been fixed in place, there must be
no contact between the contact ribbon and the adhesive foil.
The spacing must be at least 1 mm.
Make sure that the ribbons inside the box cannot cause short
circuits.
Austrittsbohrung des Kontaktbändchens
Exit hole for contact ribbon
Mindestabstand des Kontaktbändchens zur Klebefolie
im montierten Zustand: 1mm!
Minimum distance between contact ribbon and adhesive foil
after mounting: 1mm!