Safety instructions / before use / use, Before use, Assembling the multipurpose scaffold / ladder – Powerfix Z29798 Benutzerhandbuch
Seite 6: Disassembling the multipurpose scaffold / ladder, Assembling the standing ladder, Disassembling the standing ladder, Assembling the leaning ladder, Disassembling the leaning ladder
6 GB/IE/CY
Safety instructions / Before use / Use
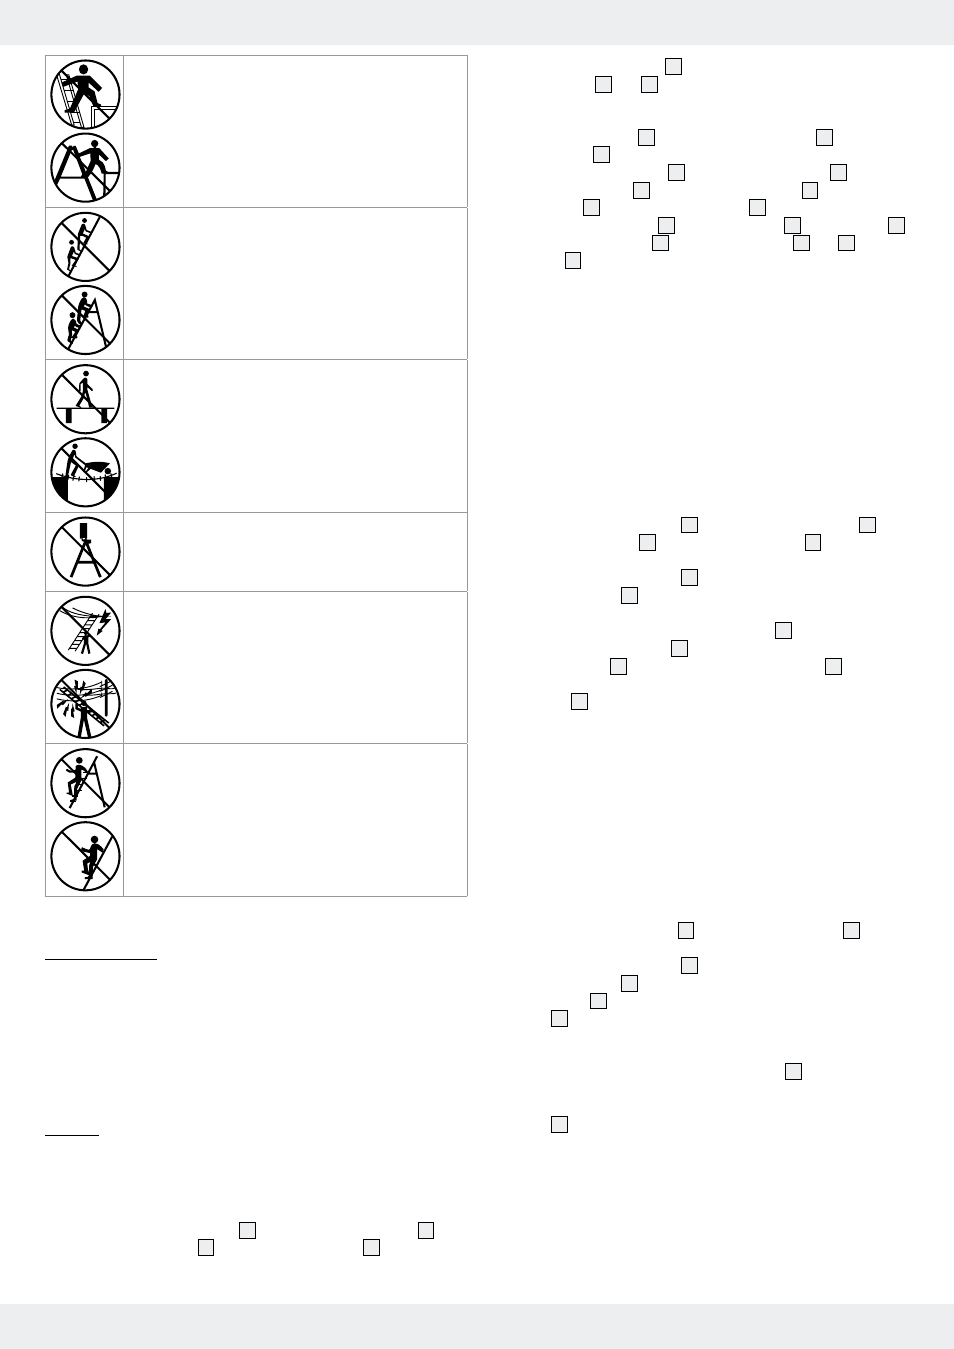
Do not step off the side of a ladder
Only one per ascendable leg of the ladder / stepladder
Do not use the ladder as a bridge
Do not stand on the top tread
Ensure that no part of the ladder comes into contact
with a live cable
Face ladder when ascending or descending ladder
Q
Before use
j
Avoid damaging ladders when transporting them on a roof rack or on the
back of a lorry. Ensure that the ladder is appropriately fastened in place.
j
Remove any foreign material such as wet paint, dirt, oil or snow from the
multipurpose scaffold / ladder.
j
Lock all doors and windows (but not emergency exits) in the working
area of the multipurpose scaffold / ladder.
Q
Use
Q
Assembling the multipurpose scaffold / ladder
note: If possible have a second person help you with the assembly.
1. Mount the short base stabiliser
4
to the narrow ladder section
2
and
the long base stabiliser
1
to the wide ladder section
3
, as shown in
Figure A.
2. Attach the working platform
5
to the rung at the desired height on both
ladder sections
2
and
3
(Figure B).
note: Ensure that the maximum standing height of 100 cm is not
exceeded (Figure F).
3. Insert the plastic sleeve
16
to the narrow ladder section
2
and the wide
narrow section
3
.
4. Insert the short threaded rod
11
each with a plain washer
15
to the
narrow ladder section
2
and the long threaded rod
12
each with a
plain washer
15
to the wide ladder section
3
.
5. Connect the diagonal struts
6
with the slotted bolt
8
and the locknut
13
.
6. Attach the diagonal struts
6
to the ladder sections
2
and
3
using the
wing nuts
7
.
Q
Disassembling the multipurpose scaffold / ladder
j
Disassemble the multipurpose scaffold / ladder in the reverse order to that
described in the section “Assembling the multipurpose scaffold / ladder”.
Q
Assembling the standing ladder
J
Avoid any tasks in which a lateral load is placed on the standing ladder,
e.g. drilling sideways into solid material (e.g. masonry or concrete).
J
Do not use the standing ladder as a means of ascending on to another
level.
1. Mount the short base stabiliser
4
to the narrow ladder section
2
and
the long base stabiliser
1
to the wide ladder section
3
, as shown in
Figure A.
2. Push the narrow ladder section
2
as far into the guide angle of the
wide ladder section
3
as possible until the guide pins on both sides
engage in the guide groove (Figure G).
3. Guide the threaded end piece of the safety stay
18
through the hole
on the narrow ladder section
2
.
4. Fix the safety stay
18
in place by screwing the plastic nut
17
tightly
from the inner face of the stile on to the threaded end piece of the
safety stay
18
(Figure H).
Q
Disassembling the standing ladder
j
Disassemble the standing ladder in the reverse order to that described in
the section “Assembling the standing ladder”.
Q
Assembling the leaning ladder
J
Avoid any tasks in which a lateral load is placed on the leaning ladder,
e.g. drilling sideways into solid material (e.g. masonry or concrete).
1. Attach the long base stabiliser
1
to the wide ladder section
3
, as
shown in Figure J.
2. Push the narrow ladder section
2
as far into the guide angle of the
wide ladder section
3
as possible until the locking hooks on the narrow
ladder section
2
can fit over the second rung of the wide ladder
section
3
(Figure L).
3. Hold the leaning ladder in a vertical position in front of the wall or the
object against which the leaning ladder is to be used. Disengage the
locking hooks and slide the narrow ladder section
2
as far upwards as
necessary until it reaches the desired climbing height (Figure M).
4. At that point fit the locking hooks over the rung of the wide ladder
section
3
. Place the leaning ladder carefully against the wall or the
object (Figure N).
Q
Disassembling the leaning ladder
j
Disassemble the leaning ladder in the reverse order to that described in
the section “Assembling the leaning ladder”.