Tokina atx-i 17-35mm f/4 FF Lens for EF Benutzerhandbuch
35mm, F4 ff, Deutsch
Index zum Aufsetzen der Streulichtblende
Ring zum manuellen Fokussieren
Entfernungsskala
Entfernungs-Einstellindex
Zoomring (zur Brennweiteneinstellung)
Brennweiten-Einstellindex
Autofokus-Position (AF)
Manuellfokus-Position (MF)
Brennweitenskala
Fassungsansatzmarkierung
Filter
Bitte beachten Sie, dass die technischen Daten und das Aussehen zur Verbesserung
des Produktes ohne vorherige Ankündigung geändert werden können.
Die Kennzeichnung wird auf Objektiven mit elektronischen Teilen (Zertifikations
- marke zur Bestätigung der Übereinstimmung mit den europäischen Anforderun-
gen an die Exportinspektion) angebracht. Diese Markierung erklärt gleichzeitig auch
die Übereinstimmung mit in den RoHS Richtlinien vorgegebenen Umweltleis-
tungsnormen.
Diese Markierung zeigt den Einschluss in die China RoHS Richtlinien
Markierung (verwaltungstechnische Maßnahme zur Kontrolle von durch
elektronische Informationsprodukte verursachte Verschmutzung) an.
Technische Daten
17-35mm
4
22
Digitales Vollformat (24×36mm)
Multibeschichtung
13 Linsen in 12 Gruppen
103.96°~64.74°
0.28 m
1: 4.82
IF Fokussierung
9
82 mm
Brennweite
Max. Blendenöffnung
Min. Blendenöffnung
Max. Aufnahmeformat
Beschichtung
Optischer Aufbau
Bildwinkel
Min. Aufnahmeabstand
Max. Makrovergrößerung
Fokusformat
Irisblende
Filtergröße
Länge
Streulichtblende
BH-821
Durchmesser
89 mm
Nikon : 94.5 mm
Canon : 97.0 mm
Nikon : 596 g
Canon : 609 g
Bezeichnung der Teile
DEUTSCH
Filter
Bitte verwenden Sie runde Einschraubfilter. Wenn der Filter verschmutzt
ist oder Wasser darauf tropft, kann es zu Streulichteffekten oder
Geisterbildern kommen. Achten Sie bitte darauf, vor dem Fotografieren
den Filter sorgfältig zu reinigen.
Bitte verwenden Sie immer nur einen Filter aufs Mal. Wenn gleichzeitig
mehr als ein Filter verwendet wird, kann es zu Vignettierung kommen.
Drehungsrichtung von dem Fokusring
Die Drehungsrichtung von dem Fokusring ist bei Original Nikon-Objek-
tiven und Canon-Objektiven jeweils in die gleiche Richtung.
Je nach Objektivmodell können Sie beim Schütteln des Objektivs
evtl. ein leises Geräusch aus seinem Inneren hören. Es rührt von
den Kugeln des Kugellagers her, das für den geschmeidigen Lauf
des Scharfstellrings sorgt, und es bedeutet keinesfalls, daß etwas
am Objektiv defekt, locker oder nicht in Ordnung wäre.
Bei Anbringung der Blende diese soweit drehen, bis Sie ein
"Klicken" hören, um einen sicheren Sitz zu gewährleisten.
Wenn die Blende nicht korrekt angebracht wird, kann es zu
Vignettierung kommen.
Vorsichtsmaßnahmen bei der Verwendung des
eingebauten Blitzlichts
Wenn man bei dem Fotografieren mit dem eingebauten Elektronenblitz
von der Kamera oder mit einem kleinen Elektronenblitz fotografiert, kann
es passieren, dass ein Teil von dem Elektronenblitzlicht unterbrochen
wird und der Schatten von der Linse mit auf das Bild draufkommt. In
solchen Fällen soll man ein externes Elektronenblitz benutzen.
Grundlegende Pflege und Lagerung
Jegliche Erschütterungen oder Stöße gegen das Objektiv sowie
extrem hohe oder tiefe Temperaturen und hohe Feuchtigkeit
vermeiden.
Reinigen Sie das Objektiv nach Gebrauch, um Schimmelbildung zu
vermeiden. Keinen Verdünner, Benzin oder andere organische Mittel
verwenden, um Schmutz oder Fingerabdrücke auf dem Objektiv zu
beseitigen. Verwenden Sie ein weiches, angefeuchtetes Optikreini-
gungstuch oder Optik-Reinigungspapier.
Bei der Pflege der äußeren Linse Schmutz oder Rückstände immer mit
einem Chamois- oder Silikontuch abwischen. Achten Sie darauf, dass
auch der Objektivtubus sauber ist und nicht nur die vorderen und
hinteren Elemente.
Wählen Sie einen kühlen und trocken, vorzugsweise gut gelüfteten
Ort, um das Objektiv langfristig zu lagern. Halten Sie das Objektiv fern
von Mottenkugeln oder Naphthalengas, um Beschädigungen der
Linsenbeschichtung zu vermeiden.
Das Objektiv ist nicht wasserfest. Achten Sie darauf, dass das Objektiv
nicht nass wird, wenn Sie es im Regen oder in der Nähe von Wasser
verwenden. Es ist oft unmöglich ein Objektiv oder deren Teile zu
reparieren, wenn diese durch Wasser geschädigt wurden.
Plötzliche Temperaturänderungen können zur Bildung von Kondensa-
tionswasser auf den Objektivelementen führen.
Es ist ratsam, das Objektiv in einem Etui zu belassen bis es Raumtem-
peratur erreicht hat, wenn Sie aus der Kälte in einen warmen Raum
kommen.
•
•
•
•
•
•
Gewicht
Part names
ENGLISH
How to attach and remove lens
Please follow the camera instruction manual for attaching and removing
the lens.
Take care to not touch or hit electrical contacts on the mounting face
of the lens while attaching or removing.
Focusing
When the manual focus ring is set to the AF position, the camera focuses
automatically. (Some Nikon cameras have a mode switch. With those
cameras, confirm that the setting is AF. See the camera’s user manual for
details.)
When set to manual focus mode, rotate the manual focus ring while
looking through the viewfinder or at the monitor to adjust the focus.
This lens also has a focus aid function to assist with focusing.
Exposure Modes
For the exposure mode settings, follow the applicable instructions
provided in your cameras manual.
Notes on use of built-in flash
Photography using the camera built-in flash or a compact flash may
cause a portion of the flash light being blocked, which could result in lens
shadow appearing on both sides of the photo. If this occurs, use an
external flash.
Lens hood
The included lens hood prevents strong angular light from the side from
striking the front lens element and causing lens flare or ghosting that
would impact image quality.
Please be sure to always use the lens hood when photographing to
achieve the best results possible.
<How to attach the lens hood>
To securely install the hood, align the mark on the hood with the hood
attachment indicator ( ) on the lens, and then turn the hood clockwise,
as viewed from the front, until a click is heard.
Confirm that the mark on the hood is aligned with the center index on
the lens.
Rotation Direction of the Focus Ring
The rotation direction of the focus ring is the same as the official Nikon
and Canon lenses, respectively.
Auto Focus Position
Depending on the lens itself, a sound may be heard from inside
the lens when the lens is shaken lightly. This is the sound of the
ball bearings that are designed to smooth the movement of the
focus ring. It does not indicate a problem with the general
functioning of the lens.
The marking (certification mark for conformance with the European export
inspection requirements) is shown on lenses containing electronic parts. The mark
also declares compliance with environmental performance standards for products
stipulated in the RoHS directive.
A display mark indicating inclusion in the China RoHS directive (Administra-
tive Measure on the Control of Pollution Caused by Electronic Information
Products).
Performance table
17-35 mm
F4
F22
Full Frame
Multi-coating
13 - 12 (elements/groups)
103.96°64.74°
0.28 m
1: 4.82
Inner focus
9
82 mm
Nikon : 94.5 mm
Canon : 97.0 mm
Focal distance
Maximum aperture
Minimum aperture
Format
Coating
Lens configuration
Angle of view
Minimum focus distance
Maximum macro magnification
Focus method
Diaphragm blades
Filter size
Overall length
Please note that specifications and appearance may be changed without notice to
improve the product.
Basic Care and Storage
Avoid any shock or impact to the lens or exposure to extremely high or
low temperature or high humidity.
To prevent outbreak of the mold, keep lens surface clean after use of
lens. Do not use paint thinner, benzene, or other organic agents to
remove dirt or finger prints from the lens elements. Clean with a soft
moistened lens cloth or lens tissue.
In caring for the exterior of the lens, always wipe any dirt, dust or debris
with a chamois or silicone cloth. Make sure the barrels of the lens are
clean, not only the front and rear elements.
Select a cool and dry place for extended storage, preferably with good
ventilation. To avoid damage to the lens coating, keep the lens away
from mothballs or naphthalene gas.
This lens is not waterproof. If using this lens in the rain or near water,
keep it from getting wet. It is often impractical to repair a lens or its
components when damaged by water.
Sudden changes in temperature may cause condensation or fog on
the lens elements. When entering a warm room from the cold, it is
advisable to keep the lens in a case until the temperature of the lens
reaches the temperature of the room.
•
•
•
•
•
•
Weight
Maximum diameter
89 mm
When attaching the hood, turn it until you hear a “click” to ensure
a secure fit.
If the hood is not attached properly, vignetting could occur.
Manual Focus Position
Hood Attachment Index
Manual Focusing Ring
Focus Distance Scale
Focus Distance Index
Zoom Ring
Center Index
Auto Focus (AF) Position
Manual Focus (MF) Position
Focal Length Scale
Mount attachment mark
Please use round screw-in filters. If there is grime or water drops on the
filter, it will cause lens flare and ghosting. Be sure to clean the filter
thoroughly before taking pictures.
Please use only one filter at a time. If more than one is used at the same
time, it may cause vignetting.
Filter
One-Touch Controllable Focus-Clutch Mechanism
<How to switch from the Auto focus position to manual
focus position>
The lens focus mode can be switched
between the Auto focus (AF) and
manual focus (MF) Positions at any
time by moving the manual focus ring
forward and backward.
BH-821
Hood
Nikon 569 g
Canon 609 g
Nombre de las partes
ESPAÑOL
Posición enfoque
automático (AF)
Posición foco
manual (MF)
Indicador de parasol
Anillo de enfoque manual
Escala de distancia
Marca de la escala de distancia
Anillo de zoom
Indicador de centro
Posición enfoque automático (AF)
Posición foco manual (MF)
Escala de longitud focal
Indicador de la montura del objetivo
Modos de exposición
Para el ajuste de los modos de exposición, siga las instrucciones
proporcionadas en el manual de su cámara.
Sencillo mecanismo “un solo toque”
<CÓMO CAMBIAR DE POSICIÓN AUTO-FOCO A POSICIÓN FOCO
MANUAL.>
El modo de enfoque se puede cambiar
de auto-foco a enfoque manual y
viceversa en cualquier momento,
moviendo el anillo de foco manual hacia
delante o hacia atrás.
Enfoque
La cámara realiza el enfoque automático cuando el anillo de enfoque
manual se encuentra en la posición AF. (Algunas cámaras Nikon tienen
un interruptor de cambio de modo. En ese caso, verifique que la configu-
ración sea AF. Para más detalles, consulte el manual de instrucciones de la
cámara)
Cuando se usa el modo de enfoque manual, el enfoque se realiza girando
el anillo de enfoque manual, mientras se verifica en el visor o en el
monitor de la cámara.
Con este objetivo también se puede enfocar con la “ayuda de enfoque”.
Forma de acoplar y retirar el objetivo
Por favor siga el manual de instrucciones para acoplar y retirar el objetivo.
Tenga cuidado para no tocar o golpear los contactos electrónicos del
lado de la montura de la lente, en el momento de acoplar o retirar el
objetivo.
Un parasol diseñado para evitar los reflejos e imágenes fantasma
producidos por los rayos de luz que llegan diagonalmente al frontal del
objetivo. Le recomendamos utilizar un parasol para proteger el objetivo
y asegurarse de que las fotos saldrán nítidas y sin problemas.
<COMO ACOPLAR EL PARASOL>
Para instalar el parasol con seguridad, alinear la marca del parasol con la
marca del objetivo ( ) y girar el parasol en el sentido de las agujas del
reloj (si lo miramos de frente) hasta oír un clic. Asegúrese de que la marca
( ) del parasol está alineada con la del Indicador de centro.
Parasol
Filtro
Utilizar filtros con rosca circular. Si hay suciedad o gotas de agua en el
filtro, pueden producirse reflejos indeseados e imágenes superpuestas.
Asegúrese de limpiar bien el filtro antes de tomar fotografías.
* Por favor utilizar solo un filtro a la vez. Si se utiliza más de uno a la vez,
puede producirse viñeteado.
Cuidados al utilizar el flash incorporado
Cuando se realiza una toma con el flash incorporado en la cámara o con
un flash pequeño, la luz del flash puede ser parcialmente bloqueada y la
sombra del objetivo aparecer en la pantalla. En este caso, use un flash
externo.
Dependiendo del modelo de objetivo, al sacudir ligeramente el
mismo se oirá un sonido en su interior. Este sonido corresponde a
los rodamientos del objetivo, diseñados para suavizar el
movimiento del anillo de enfoque y no supone un mal funciona-
miento del objetivo.
Al instalar el parasol, gire hasta que oiga un “clic” para asegurarse
de que está bien colocado.
Si el parasol no está correctamente colocado, puede causar
viñeteado.
Dirección de rotación del anillo de enfoque
La dirección de rotación del anillo de enfoque es el mismo que en un
objetivo original Nikon o Canon.
Cuidados básicos y almacenamiento
Evite cualquier golpe o impacto en la lente o la exposición a tempera-
turas extremadamente altas o bajas, así como evitar la humedad
excesiva.
Para prevenir deterioro, mantener limpia la superficie de la lente
después de utilizarla. No usar disolvente para pintura, benceno u otros
agentes orgánicos para limpiar la suciedad o las huellas digitales
impregnadas en el lente. Limpiar con una tela suave y humedecida o
un paño.
Cuando se saca el objetivo a exteriores, limpiar constantemente la
suciedad, polvo o residuos, con una tela de gamuza o silicona.
Asegurarse que las paredes del objetivo estén limpias, no solamente
de la parte frontal o posterior.
Si quiere almacenar el objetivo durante un largo periodo de tiempo,
hágalo en un lugar fresco y con buena ventilación. Para evitar daños en
el revestimiento de la lente, mantener la lente alejada de la naftalina o
de gas naftaleno.
Este objetivo no es resistente al agua. Por lo tanto, cuando se usa el
objetivo durante la lluvia o clima parecido, debe evitar que se moje.
Normalmente no se recomienda la reparación del objetivo o sus
componentes cuando han sido dañados por agua.
Cambios repentinos de temperatura, pueden causar condensación en
las lentes o en sus componentes. Cuando ingrese a un ambiente
cálido desde un ambiente frío, es recomendable dejar el objetivo en
un estuche hasta que la temperatura del objetivo alcance la tempera-
tura del ambiente.
•
•
•
•
•
•
Tenga en cuenta que las especificaciones y la apariencia del objetivo
pueden ser cambiadas sin previo aviso, para la mejora del producto.
* El marcado se muestra en lentes que contienen partes electróni-
cas (marca de certificación de acuerdo con los requerimientos
Europeos de inspección para la exportación). La marca también indica
la declaración del cumplimiento de las normas de comportamiento
medioambiental de los productos estipulados en la directiva RoHS.
* Marca indicando la inserción en la directiva RoHS de China (Medición
Administrativa para el Control de Polución Causada por Productos de
Información Electrónica)
Tabla de especificaciones
17-35 mm
F4
F22
24 x 36 mm full frame exclusivo para digital
Multi-coating
13 – 12
103.96°64.74°
0.28 m
1 : 4.82
Enfoque interno (IF)
9
82 mm
Distancia focal
Apertura máxima
Apertura mínima
Formato
Coating
Configuración del objetivo
(elementos/grupos)
Ángulo de visión
Distancia mínima de enfoque
Máxima macro-magnificación
Tipo de enfoque
Hojas del diafragma
Tamaño del filtro
Longitud total
Parasol
Peso
BH-821
Diámetro máximo
89 mm
Nikon : 94.5 mm
Canon : 97.0 mm
Nikon : 596 g
Canon : 609 g
Nomenclature
Mise au point
L'appareil photo effectue automatiquement la mise au point lorsque la
bague de mise au point manuelle est en position AF. (Certains appareils
photo Nikon disposent d'un sélecteur de mode. Dans ce cas, assurez-vous
que le réglage est sur AF. Pour plus d'informations, consultez le manuel
d'utilisation de l'appareil photo.)
En mode de mise au point manuelle, tournez la bague de mise au point
manuelle tout en regardant le viseur ou le moniteur pour effectuer la mise
au point.
Cet objectif peut également être mis au point avec l’assistant de mise au
point.
Repère de montage du parasoleil
Bague de mise au point manuelle
Echelle de distance
Repère de distance
Bague de zoom
Repère de focale
Position MAP auto (AF)
Position MAP manuelle (MF)
Echelle de focale
Repère de montage de l’objectif
Modes d'exposition
Pour les réglages des modes d'exposition, reportez vous au mode
d'emploi de votre appareil.
Bague de mise au point One-Touch
<Comment basculer du mode Auto au mode Manuel de
mise au point>
Le mode de mise au point peut-être
modifié à tout instant entre le mode
autofocus (AF) et le mode manuel (MF), il
suffit de tirer la bague de mise au point
en arrière ou en avant.
Position MAP auto (AF) Position MAP manuelle (MF)
Montage / démontage de l’objectif
Veuillez suivre les instructions fournies avec votre appareil photo
concernant le montage de l'objectif sur l'appareil et son démontage.
Lorsque vous montez ou démontez l'objectif, veillez à ne pas toucher
les contacts électroniques et préservez-les des chocs.
Parasoleil
Le parasoleil est conçu pour éviter les rayons parasites (flare) et les images
fantômes qui apparaissent quand les rayons lumineux obliques
atteignent la lentille frontale. L'usage du parasoleil est recommandé afin
d'obtenir de meilleures images et de protéger l'objectif.
<Comment fixer le parasoleil>
Afin de le fixer correctement, alignez la marque " " du parasoleil avec
le repère de fixation de celui-ci sur l'objectif et tournez-le dans le sens des
aiguilles d'une montre jusqu'au clic de butée.
La confirmation du bon montage est donnée quand la marque
triangulaire du parasoleil est alignée avec le centre de l'objectif.
Filtre
Veuillez utiliser des filtres filetés. Vous ne pourrez pas prendre de
photographies parfaites si le filtre est sale ou présente des gouttes d’eau
ou d’autres particules étrangères. Nettoyez soigneusement le filtre avant
de prendre des photos.
* Si deux filtres ou davantage sont utilisés en même temps, un effet de
vignettage (assombrissement aux coins de l'image) peut se produire.
Drehungsrichtung von dem Fokusring
En fonction de l'objectif, un son peut-être entendu de l'intérieur
de l'objectif quand celui-ci est secoué légèrement. C'est le son des
roulements à billes conçus pour le mouvement régulier de la
bague de mise au point. Ceci n'est pas un problème et n'affecte
pas le bon fonctionnement de l'objectif.
Quand vous fixez le parasoleil, tournez-le jusqu'à entendre un «
clic » pour vous assurer qu'il soit bien fixé.
Si le parasoleil n'est pas convenablement monté, un effet de
vignettage peut se produire.
Avertissement au sujet de l’utilisation d’un flash intégré
Si vous prenez des photos à l'aide du flash intégré ou du petit flash de
l’appareil photo, il se peut que l'éclair du flash soit partiellement masqué
et que l'ombre de l'objectif apparaisse à l'écran. Dans ce cas, utilisez un
flash externe.
Sens de rotation de la bague de mise au point
Le sens de rotation de la bague de mise au point est identique à celui de
l’objectif d’origine Nikon, Canon.
Conseils d’entretien et de stockage
Évitez tout choc, impact sur l'objectif ou exposition à des températures
extrêmement élevées ou extrêmement basses, ainsi qu'à une
humidité élevée.
Pour éviter la moisissure, nettoyez la surface de l’objectif après son
utilisation. Ne pas utiliser de diluant à peinture, benzène, ou d'autres
agents biologiques pour éliminer les traces de saleté ou de doigts des
éléments de l’objectif. Nettoyer avec un chiffon doux humide ou un
mouchoir.
Pour nettoyer l'extérieur de l’objectif, essuyez toujours la saleté, la
poussière ou les débris avec une peau de chamois ou un chiffon à base
de silicone. Assurez-vous que le fût de l'objectif soit propre, pas
seulement les éléments avant et arrière.
Choisissez un endroit frais et sec pour le stockage prolongé, de
préférence avec une bonne ventilation. Afin d’éviter d'endommager le
revêtement de l’objectif, éloigner l’objectif de la naphtaline ou du gaz
naphtalène.
Cet objectif n'est pas étanche. Si vous utilisez cet objectif en cas de
pluie ou à proximité de l’eau, ne le mouillez pas. Il est souvent impossi-
ble de réparer un objectif ou ses composants lorsqu'ils sont
endommagés par l'eau.
Les changements brusques de température peuvent provoquer de la
condensation sur les éléments de l’objectif.
Lorsque vous entrez dans une pièce chaude quand il fait froid dehors,
il est conseillé de garder l’objectif dans une housse jusqu'à ce que la
température de l’objectif atteigne la température de la pièce.
•
•
•
•
•
•
* La marque (marque de certification de conformité pour les produits Européens)
est affichée sur les optiques contenant des composants électroniques. La marque
déclare également respecter les normes de performance environnementales pour les
produits stipulés dans la directive RoHS.
* L'objectif porte une marque indiquant l'inclusion dans la directive RoHS de la
Chine (mesure administrative sur le contrôle de la pollution causée par les produits
électroniques).
Spécifications techniques
Veuillez noter que les spécifications et l'aspect peuvent être modifiés sans préavis
pour améliorer le produit.
17-35 mm
F4
F22
Distance focale
Ouverture maximum
Ouverture minimum
Multicouches
13-12 (éléments/groupes)
103.96°~64.74°
0.28 m
1: 4.82
Mise au point interne
9
82 mm
Revêtement
Construction optique
Angle de champ
Distance minimale de MAP
Ratio de grossissement macro
Méthode de mise au point
Nombre de lamelles de diaphragme
Diamètre du filtre
Longueur totale
Format
Nikon : 94.5 mm
Canon : 97.0 mm
Nikon : 596 g
Canon : 609 g
Pare-soleil
Poids
BH-821
Diamètre maximum
89 mm
Indicatore di montaggio paraluce
Ghiera di messa a fuoco
Scala delle distanze
Indice della scala delle distanze
Ghiera dello zoom
Lunghezza focale
Posizione AF
Posizione MF
Scala della lunghezza focale
Indicatore di montaggio sul corpo macchina
ITALIANO
Modo di esposizione
Per informazioni sulla regolazione dell’esposizione s’invita a vedere il
manuale della fotocamera in uso.
Installazione e rimozione dell'obiettivo
Per l’installazione e la rimozione dell’obiettivo, consultare attentamente il
manuale di istruzioni della macchina fotografica.
Nota: durante l’installazione o la rimozione dell’obiettivo, evitare di
toccare o urtare i contatti elettrici sulla superficie di montaggio, e
di forzare l’installazione dell’obiettivo stesso.
Sistema di cambio della messa a fuoco
<Passaggio dalla modalità AF alla modalità MF>
Il passaggio dalla modalità AF alla
modalità MF avviene semplicemente
spostando in avanti o indietro la ghiera
di messa a fuoco manuale a prescindere
dalla sua posizione attuale.
Il rumore interno che si avverte quando si ruota leggermente nei
due sensi la ghiera di messa a fuoco proviene dai cuscinetti a sfera
intimpiegati per rendere più fluida la rotazione; non è perciò
indice di guasto o malfunzionamento.
Messa a fuoco
Quando la ghiera di messa a fuoco manuale è regolata nella posizione AF
la fotocamera mette a fuoco il soggetto automaticamente. (Alcuni
modelli di fotocamere Nikon dispongono di un selettore della modalità
di messa a fuoco che occorre pertanto impostare in tale posizione. Per
maggiori informazioni al riguardo s’invita a vedere il manuale d’uso della
propria fotocamera.)
Nel modo manuale si ruota la ghiera di messa a fuoco mentre si osserva
il soggetto nel mirino o sul monitor della fotocamera.
Questo obiettivo può operare altresì con la funzione di messa a fuoco
assistita.
Posizione AF
Posizione MF
Nomenclatura
Note sull’uso del flash incorporato
Quando si scattano foto con il flash incorporato , o con un piccolo flash
dedicato innestato sul corpo della macchina, parte della luce emessa
potrebbe risultare bloccata dall’obiettivo e causare così la comparsa della
sua ombra sulle immagini. Per evitare che ciò accada si suggerisce di
utilizzare un flash esterno.
Modalità di rotazione della ghiera di messa a fuoco
Il senso di rotazione della ghiera di messa a fuoco è lo stesso degli
obiettivi originali Nikon e Canon.
Tabella delle prestazioni
La marcatura ( certificazione di Conformità Europea) è apposta su
tutte le componenti contenenti parti elettroniche e altresì dichiara la
conformità alle norme per la prevenzione ambientale stabilite dalla
direttiva RoHS.
Il simbolo indica inoltre il rispetto delle norme previste dalla
direttiva China RoHS (misure amministrative di controllo del livello di
inquinamento causato dall’emissione di prodotti elettronico-informatici).
Note: si prega di prendere atto che le caratteristiche o l’aspetto del
prodotto potrebbero variare senza preavviso in caso di migliorie
apportate al prodotto.
Manutenzione e corretta conservazione
Evitare l’esposizione dell’obiettivo a temperature eccessivamente alte
o basse, o ad ambienti con alto tasso di umidità. Proteggere l’obiettivo
da forti impatti o urti accidentali. In caso di non utilizzo per periodi
prolungati, conservare l’obiettivo in un contenitore ermetico sufficien-
temente capiente, possibilmente allegando un sacchetto disidratante.
Per prevenire la formazione di muffa procedere alla pulizia della
superficie della lente dopo ogni utilizzo. Evitare l’utilizzo di solventi,
prodotti contenenti benzene, o sostanze organiche per rimuovere
eventuale sporco o impronte digitali dalle componenti dell’obiettivo.
Utilizzare esclusivamente un panno morbido leggermente umidificato
con apposito liquido per la pulizia delle lenti, o un panno apposito per
la pulizia delle lenti.
Per una buona cura e manutenzione delle componenti esterne,
rimuovere abitualmente eventuali macchie, polvere o sporcizia con un
panno di camoscio o in silicone. Assicurarsi di non limitare la pulizia
solo alla parte anteriore e posteriore dell’obiettivo, ma di pulirne
accuratamente anche il barilotto.
In caso di non utilizzo per periodi prolungati, riporre l’obiettivo in un
luogo fresco, asciutto e preferibilmente ventilato. Per prevenire il
deterioramento del rivestimento della lente, si raccomanda di porre
l’obiettivo lontano da antitarmici o gas contenenti naftalene.
Questo obiettivo non è dotato di elementi impermeabili o resistenti
all’acqua. In caso di pioggia o di utilizzo in luoghi in prossimità di fonti
d’acqua, fare attenzione affinché la lente non si bagni. Infiltrazioni
d’acqua all’interno dell’obiettivo possono causare gravi malfunziona-
menti o danni irreparabili.
Violenti o improvvisi sbalzi di temperatura possono causare l’insorgere
di condensa all’interno dell’obiettivo. Qualora sia necessario spostare
l’obiettivo da un luogo freddo a un luogo caldo, si raccomanda di
inserire preventivamente l’obiettivo in un astuccio e in seguito in una
busta di plastica, nonché di procedere all’utilizzo solo una volta che la
temperatura dell’ambiente si sia stabilizzata.
•
•
•
•
•
•
17-35 mm
F4
F22
APS-C
Full-frame solo digitale 24 x 36mm
12 gruppi / 13 elementi
103.96°64.74°
0.28 m
1: 4.82
Interno anteriore
9
Lunghezza focale
Luminosità (apertura massima)
Apertura minima
Formato
Rivestimento
Struttura dell’obiettivo
Angolo di campo
Distanza minima del soggetto
Ingrandimento massimo
nelle foto macro
Metodo di messa a fuoco
Numero delle lamelle
del diaframma
Ghiera porta filtri
Lunghezza totale
Peso
Paraluce
Diametro massimo
89 mm
Nikon : 94.5 mm
Canon : 97.0 mm
Nikon : 596 g
Canon : 609 g
82mm
BH-821
Il paraluce incluso con questo obiettivo permette di proteggere la lente
dalla luce diretta che, penetrando sia frontalmente che obliquamente,
potrebbe causare bagliori (flare) o immagini fantasma (ghosting),
influendo negativamente sulla qualità dell’immagine. Utilizzare pertanto
il paraluce in ogni circostanza, sia a protezione della lente che per
mantere alta la qualità delle foto.
<Montaggio del paraluce>
Allineare il simbolo ( ) del paraluce con l'indicatore ( ) di montaggio
dell'obiettivo, quindi guardando quest'ultimo dal davanti ruotare il
paraluce stesso in senso orario sino ad avvertirne lo scatto in posizione.
Verificare che l'indicatore ( ) situato sulla parte inferiore dell'obiettivo sia
correttamente allineato con l'indicatore ( ) del paraluce.
Paraluce
Filtri
Con questo obiettivo è possibile utilizzare solo filtri circolari “a vite”. La
presenza di sporco o di condensa sulla superficie del filtro può causare
bagliori (flare) o immagini fantasma (ghosting) nella foto. Si raccomanda
pertanto di detergere e asciugare accuratamente la superficie del filtro
prima di qualsiasi ripresa.
Nota: utilizzare un solo filtro alla volta. L’utilizzo di più filtri contempora-
neamente può causare la presenza di vignettature (vignetting).
Autofokus-Position (AF)
Manuellfokus-Position (MF)
Objektiv ansetzen und abnehmen
Bitte befolgen Sie die Anleitungen in der Bedienungsanleitung für die
Kamera beim Ansetzen und Abnehmen des Objektivs.
Achten Sie darauf, beim Ansetzen und Abnehmen des Objektivs nicht
die elektrischen Kontakte an der Fassungsfläche zu berühren oder
dagegen zu stoßen.
Fokussiermodus-Umschaltung mit einem Handgriff
Fokussieren
Was das Fokussieren betrifft, wird die Kamera, wenn der manuelle
Fokusring auf AF-Position ist, automatisch die Fokussierung durchführen.
(Bei den Kameras von Nikon gibt es einige Kameras, die mit einem
Schalter für Modus-Umschalten ausgestattet sind. In solchen Fällen soll
man sich vergewissern, dass die Einstellung auf AF eingestellt ist. Über
Einzelheiten, bitte schauen Sie in der Bedienungsanleitung von der
Kamera nach.)
Bei manuellem Fokusmodus soll man in den Sucher oder auf den Monitor
schauen und den manuellen Fokusring drehen und dabei fokussieren.
So wird von Autofokus- auf manuelle Scharfeinstellung
und um-gekehrt umgeschaltet
Der Scharfeinstell-Modus Ihres Objektivs
kann jederzeit von AF auf MF und
umgekehrt durch axiales Verschieben des
Scharfstellrings (für AF = nach vorn, für MF
= nach hinten) umgeschaltet werden.
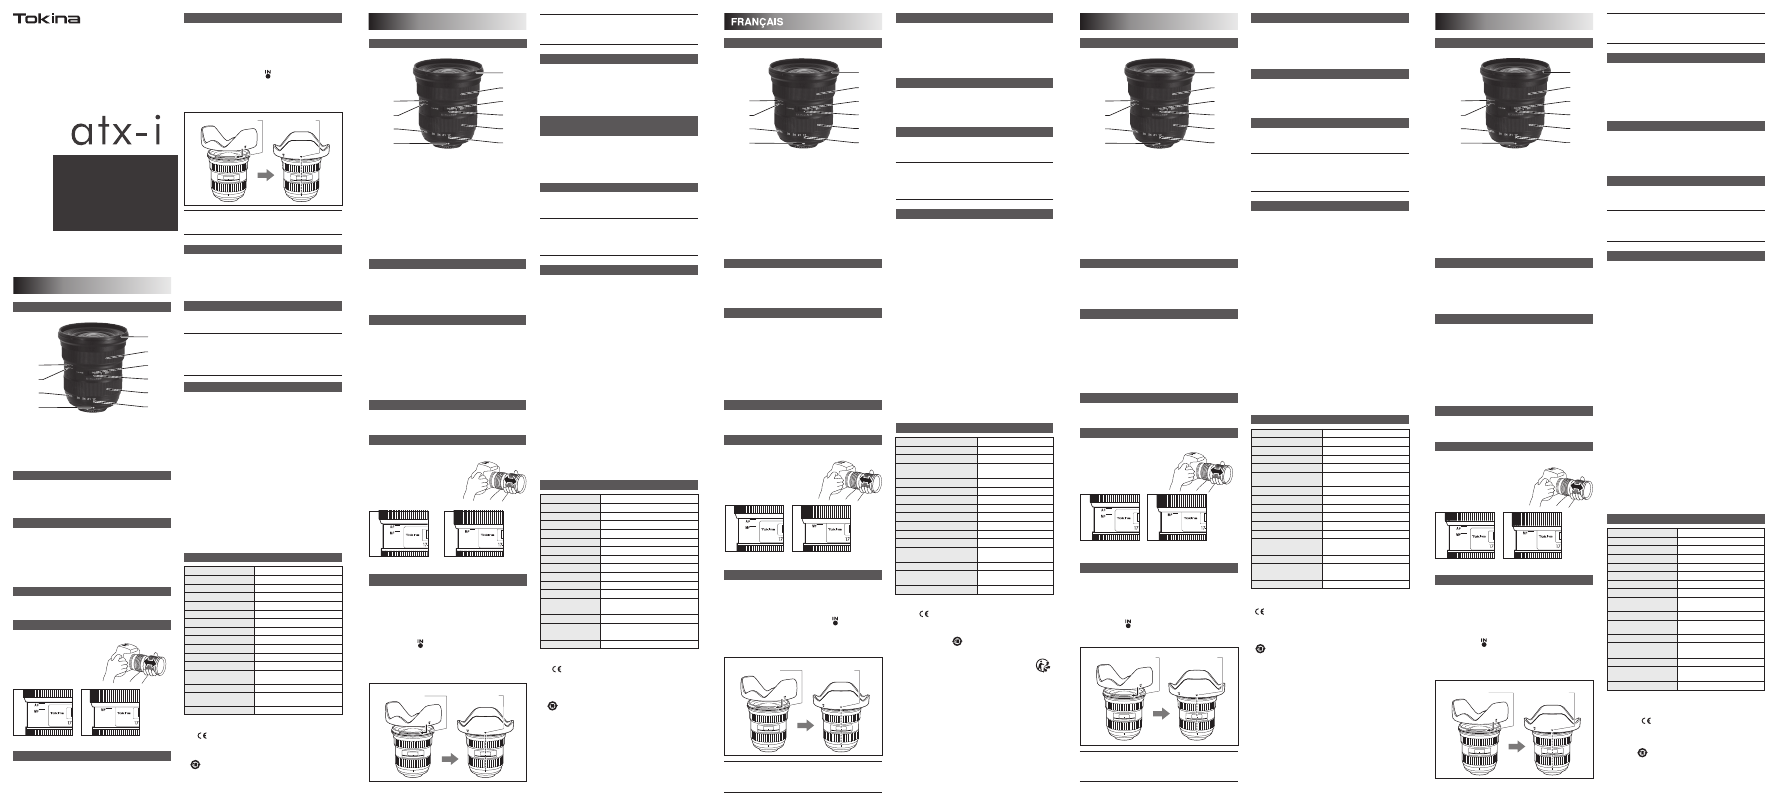
Streulichtblende
Die Streulichtblende ist so konstruiert, dass sie Streulicht und
Geisterbilder verhindert, die sonst von schräg vorn und seitlich auf die
Frontlinse einfallendem Licht verursacht werden könnten. Wir empfehlen
Ihnen, die Streulichtblende möglichst immer zu benutzen, um klare und
kontrastreiche Fotos zu erzielen und Ihr Objektiv zu schützen.
Befestigen der Streulichtblende
Setzen Sie die Streulichtblende zum sicheren Befestigen so ans Objektiv,
daß die Markierung ( ) auf der Streulichtblende mit der Markierung
( ) vorn am Objektiv fluchtet und arretieren Sie dann die Streulicht-
blende durch eine Drehung im Uhrzeigersinn (von vorn gesehen) bis
zum hörbaren Einrasten. Vergewissern Sie sich, daß die Markierung
Brennweiten-Einstellindex am Objektiv steht.
Belichtungsmethoden
Zur Einstellung des gewünschten Belichtungsmodus folgen Sie der
Beschreibung in der Bedienungsanleitung Ihrer Kamera.
Hood Attachment Index
mark
Markierung
Index zum Aufsetzen der
Streulichtblende
Marque
triangulaire
Repère de montage
du parasoleil
Indicatore di montaggio
dell'obiettivo
Nota: assicurarsi di ruotare il paraluce sino ad avvertire il "click"
dello scatto in posizione. In caso contrario, il paraluce non
risulterà correttamente posizionato, causando vignettature
sull'immagine finale.
Indicatore ()
del paraluce
Indicador del parasol
Posición correcta
del parasol
17-35mm
F4 FF
24x36mm
Capteur Numérique plein format