Gnss, Den lantime anschließen connecting the lantime, Einstellen der ip-adresse entering the ip address – Meinberg LANTIME NTP SERVER Benutzerhandbuch
Seite 2: Anschließen der antenne connecting the antenna, Pps out, Co no nc 10mhz out
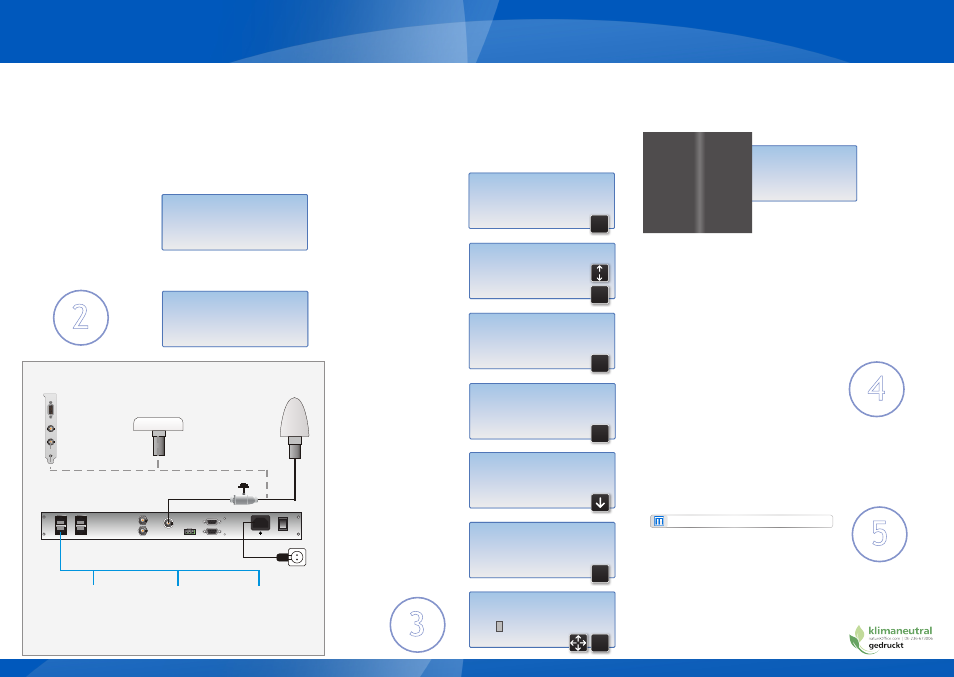
2. Den LANTIME anschließen
Connecting the LANTIME
Stellen Sie sicher, dass sich der An/Aus - Schalter auf Position „0“ (aus) befindet und
schließen Sie die Versorgungsspannung an. Danach verbinden Sie den LANTIME mit
einem geeigneten Netzkabel mit dem Netzwerk.
Make sure that the power switch is in the „0“ position (off), and plug the power cord
into the power socket of your LANTIME. Then connect the device to your computer
network using a suitable network cable.
Nach dem Einschalten des Gerätes erscheint die folgende Anzeige auf dem Display:
After switching on power, the following message is displayed:
Nach einer Reihe von Selbsttests ist
der NTP Zeitserver betriebsbereit
und die Anzeige wechselt in die
Hauptanzeige, in der einige wich-
tige Statusinformationen angezeigt
werden:
After running a number of power-on
self tests, the time server is in operation mode and the main screen appears:
3. Einstellen der IP-Adresse
Entering the IP Address
Zur Erstinstallation muss am Gerät eine IP Adresse, Netzmaske und (in den meisten
Netzwerkumgebungen) ein Default Gateway eingegeben werden. Um eine Über-
sicht der aktuellen Netzwerkparameter zu bekommen, drücken Sie einmal die F2
Taste. Durch nochmaliges Drücken der F2 Taste gelangen Sie aus dieser Übersicht in
das SETUP Menü:
Initial installation requires setting up an IP address, netmask and (in most network
environments) a default gateway. To get an overview of the current configuration,
press F2. Press F2 again to enter the Network SETUP screen:
5. Aufruf des Web Interface
Accessing the Web Interface
Um eine HTTP Verbindung zu dem LANTIME aufzubauen, geben Sie die
IP Adresse des LANTIME in das Adressfeld Ihres Browsers ein:
Connect to the web interface by entering the IP address of the LANTIME
into the address field of your web browser:
http://xxx.xxx.xxx.xxx
LOGIN:
Benutzer /
user
:
root
Passwort /
password
: timeserver
Eine umfangreiche und detaillierte Beschreibung können Sie sich unter
dem Menüpunkt „Dokumentation“ ansehen!
A full manual is available in PDF format for
download when choosing the menu option
„Documentation“!
5
Verbinden Sie bei eingeschaltetem Gerät das Antennenkabel mit der Antennen-
anschlussbuchse. Sollte auf der Antennenleitung ein Kurzschluss auftreten, wird
dieser durch eine Warnmeldung im Display angezeigt:
Connect the antenna cable with the antenna socket of your LANTIME. In case of
a short-circuit, the following message appears in the display:
In diesem Fall muss der Zeitserver ausgeschaltet, der Fehler behoben und da-
nach das Gerät wieder eingeschaltet werden.
In such a case, switch off the device and check the antenna cable.
Jetzt können alle weiteren Einstellungen über das Netzwerk, entweder über
einen WEB Browser oder eine Telnet / SSH Session, konfiguriert werden.
The system configuration can now be changed via the network using a WEB
browser or a Telnet / SSH client.
Für eine korrekte Antenneninstallation folgen Sie den Anweisungen im Hand-
buch (Kapitel Antennenmontage), welches Sie auf dem mitgelieferten USB Stick
im Ordner „Manual“ finden.
Instructions for installing the antenna are included in the
corresponding chapter „Mounting the Antenna“ of the
manual which is available in the „Manual“ folder of the
USB flash drive.
4. Anschließen der Antenne
Connecting the Antenna
# # #
Reference
Signal In
Error
PPS Out
COM 1
COM 0
CO NO NC
10MHz Out
100M 10M
LAN 0
LAN 1
100M 10M
LAN 3
LAN 2
O
I
100 - 240V / 50-60 Hz
Anschluss - Schema
Connection diagram
GNSS
*
LW
*
3
Wählen Sie „Interfaces“ mit den
Pfeiltasten und drücken Sie danach
die OK Taste, um die Einstellungen
für das erste Netzwerkinterface
aufzurufen.
Sie können den Netzwerkanschluss
mit den Pfeiltasten (Hoch/Runter)
auswählen:
Navigate to „Interfaces“ using the
arrow keys and press OK to change
to the configuration menu of the
connected network interface.
You can select the network port with
the „Down“ and „Up“ arrow keys:
Manuelle Eingabe der IP
(ohne DHCP)
Deaktivieren Sie entweder DHCP
und geben Sie nacheinander die
IP Adresse, die Netzmaske und evtl.
ein Default Gateway ein. Dazu
wählen Sie das zu verändernde Feld
mit den Pfeiltasten an und wechseln
mit OK in den Eingabemodus.
Jetzt können Sie mit Pfeil Rechts/
Links den Cursor bewegen und mit
Pfeil Hoch/Runter den Wert unter
dem Cursor verändern. Schließen
Sie die Eingabe mit OK und F2 ab.
Entering the IP Address manually
(not using DHCP)
Deactivate DHCP and set up a valid
IP address, netmask and (if re-
quired) a default gateway. This can
be done by selecting a field with the
arrow keys. Then press OK to switch
to edit mode.
The cursor can be moved using the
left/right arrow keys, the value un-
derneath the cursor can be modified
with up/down. Confirm your chan-
ged values with OK and F2.
www.meinberg.de - 11/2014
MEINBERG LANTIME
is booting . . .
please
wait . . .
. . . . . .
NORMAL OPERATION
NTP: Offset 2us
Fri, 05.09.2014
UTC 12:00:00
-> Interfaces
<-
Global Cfg.
Services
Use Up and Down
to select Port:
lan0 : 0 #1 of 1
-> 172.160.100.200
-> IPV4 Parameter <-
IPV6 Parameter
Link Mode
ANTENNA
SHORT-CIRCUIT
DISCONNECT POWER
! ! !
4
2
OK
OK
OK
-> LAN Address
<-
LAN Netmask
Gateway
OK
Set LAN Address
IPv4 lan0:0 :
DHCP: disabled
-> 000.000.000.000 <-
OK
Set LAN Address
IPv4 lan0:0 :
-> DHCP: enabled
<-
172.160.100.200
TCG
*
* TCG = Time Code Generator, LW = Long Wave Receiver, GNSS = Global Navigation Satellite System (GPS, GLONASS)
OK
Set LAN Address
IPv4 lan0:0
:
172.100.000.000