Multi-Contact MA075 Benutzerhandbuch
Seite 4
Advanced Contact Technology
4 / 8
www.multi-contact.com
6
W
4 5 6
7
7 4 5 6
8
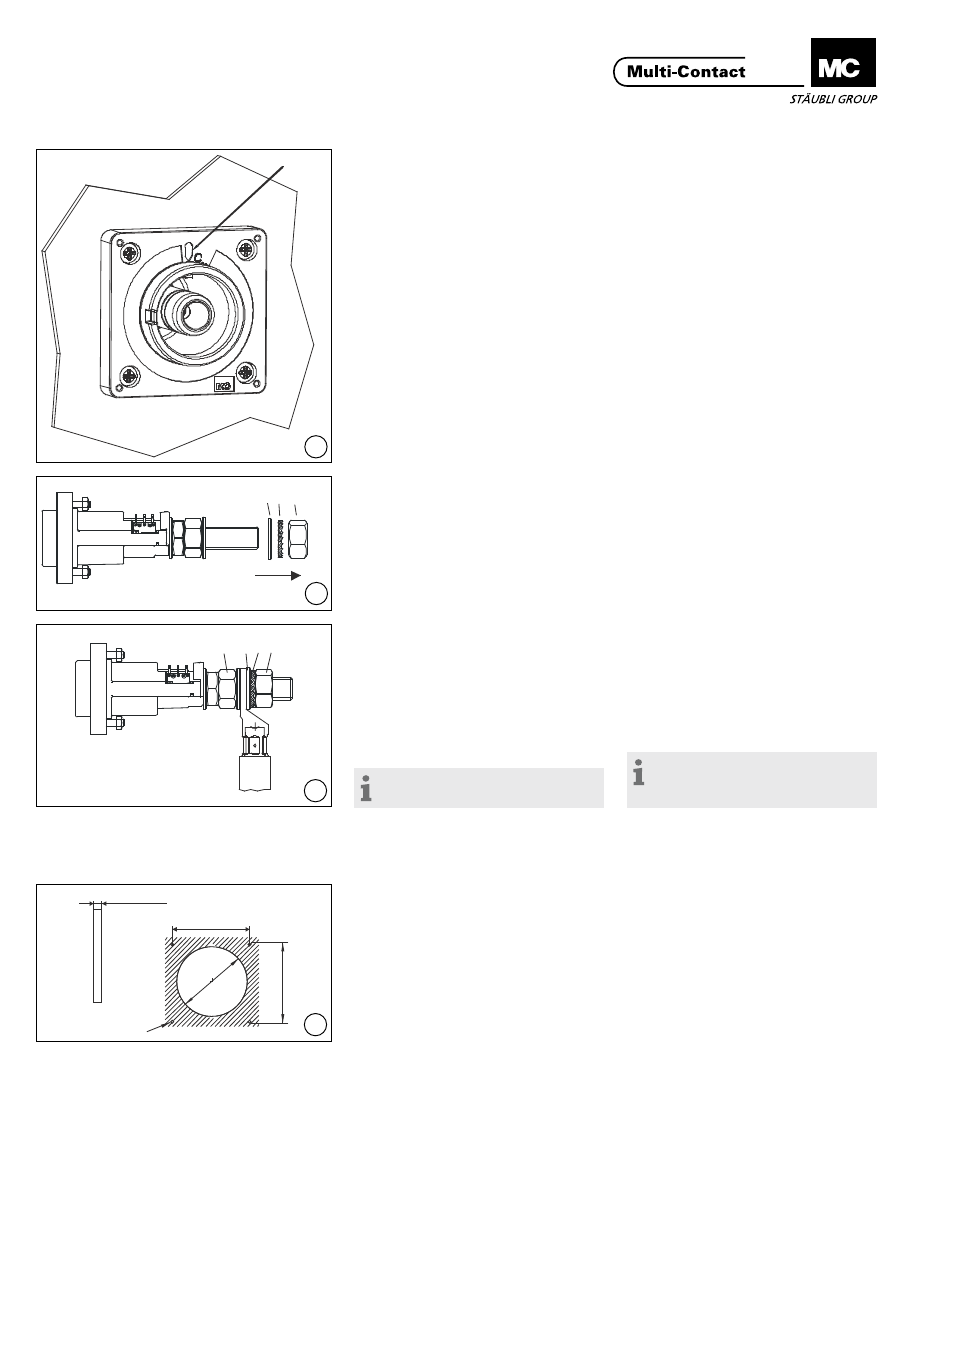
4 x Ш6,5
Ш1
10
93±0,2
93
±
0,
2
min. 3mm
9
(ill. 6)
Dose von vorne in die Fronttafel
stecken und so ausrichten, dass die
Markierung W beim Steckvorgang gut
sichtbar ist�
Kreuzschlitzschrauben M6 und Mutter
M6 anziehen�
Drehmoment 4 Nm.
(ill.6)
Insert plug into front panel�
Align plug so that marking W is visible
during plugging�
Tighten Philips screws M6 and nut
M6. Torque 4 Nm.
Anschluss
Connection
(ill. 7)
Mutter 6, Federscheibe 5 und Unter-
lagscheibe 4 vom Gewinde lösen�
(ill. 7)
Remove nut 6, lock washer 5 and
washer 4 fromscrew thread�
(ill. 8)
Kabelschuh mit angeschlossener
Leitung auf das Gewinde schieben�
Unterlagscheibe 4, Federscheibe 5
und Mutter 6 montieren� Mutter 6 mit
Drehmomentschlüssel SW 30 anzie-
hen und mit Gabelschlüssel SW 30
und Mutter 7 kontern�
Anzugsdrehmoment 52 Nm
Hinweis:
Nicht an der Isolation kontern!
(ill. 8)
Slip cable lug with pre-assembled
cable onto the thread� Reinstall nut,
washer and lock washer�
Tighten nut with the torque spanner
30 mm A/F and secure it with nut and
the open-end spanner 30 mm A/F.
Tightening torque 52 Nm
Note:
Do not lock-tighten on the insula-
tion!
Steckverbindermontage mit
Winkeladapter
Connector assembly in angle
adapter
(ill. 9)
Fronttafel gemäss Bohrplan bohren�
Winkeladapter von vorne auf die
Fronttafel montieren, so dass der An-
schluss der ID/S nach unten gerichtet
ist�
Kreuzschlitzschrauben M6 und Mutter
M6 anziehen. Drehmoment 4 Nm.
(ill. 9)
Drill front panel according to drilling
plan�
Mount angle adapter on the panel
from the front so that the ID/S con-
nection points downwards�
Tighten Philips screws M6 and nuts
M6. Torque 4 Nm.