Katun rebuild kit contents, Preparing for disassembly, Cleaning the paper dust collection assembly – Katun Minolta EP-1031F Imaging Unit Benutzerhandbuch
Seite 2: Disassembly
2
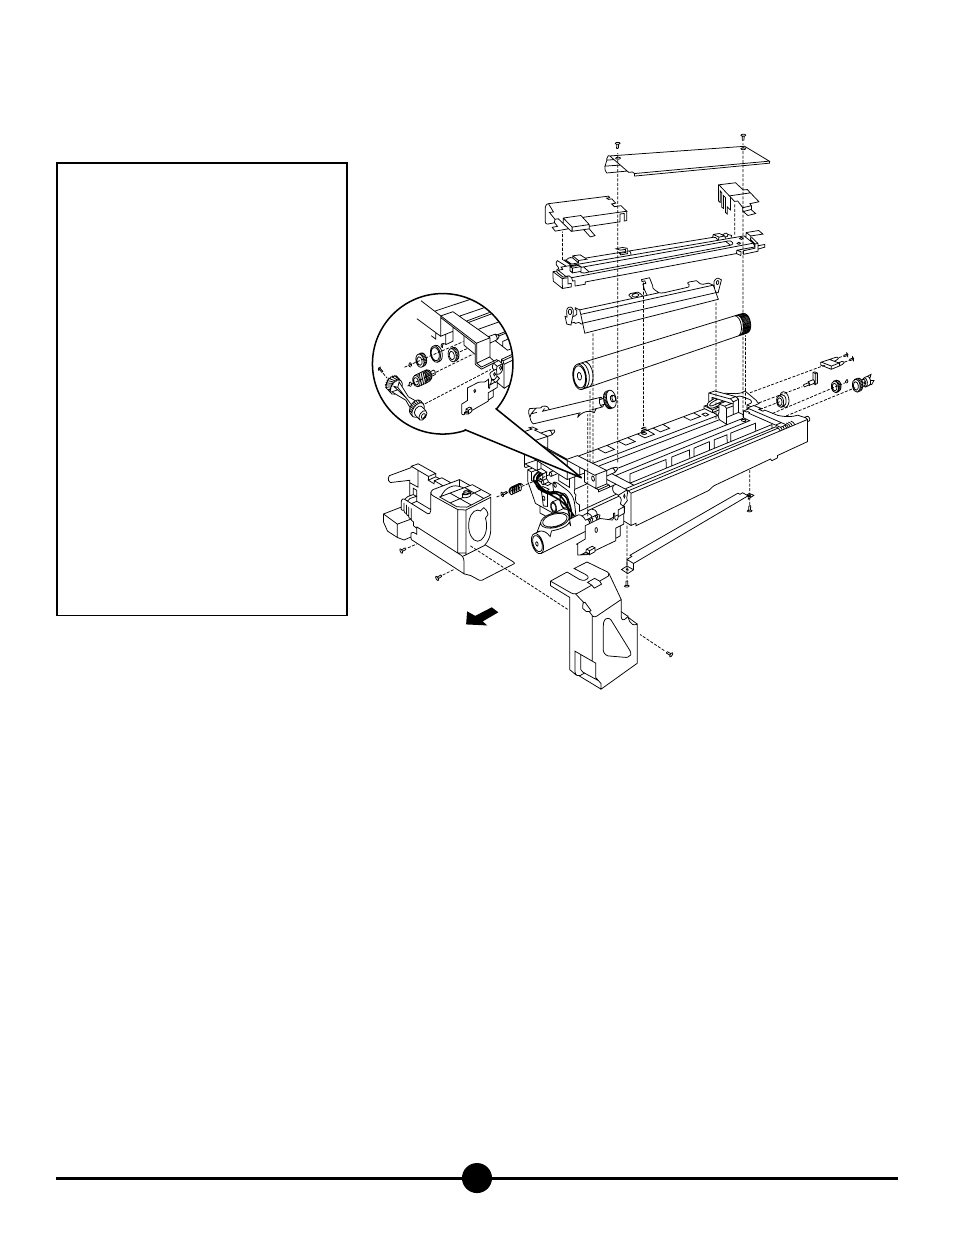
(A) Paper guide plate
(B) Starter unit cover
(C) Corona assembly wire harness
snap covers
(D) Main charge corona assembly
(E) Toner-add assembly
(F) Front cover/cartridge holder
(G) Drum cleaning blade
(H) Main pressure spring
(I) Front shoulder screw and spring
(J) Rear shoulder screw and plastic lever
(K) OPC drum
(L) Drum retaining bushing
(M) Toner recycling pipe
(N) Fuse
(O) Barbell-shaped gear
(P) Front drive gear
(Q) Mag roller gear
(R) Idler gear
(S) Front Ds positioning collar
(T) Coupler gear
(U) Rear Ds positioning collar
Katun Rebuild Kit Contents
OPC drum (1)
Drum cleaning blade (1)
Ds positioning collars (2)
Fuse (1)
Starter (1)
Preparing for Disassembly
1. Remove the imaging unit from the copier.
2. Remove the toner cartridge from the imaging unit.
Cleaning the Paper Dust Collection Assembly
3. Remove the paper guide plate (A) from the underside of the unit by removing two screws. Open the paper dust collection assembly cover and
thoroughly clean all paper dust from the area.
4. Close the paper dust collection assembly cover and reinstall the paper guide plate removed in step 3. NOTE: Ensure the paper guide plate is
positioned away from the OPC drum.
Disassembly
5. Remove the starter unit cover (B) by removing two screws and then lifting it upward. Dispose of the used starter/toner.
6. Remove the two corona assembly wire harness snap covers (C) from the top of the unit by releasing their plastic snap-fit tabs. Disconnect the two
wire connectors, then remove the main charge corona assembly (D) by lifting straight upward.
7. Remove the toner-add assembly (E) by removing one screw and disconnecting its wiring harness. Gently move the toner-add assembly aside, using
caution not to displace the gears it contains.
8. Remove the front cover/cartridge holder (F) by removing two screws from the front cover, then sliding it away from the unit.
9. To remove the used drum cleaning blade (G):
• Unhook the main pressure spring (H).
• Remove the front shoulder screw and spring (I) and the rear shoulder screw and plastic lever (J).
Rebuilding Instructions for the Minolta EP-1030/1030F/1031/
1031F Imaging Unit
A
B
C
D
N
E
F
G
J
K
L
M
O
P
Q
R
S
T
U
I
C
H
FRONT