3 dmx wiring, 4 installing a plug on the power cord, 5 relaying power to other fixtures – JB-Lighting Varyscan P8 Benutzerhandbuch
Seite 32
- 32 -
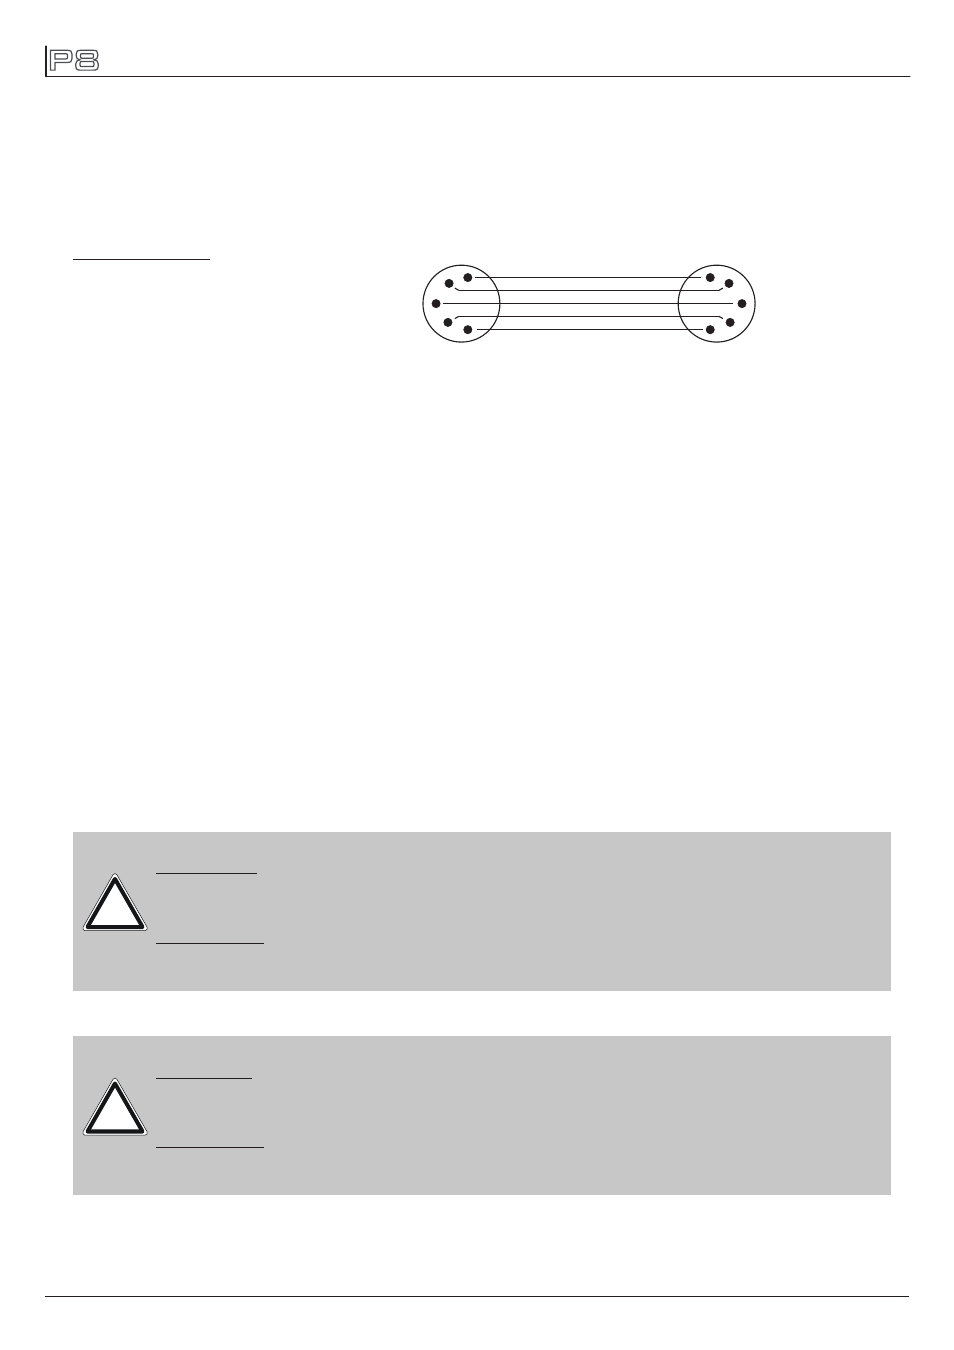
4.3 DMX wiring
Use a shielded twisted-pair cable with two pairs to connect the serial link. Connect all pins if
you want to upgrade the software in crossload. If a microphone cable (or any other cable with
only one pair) is used the software can not be updated via DMX line because pin 4 and 5 are not
connected.
Pin assignment:
Pin 1 = shield
Pin 2 = data -
Pin 3 = data +
Pin 4 = data out -
Pin 5 = data out +
1
2
3
4
5
1
2
3
4
5
shielded signal cable
The P8 has 3pin and 5pin XLR connectors for DMX-in and DMX-out. Do not connect more than
one data input and one data output on a fixture.
Connect the DMX-out of the control desk to the first P8 in line. (lighting control desk DMX-Out
-> P8 DMX-In). Connect the second P8 to the first in line, and so on (P8 no. 2 DMX-In -> P8
no. 1 DMX-Out). All 3-pin and 5-pin connectors are wired parallel. Do not use this fixture as a
DMX splitter! The DMX-Out of the last unit in line is not occupied unless problems occur. Then
use a termination plug with the last P8 in line. (XLR-connector with a 120 Ohm resistor soldered
between pin 2 and pin 3). Problems might occur when the line is overloaded, e.g.
Install a plug like described in chapter 4.1.
Connected load: Voltage 100-240 Volts, frequence 50 - 60 Hz, power max. 500 VA Connect the
fixture to a proper installed grounded system only. If any doubts on the electrical installations
occur, consult a qualified electrician. In case of damages occuring due to a not proper installed
electrical system, warranty claims will be invalidated. Don´t use fixtures when top cover is not
fixed properly. Contact with electronic parts can result in risk for life. (Electrical shock 100-240 V)
Connect fixture only after assuring that the electrical installation fits your demands. If any doubts
occur consult a qualified technician!
Power can be relayed to another device via the grey PowerCon throughput socket that accepts
a grey PowerCon NAC3FCB cable connector. Note that blue input and grey throughput connec-
tors have different design: one type cannot be connected to the other.
4.4 Installing a plug on the power cord
4.5 Relaying power to other fixtures
WARNING: P8 might light up immediately if standalone mode is active or DMX
signal is connected!
ATTENTION: Le projecteur P8 peut s‘illuminé directement, lorsque le mode
standalone et activé ou si un signal DMX est programmé!
WARNING: To ensure propper installation of the plug consult a qualified
technican!
ATTENTION: Installation de la connexion au réseau doit être effectuée par un
professionnel!
!
!