Multi-Contact MA040 Benutzerhandbuch
Seite 4
Advanced Contact Technology
6
7
5
© b
y
Multi-Contact A
G, Switz
erland – MA040 – 06.2013, Inde
x b
, Global Communications – Änderungen v
orbehalten / Subject to alterations
Hersteller/Producer:
Multi-Contact AG
Stockbrunnenrain 8
CH – 4123 Allschwil
Tel.
+41/61/306 55 55
Fax
+41/61/306 55 56
www.multi-contact.com
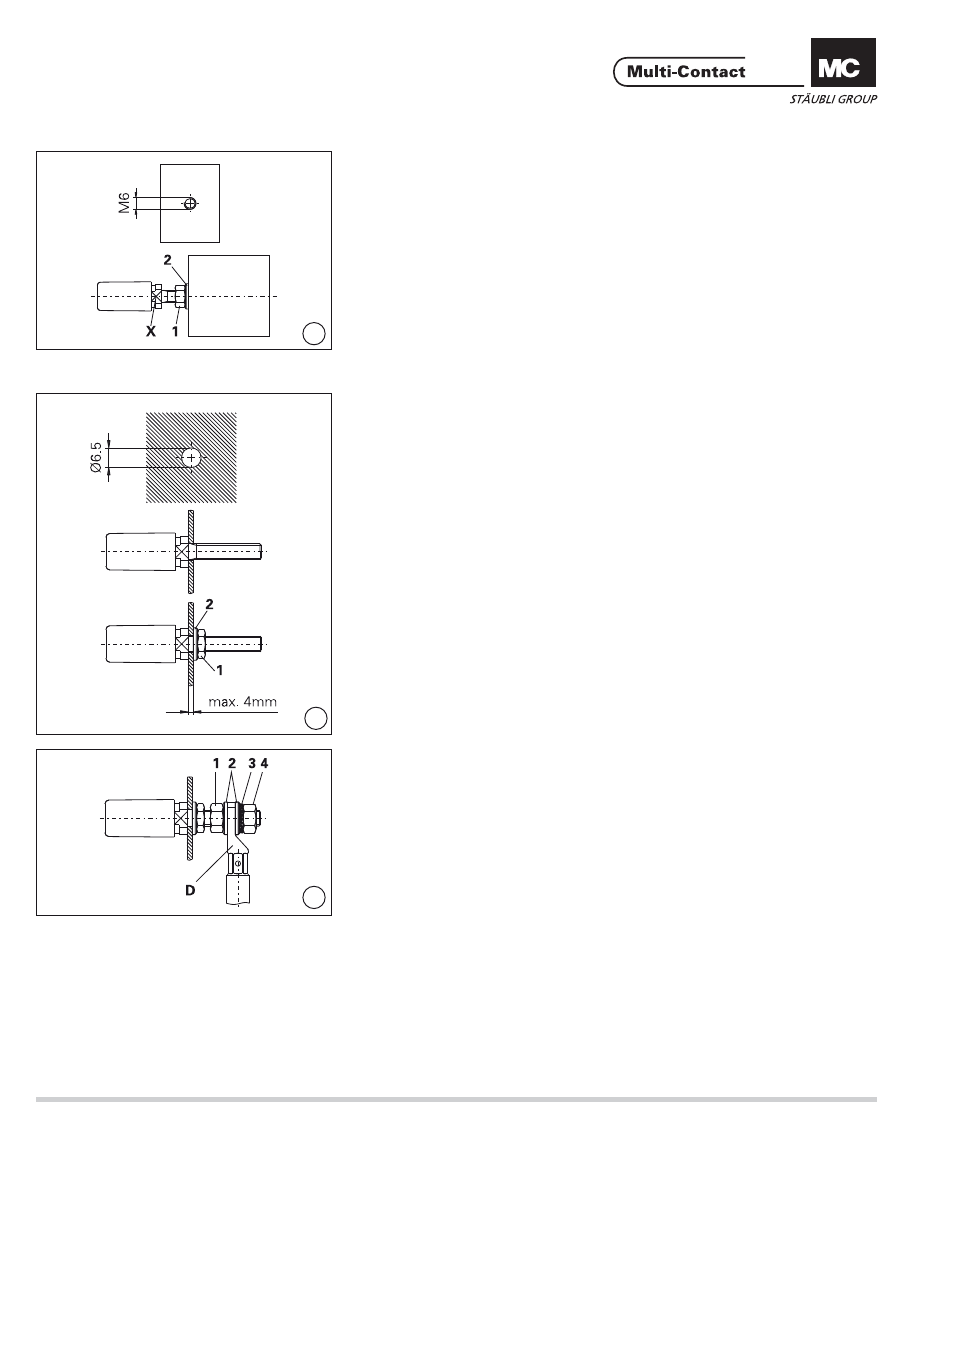
Anschluss an Kontaktblock
Connection on contact block
(ill. 5)
Kontaktblock bohren und Gewinde
schneiden gemäss Bohrplan. U-Schei-
be 2 und Mutter 1 auf Gewindebolzen
montieren. Sicherheitsbuchse fest-
schrauben mit Drehmomentschlüssel
SW10 (an Pos. X ansetzen), Anzugs-
drehmoment: 3Nm. Mutter 1 anzie-
hen. Anzugsdrehmoment: 3Nm.
(ill. 5)
Drill and cut thread into the contact
block according to drilling plan. Install
washer 2 and nut 1 onto threaded
bolt. Screw-in the safety socket and
tighten with open-end spanner 10mm
A/F (placed on position X), Tighten-
ing torque 3Nm. Secure with nut 1.
Tightening torque 3Nm.
Einbau in Frontplatte
Panel assembly
(ill. 6)
Fronttafel bohren gemäss Bohrplan.
Den Gewindebolzen der Sicherheits-
buchse von vorne in die Frontafel ste-
cken. U-Scheibe 2 auf das Gewinde
schieben und mit Mutter 1 festschrau-
ben. Anzugsdrehmoment 2,5Nm. An
Pos. X mit Gabelschlüssel kontern.
(ill. 6)
Drill front panel according to drilling
plan. Insert threaded bolt of safety
socket into front panel. Slip washer 2
onto the threaded bolt and screw-on
the nut 1. Tightening torque 2,5Nm.
Secure with the open-end spanner
10mm A/F on pos. X.
(ill. 7)
Kabelschuh D mit angeschlossener
Leitung auf das Gewinde schieben.
U-Scheiben 2, Federscheibe 3 und
Mutter 4 montieren. Mutter 4 mit
Drehmomentschlüssel SW10 anzie-
hen und mit Gabelschlüssel SW10 und
Mutter 1 kontern. Anzugsdrehmo-
ment: 3Nm.
(ill. 7)
Slip cable lug D with preassembled
cable onto the thread. Install washers 2
lock washer 3 and nut 4. Tighten nut 4
with the torque spanner 10mm A/F
and secure it with nut 1 and the open-
end spanner 10mm A/F. Tightening
torque 3Nm.