Multi-Contact MA213-02 Benutzerhandbuch
Seite 3
Advanced Contact Technology
www.multi-contact.com
3 / 8
1
3
4
2
5
6
Erforderliches Werkzeug
Tools required
(ill. 1)
Abisolierwerkzeug CT-AIWZ/COAX
Bestell-Nr. 33.3011
(ill. 1)
Insulation stripper CT-AIWZ/COAX
Order No. 33.3011
(ill. 2)
Crimpzange CT-CZ/COAX
Bestell-Nr. 33.3010
(ill. 2)
Crimping pliers CT-CZ/COAX
Order No. 33.3010
(ill. 3)
Einsetzwerkzeug Stift / Buchse
ME-WZ5, Bestell-Nr. 18.3013
(ill. 3)
Insertion tool pin / socket
ME-WZ5, Order No. 18.3013
(ill. 4)
Buchsen Ausbauwerkzeug MSA-WZ5
Bestell-Nr. 18.3015
Stift Ausbauwerkzeug MSA-WZ8
Bestell-Nr. 18.3022
(ill. 4)
Extraction tool (socket) MSA-WZ5
Order No. 18.3015
Extraction tool (pin) MSA-WZ8
Order No. 18.3022
Vorbereiten der Leitung
Cable preparation
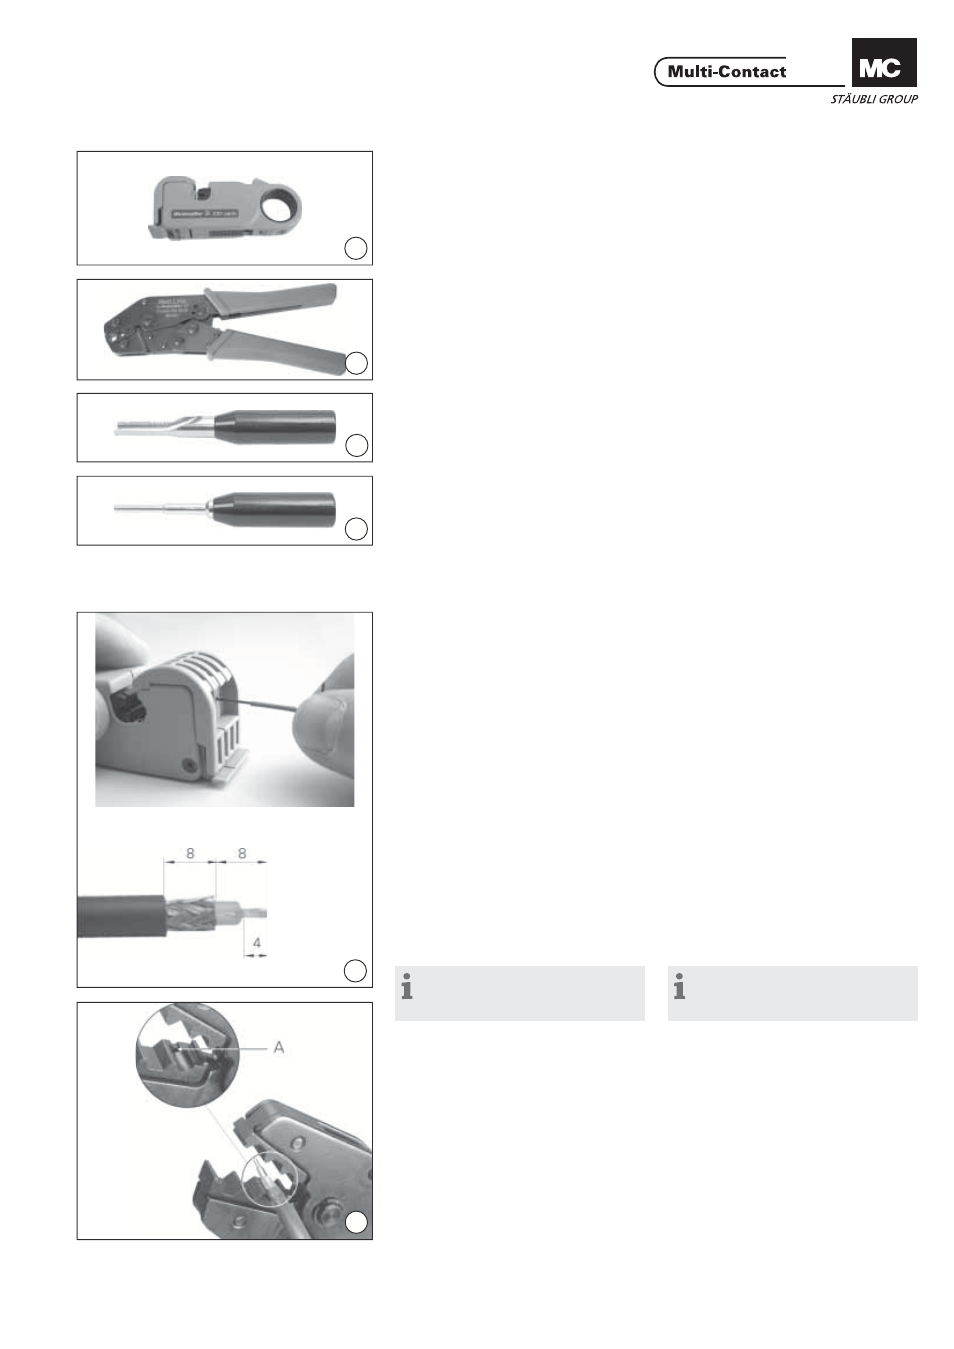
(ill. 5)
Das Abisolierwerkzeug
CT-AIWZ/COAX auf die gezeigten
Masse einstellen und die Leitung
abisolieren.
(ill. 5)
Adjust the insulation stripper
CT-AIWZ/COAX according to the indi-
cated dimensions and strip the cable.
Montage der Leitung
Cable assembly
Hinweis:
der Montagevorgang für Buchsen
und Stifte ist identisch..
Note:
The assembly procedures for sock-
ets and plugs are identical.
(ill. 6)
Einzelleiter in die Crimphülse des Kon-
taktes bis zum Anschlag einführen.
Zum Crimpen die weisse Isolation
des Innenleiters an den Anschlag A
der Crimpposition 58/59 halten. Leiter
dabei in axialer Richtung in die
Crimphülse drücken.
Angeschlossene Leiter müssen vor
und nach dem dem Crimpen im Sicht-
loch der Crimphülse sichtbar sein.
(ill. 6)
Insert wire into the contact crimp-
ing sleeve to the limit. For crimping
hold the white insulation of the inner
conductor onto the end stop A of the
crimp position 58/59, gently push the
wires into the sleeve and crimp.
Wires must be visible in the sight hole
before and after crimping.