Multi-Contact MA270 Benutzerhandbuch
Seite 4
Advanced Contact Technology
4 / 4
www.multi-contact.com
5
6
7
8
9
7
MC4
MC4-EVO 2
(ill. 5)
Entriegelung Solmac Buchse
Stecken Sie die Entriegelungsstifte
von
PV-MS-PLS/2 in die dafür vor-
gesehenen Öffnungen des
MC4-EVO 3 Steckers auf die Ein-
rastlaschen der Buchse, entfernen
Sie das Werkzeug nach der Entriege-
lung und trennen Sie anschließend
die Steckverbindung.
Entriegelung Solmac Stecker
Stecken Sie die Entriegelungsstifte
von
PV-MS-PLS/1 in die dafür vor-
gesehenen Öffnungen des Solmac
Steckers auf die Einrastlaschen der
MC4-EVO 3 Buchse und ziehen die
Buchse aus dem Solmac Steckerge-
häuse.
Bei Einsatz des
MC4 ist für das Ent-
riegeln von Buchse und Stecker der
PV-MS-PLS/1 zu verwenden.
(ill. 5)
Unlocking the Solmac socket
Insert the unlocking pins of
PV-MS-PLS/2 into the openings pro-
vided in the
MC4-EVO 3 plug and onto
the latch clips of the socket, remove the
tool after unlocking and then disconnect
the plug connector.
Unlocking the Solmac plug
Push the unlocking pins of
PV-MS-PLS/1 into the openings of the
Solmac plug and onto the latch clips
of the
MC4-EVO 3 socket and pull the
socket out of the Solmac plug housing.
When using the
MC4 take the
PV-MS-PLS/1 for unlocking the plug
and the socket
(ill. 6)
Entriegelung TwinBox Stecker
Stecken Sie die Entriegelungsstifte
von
PV-MS-PLS/1 auf die Ein-
rastlaschen der
MC4 Buchse und
ziehen diese anschließend aus dem
Steckergehäuse der TwinBox.
Hinweis:
Nicht in den Illustrationen gezeigte
Entriegelungen von weiteren Produkt-
kombinationen entnehmen Sie bitte
der Anwendungsmatrix.
(ill. 6)
Unlocking the Twin Box plug
Push the unlocking pins of
PV-MS-PLS/1 onto the latch clips of
the
MC4 socket and pull the socket out
of the plug housing of the TwinBox.
Note:
For unlocking operations on other
product combinations not shown in
the illustrations, please see the utilisa-
tion matrix.
Verschrauben von Steckverbin-
dungen
Screw assembly of plug connec-
tions
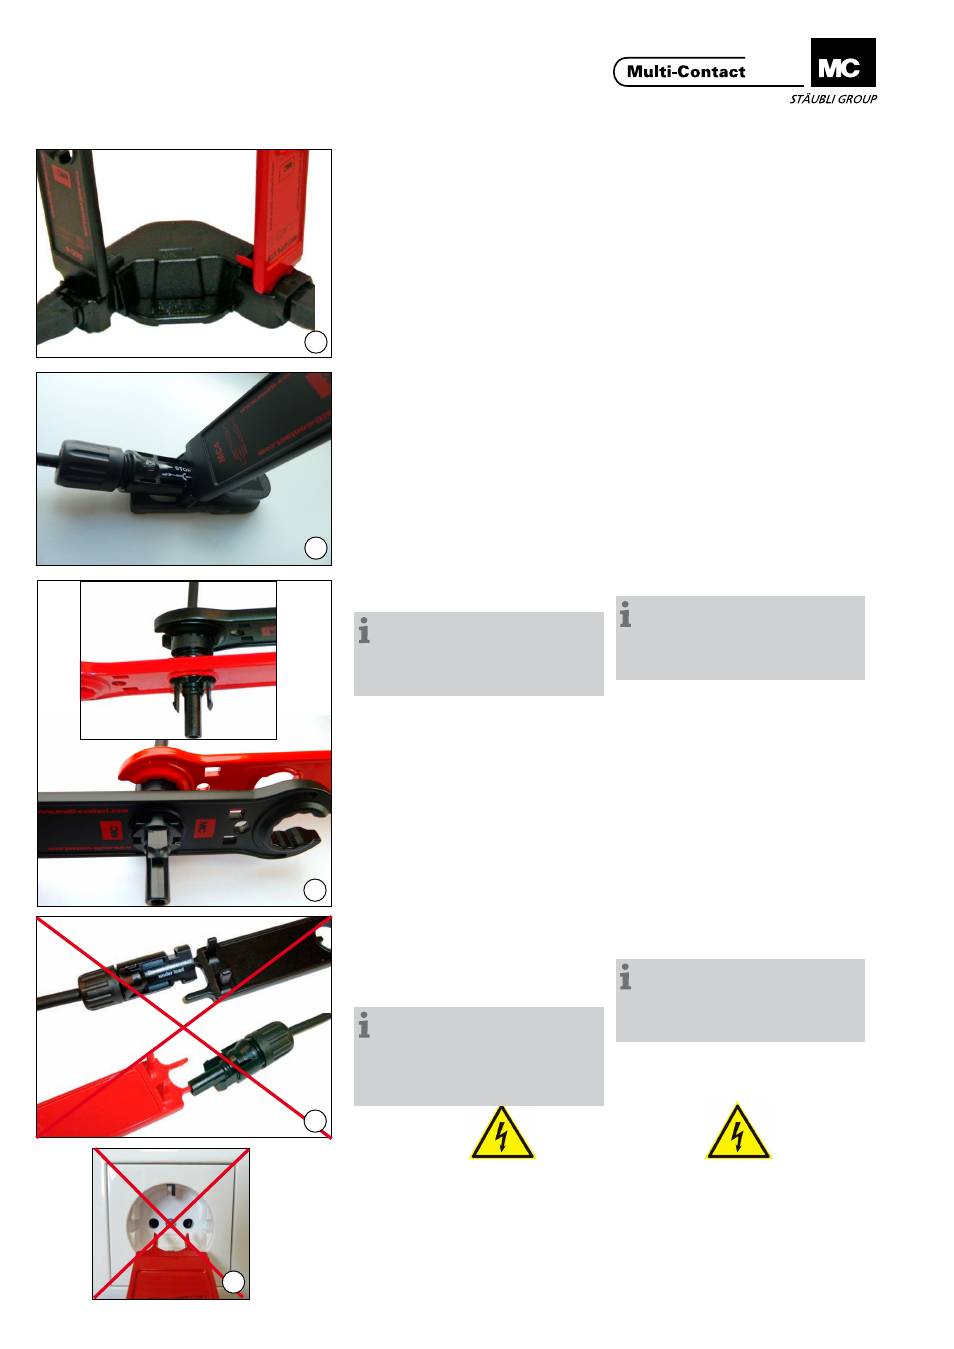
(ill. 7)
Verschrauben von MC4
Stecken Sie das Gehäuse der
MC4
Buchse bzw. des Steckers in die
dafür vorgesehene Montageöffnung
(Halterung) des
PV-MS-PLS/2 und
ziehen Sie die Hutmutter mit dem
Ringschlüssel des
PV-MS-PLS/1 an.
Verschrauben von MC4-EVO 2
Stecken Sie das Gehäuse der
MC4-EVO 2 Buchse bzw. des
Steckers in die dafür vorgesehene
Montageöffnung (Halterung) des
PV-MS-PLS/1 und ziehen Sie die
Hutmutter mit dem Ringschlüssel
des PV-MS-PLS/2 an.
Hinweis:
Weitere Details zur Verschraubung
der Hutmutter mit dem Steckverbin-
der finden Sie in den Montageanlei-
tungen MA231 (MC4) und MA273
(MC4-EVO 2).
(ill. 7)
Screw fixing of MC4
Insert the housing of the
MC4 socket or
plug in the assembly opening (holder)
of the
PV-MS-PLS/2 and screw on the
cap nut with the ring spanner of the
PV-MS-PLS/1.
Screw fixing of MC4-EVO 2
Insert the housing of the MC4-EVO 2
socket or plug in the assembly opening
(holder) of the PC-MS-PLS/1 and screw
on the cap nut with the ring spanner of
the PV-MS-PLS/2.
Note:
Further details on screwing the cap
nut onto the plug connector are given
in the assembly instructions MA231
(MC4) and MA273 (MC4-EVO 2).
Fehlgebrauch
Misuse
(ill. 8)
Stecken Sie die Entriegelungsstifte
des
PV-MS-PLS/1 und
PV-MS-PLS/2 nicht in Stecker oder
Buchsen der MC-Steckverbinder.
(ill. 8)
Do not Insert the unlocking pins of
PV-MS-PLS/1 and PV-MS-PLS/2 in
sockets or plugs of the MC plug con-
nectors.
(ill. 9)
Stecken Sie die Entriegelungsstifte
des
PV-MS-PLS/1 und
PV-MS-PLS/2 nicht in eine Steck-
dose.
(ill. 9)
Do not insert the unlocking pins of the
PV-MS-PLS/2 and PV-MS-PLS/2 into
the openings of a mains power outlet.
© b
y Multi-Contact A
G, Switz
erland – MA270 – 10.2014, Inde
x e
, Global Communications – Änderungen v
orbehalten / Subject to alterations