Multi-Contact MA201 Benutzerhandbuch
Seite 6
Advanced Contact Technology
6 / 12 www.multi-contact.com
17
18
19
20
21
Einbau der Kontakte
Installation of the contacts
Hinweis (ill. 17):
Der Einsetzvorgang kann erleich-
tert werden, wenn die Isolierkörper
vor dem Einsetzen der Kontakte in
Industriealkohol getaucht werden.
Keine fetthaltigen Medien (kein Tal-
kum) benutzen.
Note (ill. 17):
To facilitate installation immerse
the insulation carrier in industrial
alcohol before inserting the contacts.
Do not use any grease or talcum
powder.
(ill. 18) gilt nur für TID-B/...
Wenn vorhanden, ungeschrumpftes
Wärmeformschrumpfteil auf Leitung
auffädeln�
(ill. 18) for TID-B/... only
When applicable, place unshrunken
form shroud on the cable�
(ill. 19)
Kontakte in die Kontaktkammern der
Isolierkörper von der Anschlussseite
her (grösster Durchmesser der Kon-
taktkammern) mit normaler Handkraft
vorstecken� Kontakte mit Einsetzwerk-
zeug (ME-WZ6, 18�3016 bzw�
ME-WZ11/38, 18�3021) bis zum
spürbaren Einrasten eindrücken� Es
empfiehlt sich, die Isolierkörper dabei
auf eine Unterlage zu stellen�
Werkzeug beim Eindrücken und Her-
ausziehen parallel zur Achse führen�
(ill. 19)
Insert contacts by hand into the
contact holes of the insulator from the
connector side (larger hole diameter)�
Press in the contacts with insertion
tool (ME-WZ6, 18�3016 or
ME-WZ11/38, 18�3021) until contact
can be heard engaging�
It is advisable to place insulator on a
flat bench.
Be sure to keep tool straight when
installing or removing contacts�
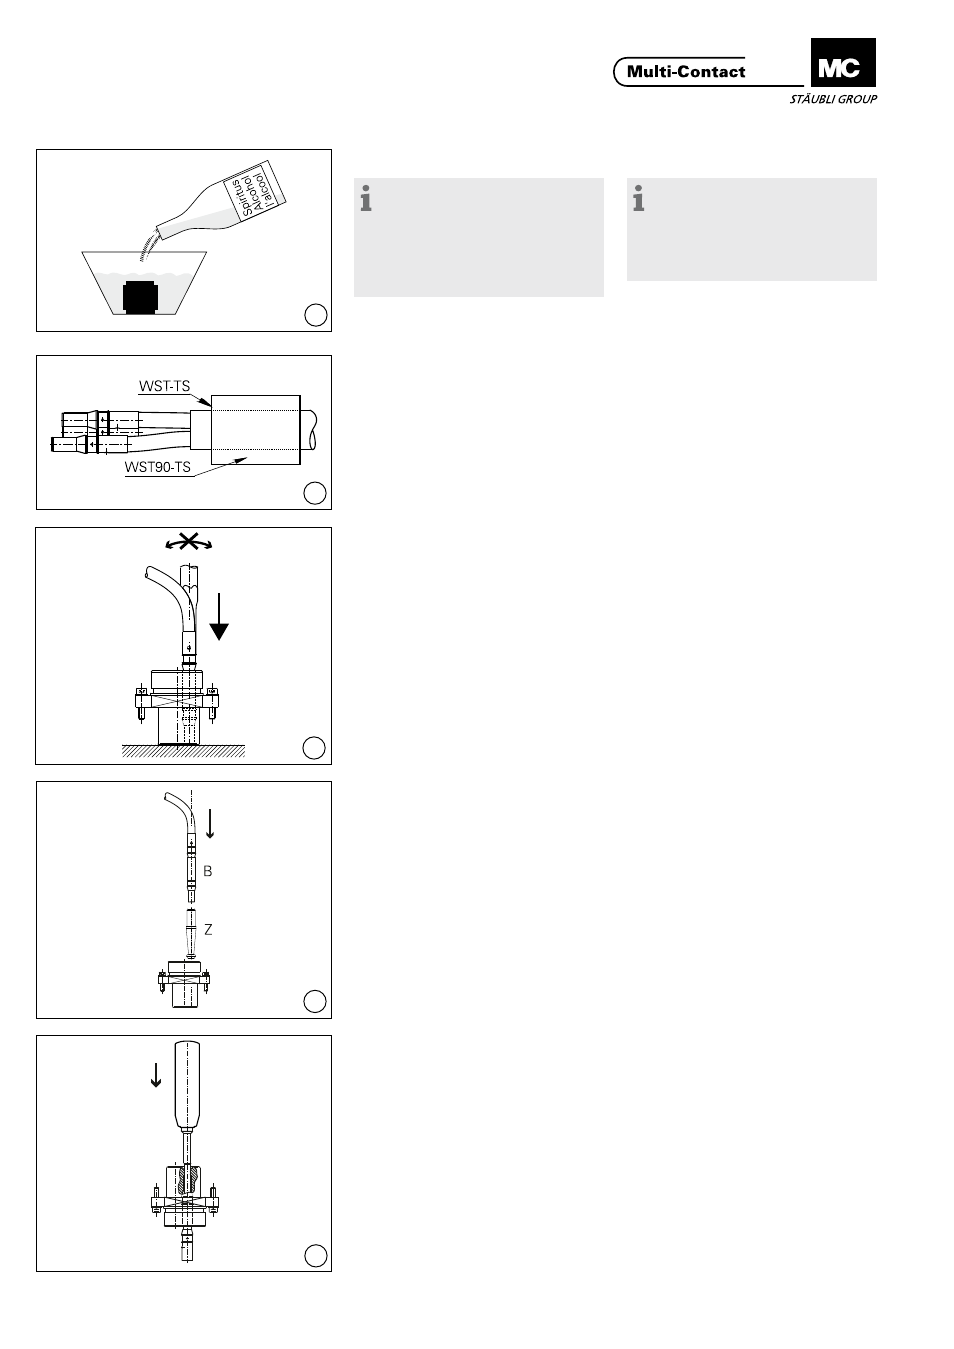
(ill. 20)
Bei TSB250/...
Buchsen mit Berührschutz in Kon-
taktkammern “U” und “V” einsetzen�
Zum Einsetzen den Zentrierkegel (Z)
MEK-WZ-12 vorher auf die Buchsen
(B) stecken�
(ill. 20)
For TSB250/...
Insert socket with touch protection in
the contact holes “U” and “V”� To in-
sert the centring cone (Z) MEK-WZ-12
first plug into the socket (B).
(ill. 21)
Bei eventuellen Reparaturen werden
die Kontakte mit dem Ausbauwerk-
zeug (siehe Tab� 2) aus dem Isolierkör-
per gedrückt und neu eingesetzt�
(ill. 21)
In the case of repairs contacts are ex-
tracted and replaced with the extrac-
tion tool (see Tab� 2)�