Start-up screen, System status screen, Main menu screen – ROTEL RSP985 Benutzerhandbuch
Seite 18
18
RSP-985 Surround Sound Processor
The following buttons are used to navigate the
ON-SCREEN MENU system:
ON-SCREEN/MENU Button:
To dis-
play the main SYSTEM STATUS screen. All other
menus are reached from this menu. If a menu
is already visible, push this button to cancel
the display.
DOWN/UP Buttons:
To move up and
down in the lists that appear on the ON-
SCREEN MENU system.
VOLUME DOWN/UP Buttons:
To
change the current settings for a selected menu
choice in the ON-SCREEN MENU system.
ENTER Button:
To execute a command
on the ON-SCREEN MENU system, generally
to move to the next menu or confirm a choice.
BACK Button:
The BACK button is used
to cancel a selection on an ON-SCREEN MENU
and return to the previous menu.
NOTE
: There is no need to memorize these
buttons. A help system at the bottom of each
ON-SCREEN MENU reminds you which but-
tons to press.
Figure 8 at the front of this manual shows the
menus that constitute the ON-SCREEN MENU
system and how to reach them. Most of the
menus are used to configure the system and
will not typically be used during normal op-
eration. Details of each menu follow:
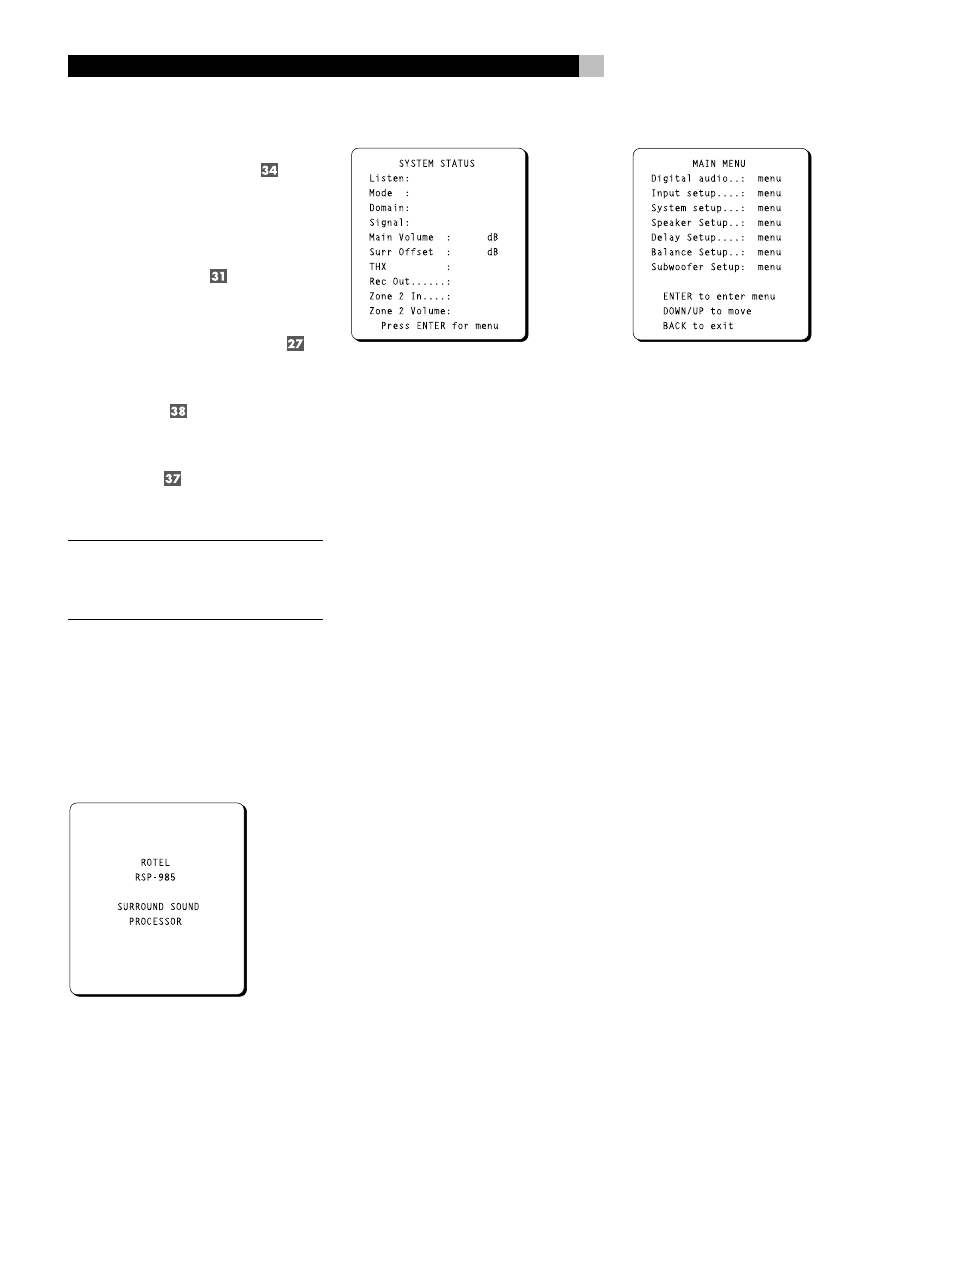
Start-up Screen
The RSP-985’s ON-SCREEN MENU system
automatically appears on your TV monitor
whenever you take the RSP-985 out of
STANDBY mode. The first screen you’ll see is
the START-UP screen.
System Status Screen
The SYSTEM STATUS screen provides the sta-
tus all of the important settings of the RSP-985
and a starting point for reaching all other
screens and menus. This screen is available
at any time by pressing the ON-SCREEN button
on the remote control. The screen displays the
following status information:
LISTEN: the current source selected
MODE: the current surround mode
DOMAIN: whether a DIGITAL or ANALOG
signal is active for the listening source
SIGNAL: type of digital signal available at
the selected input, for example: DOLBY DIGI-
TAL, DIGITAL AUDIO, DTS, NO SIGNAL, or
ANALOG
MAIN VOLUME: the output volume setting
SURR OFFSET: a temporary increase or de-
crease in the surround speaker volume for more
or less emphasis on surround effects. The set-
ting is made with the SEARCH +/– buttons on
the RR-939 remote and reverts to the calibrated
settings when the surround mode is changed
or the unit is powered off.
THX: current status of the additional cinema
circuitry – THX ON, THX OFF, or RE-EQ ON.
REC OUT: which source is selected for the
recording outputs
ZONE 2 IN: which source is selected for Zone
2
ZONE 2 VOLUME: the volume setting for
Zone 2
The SYSTEM STATUS screen simply provides
information. None of the settings can be ad-
justed from this screen. To make changes to
the settings, go to the MAIN MENU by press-
ing the ENTER button on the remote control,
as indicated at the bottom of the SYSTEM
STATUS screen.
Main Menu Screen
The MAIN MENU screen is the entry point for
all of the RSP-985’s settings and setup menus
where system configuration settings can be
made. These are typically accessed only dur-
ing initial system configuration and are not used
in day-to-day operation:
DIGITAL AUDIO MENU: Reach this menu
by moving the highlight to this line and press-
ing the ENTER button. This takes you to a menu
for setting up digital sources.
INPUT SETUP: Reach this menu by moving
the highlight to this line and pressing the ENTER
button. This will take you to a menu for con-
figuring each input including selection of digital
or analog connections, type of digital connec-
tion, input levels, etc.
SYSTEM SETUP: Reach this menu by mov-
ing the highlight to this line and pressing the
ENTER button. This takes you to a menu for
basic system settings, Zone 2 settings, etc.
SPEAKER SETUP: Reach this menu by moving
the highlight to this line and pressing the ENTER
button. This will take you to a menu for con-
figuring the number and type of speakers in
the system.
DELAY SETUP: Reach this menu by moving
the highlight to this line and pressing the ENTER
button. This takes you to a menu for configur-
ing delay times to each speaker in surround
modes.
BALANCE SETUP: Reach this menu by
moving the highlight to this line and pressing
the ENTER button. This will take you to a menu
for configuring the relative volume levels of
each speaker .
SUBWOOFER SETUP: Reach this menu by
moving the highlight to this line and pressing
the ENTER button. This takes you to a menu
for configuring your subwoofer for various sur-
round modes.