Multi-Contact MA246 Benutzerhandbuch
Seite 4
Advanced Contact Technology
Advanced Contact Technology
6 / 20
www.multi-contact.com
www.multi-contact.com
7 / 20
6
3M Silan-Glas-Primer
• Die empfohlene Verarbeitungstemperatur für Primer und
Werkstoff liegt zwischen + 15 °C und + 25 °C.
• Primer vor Gebrauch gut schütteln
• Befeuchten Sie ein fusselfreies Einwegtuch mit Silan-Glas-
Primer�
• Tragen Sie den Silan-Glas-Primer sehr dünn auf die Klebe-
fläche des Glases auf, in einer möglichst ununterbrochenen
360°Bewegung um die Anschlussbändchen herum.
• Wichtig: Der Primer muss wirklich hauchdünn aufge-
tragen werden (monomolekulare Schicht).
• Wichtig: Entfernen Sie nach dem Auftragen unverzüglich
den milchig angetrockneten Film des Silan-Glas-Primers mit
einem neuen Tuch� Reiben Sie dabei in der gleichen Dreh-
richtung wie beim Auftragen�
• Berühren Sie die geprimerte Glasoberfläche vor dem Auf-
bringen des Klebebands NICHT mit blossen Fingern�
• Auf der geprimerten Glasoberfläche dürfen keine regenbo-
genartigen Schlieren zu sehen sein� Sollte dies der Fall sein,
wurde der Primer zu dick aufgetragen� Entfernen Sie ihn mit
Isopropanol und tragen Sie ihn neu auf�
• Bringen Sie die Paneldose spätestens 5 Minuten nach dem
Primern auf das Modul auf�
• Stellen Sie sicher, dass in der Zeit zwischen Primern und
dem Aufsetzen der Dose weder Verschmutzung noch Feuch-
tigkeit auftritt�
• Beachten Sie zusätzlich die Verarbeitungshinweise des Pri-
merherstellers�
3M Silane Glass Primer
• The recommended working temperature for the primer and
material is between + 15 °C and + 25 °C.
• Shake primer well before use
• Moisten a lint-free disposable cloth with Silane glass primer�
• Apply Silane glass primer very thinly to the bonding surface
of the glass, in as continuous as possible a 360° movement
around the connecting ribbons�
• Important: The primer must really be applied extremely
thinly (monomolecular layer).
• Important: Using a new cloth, remove the milky-looking
dried film of Silane primer, without delay after application.
Wipe in the same rotation direction as when applying the
primer�
• Do NOT touch the primered glass surface with the bare
fingers before applying the adhesive tape.
• No rainbow-like streaks must be visible on the primered
glass surface� If this is the case, the primer has been applied
too thickly� Remove with isopropanol and repeat the applica-
tion�
• Fix the junction box on the module not more than 5 minutes
after applying the primer�
• Make sure that neither soiling nor moisture develops on
the surface between primering and the application of the
junction box�
• Also observe the processing instructions of the primer ma-
nufacturer�
3M Primer 94 und 3M Primer 4298 UV auf Tedlar
• Die empfohlene Verarbeitungstemperatur für Primer und
Werkstoff liegt zwischen + 15 °C und + 25 °C.
• Primer vor Gebrauch gut schütteln
• Bringen Sie den Primer gleichmässig in einer möglichst
dünnen Schicht auf� Dadurch wird eine kurze Ablüftzeit der
enthaltenen Lösemittel erreicht� Sie können den Primer mit
einem fusselfreien Einwegtuch, einem Pinsel, einer Rollen-
bürste, durch Sprühen oder durch ein Auftragsgerät auftra-
gen�
3M Primer 94 and 3M Primer 4298 UV on tedlar
• The recommended working temperature for the primer and
material is between + 15 °C and + 25 °C.
• Shake primer well before use
• Apply the primer in as thin a layer as possible� This shortens
the time needed for the solvent to evaporate� You can apply
the primer with a lint-free disposable cloth, a roller brush, by
spraying or with an applicator�
Wichtig: Primer nur einmal auftragen!
Important: Apply primer only once.
• Lassen Sie den Primer je nach Temperatur, Luftfeuchte, Luft-
zirkulation und Porosität der Oberflächen ablüften.
• Wir empfehlen eine Ablüftzeit von:
– ca� 5 Minuten für Primer 94
– 30-90 Sekunden für Primer 4298 UV
• Sie können die Verdunstung des Lösemittels deutlich
beschleunigen, indem Sie über der Aufbringfläche einen
erhöhten Luftstrom durch ein Gebläse erzeugen (mit einer
Temperatur zwischen 20 °C und 40 °C). Bei dünn aufgetrage-
nem Primer und guter Belüftung können Ablüftzeiten von ca�
10 Sekunden erreicht werden�
• Allow the solvent to evaporate by airing for a time which de-
pends on temperature, atmospheric humidity, air circulation
and the porosity of the surfaces�
• We recommend an airing time of:
– approx� 5 minutes for Primer 94
– 30-90 seconds for Primer 4298 UV
• You can substantially speed the evaporation of the solvent
by increasing the flow of air over the application surface by
means of a blower (with a temperature between 20 °C and
40 °C). With a thin primer coating and a good air flow, the
evaporation times can be reduced to as little as around 10
seconds�
Wichtig: Stellen Sie sicher, dass das Lösemittel komplett
verdunstet ist!
Important: Make certain that the solvent has completely
evaporated.
Aufbringen der Paneldose
Fixing the junction box in
place
1) Klebefolien-Applikation
(3M und TESA)
1) Adhesive foil application
(3M und TESA)
Drücken Sie die Paneldose nach dem
Aufsetzen kurz und heftig an� Wenn
Sie die Anschlussdose mit einer eige-
nen Vorrichtung aufsetzten, so muss
ein Druck von ca. 1200 N für mindes-
tens 5 Sekunden gleichmässig verteilt
aufgebracht werden� Bitte beachten
Sie die notwendigen klimatischen
Bedingungen laut Datenblatt des
Klebepadherstellers�
Die Montage der Paneldose mit dem
Hilfswerkzeug PV-W Z-JB/LC auf das
PV-Modul wird auf den folgenden
Seiten ausführlich beschrieben�
After placing the junction box in posi-
tion, briefly press down with strong
pressure� If the junction box is at-
tached with own device, then a pres-
sure of approx. 1200 N for 5 seconds
must be applied evenly distributed�
Please note the necessary climatic
conditions according to the data sheet
of the adhesive foil manufacturer�
The fixing of the junction box on the
PV module with the auxiliary tool
PV-W Z-JB/LC is described on the fol-
lowing pages�
Hinweis:
Bitte achten Sie auf eine regelmäs-
sige Wartung des Anpresswerkzeu-
ges und eine Kontrolle des Anpress-
druckes.
Note:
Please ensure that the pressing
tool is regularly serviced and the ap-
plication pressure regularly checked.
Hinweise zur Montage der
Paneldose ohne das Hilfs-
werkzeug befinden sich am
Ende dieses Kapitels.
Notes to the fixing of the junc-
tion box without the auxiliary
tool at the end of this chapter.
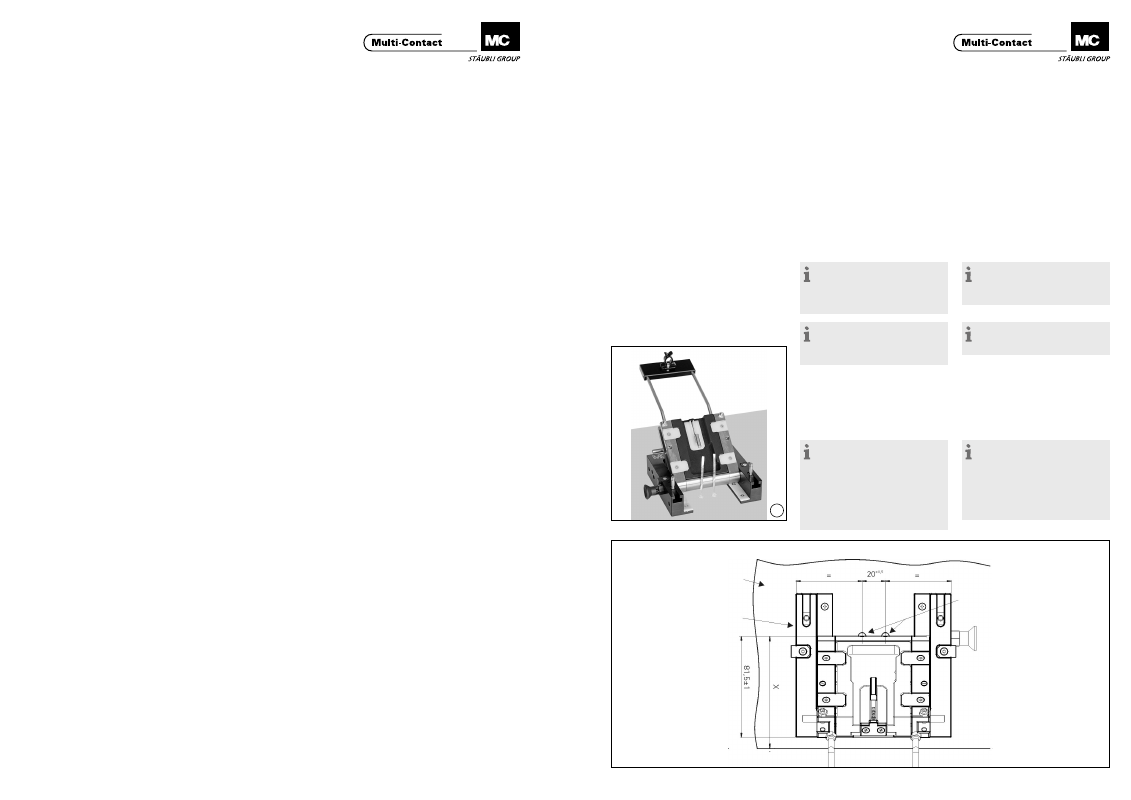
Einrichten des Hilfswerk-
zeugs PV-WZ-JB/LC
Setting up the auxiliary tool
PV-WZ-JB/LC
(ill. 6)
Setzen Sie das Montagewerkzeug auf
das Modul auf und bringen Sie es in
Position�
(ill. 6)
Place assembly tool on the module
and bring into position�
Hinweis:
Der Abstand „X“ zwischen
Kontaktbändchenaustritt und dem
Aussenrand des PV-Moduls muss
mindestens 50 mm betragen!
Der Abstand zwischen Kontakt-
bändchenaustritt und dem Rand
des Montagewerkzeugs muss
81.5 ±1 mm betragen.
Note:
The distance “X” between the
contact ribbon outlet and the outer
edge of the PV module must be at
least 50 mm.
The distance between the contact
ribbon outlet and the edge of the as-
sembly tool must be 81.5 ±1 mm.
PV-Modul
PV module
Hilfswerkzeug
Auxiliary tool
PV-WZ-JB/LC
Austrittsbohrungen der Kontakt-
bändchen
Exit holes for contact ribbons