Multi-Contact MA246 Benutzerhandbuch
Seite 8
Advanced Contact Technology
Advanced Contact Technology
14 / 20
www.multi-contact.com
www.multi-contact.com
15 / 20
25
26
27
28
29
30
31
32
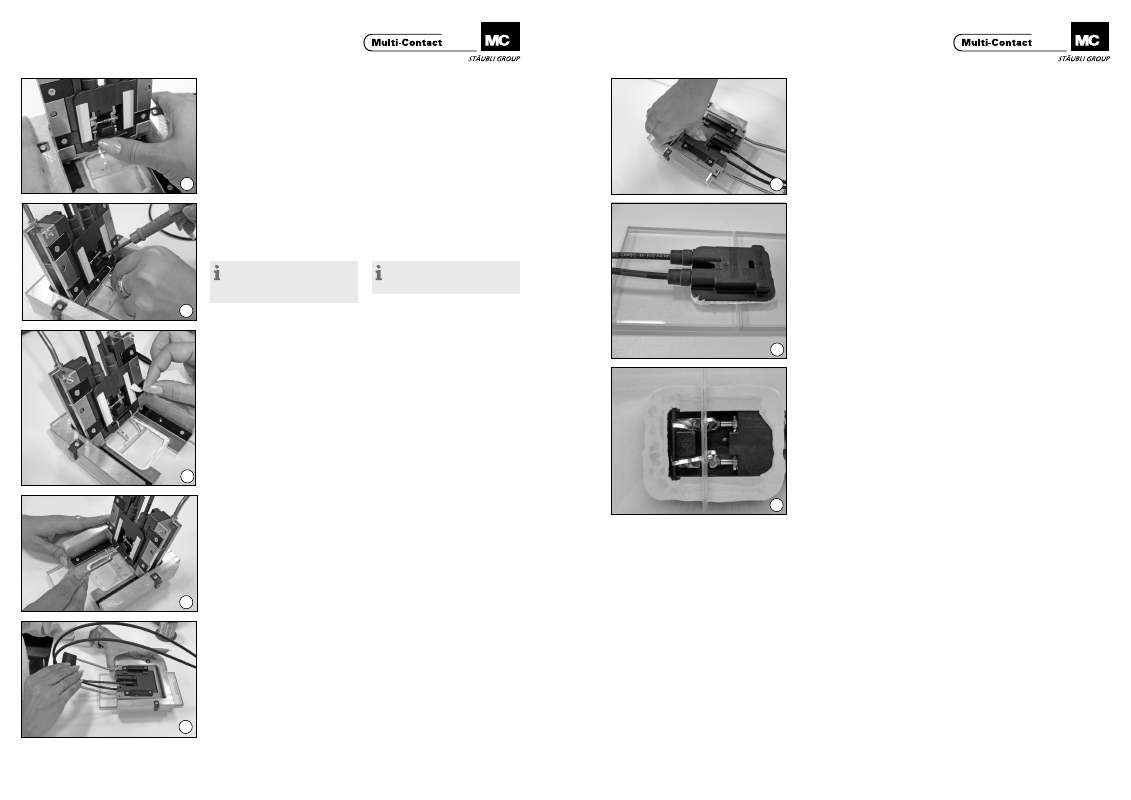
(ill. 25)
Fixieren Sie die Flachbandleiter mit
dem lose mitgelieferten PV-Bügel „B“,
d�h� drücken Sie den PV-Bügel in die
dafür vorgesehene Aussparung in der
Paneldose bis zum Anschlag ein�
(ill. 25)
Fix the ribbon conductors with the PV
clip “B” which is supplied loose, i�e�
press the PV clip as far as it will go
into the recess provided in the junc-
tion box�
(ill. 26)
Verlöten sie die Flachbandleiter mit
dem PV-Kontaktteil� Löttemperatur:
320 °C – 450 °C (bei Verwendung des
empfohlenen Flussmittels)�
(ill. 26)
Solder the ribbon conductors to the
PV contact part� Soldering tempera-
ture: 320450 °C (if the recommended
flux is used).
Hinweis:
Es ist unbedingt notwendig,
zusätzlich Lötflussmittel 950E (Kester,
www.kester.com) zuzuführen.
Notes:
It is essential to apply additional
flux 950E (Kester, www.kester.com).
Montage der Paneldose auf das
PV-Modul
Mounting the junction box on the
PV module
(ill. 27)
Die Schutzfolie vorsichtig von der
Vorfixierung abziehen.
(ill. 27)
The protective film must now be care-
fully removed from the adhesive foil�
(ill. 28)
Die Flachbandleiter müssen nun vor-
sichtig nach vorne gezogen werden
(z� B� mit L-förmigem Hilfsmittel), um
saubere Montage zu ermöglichen�
(ill. 28)
The ribbon conductors must now be
placed in position by carefully pulling
them forward (by means of the
L-shaped tool) to facilitate assembly�
(ill. 29)
Die Montagevorrichtung vorsichtig bis
zum Anschlag herunterklappen�
(ill. 29)
Carefully lower the assembly jig into
position�
(ill. 30)
Paneldose kurz andrücken (kurzer
leichter Druck auf die Rückseite der
Vorrichtung reicht)�
(ill. 30)
The junction box should now be lightly
pressed in place (brief pressure on the
back of the tool is sufficient).
(ill. 31)
Nachdem der Anpressvorgang been-
det ist kann das Montagewerkzeug
vertikal entfernt werden�
(ill. 31)
When the pressing on process is
completed, the auxiliary tool can be
vertically removed�
(ill. 32)
Ansicht der verklebten Paneldose von
unten�
(ill. 32)
Junction box bonded in place, seen
from below�
Wichtiger Hinweis zur Klebe-
verbindung
Important note on the adhesive
bond
Nach dem korrekten Aufsetzen der
Paneldose benötigt die Klebeverbin-
dung ca. 72 Stunden zum vollständi-
gen Abbinden� Erst nach dieser Zeit
hat die Kleberbindung die geforderte
Dichtigkeit und darf der Umgebungs-
Feuchtigkeit ausgesetzt oder Reini-
gungsarbeiten unterzogen werden�
After junction box has been correctly
fixed in place. The adhesive bond
needs approximately 72 hours to cure
completely� Only after this time does
the bond have the necessary imper-
meability so that it can be exposed to
environmental moisture or subjected
to cleaning operations�