Multi-Contact MA307 Benutzerhandbuch
Seite 14
Advanced Contact Technology
14 / 16 www.multi-contact.com
34
33
N
P
35
10,3
+0,3
X
Richtige Montage
Correctly assembled
Falsche Montage
Incorrectly assembled
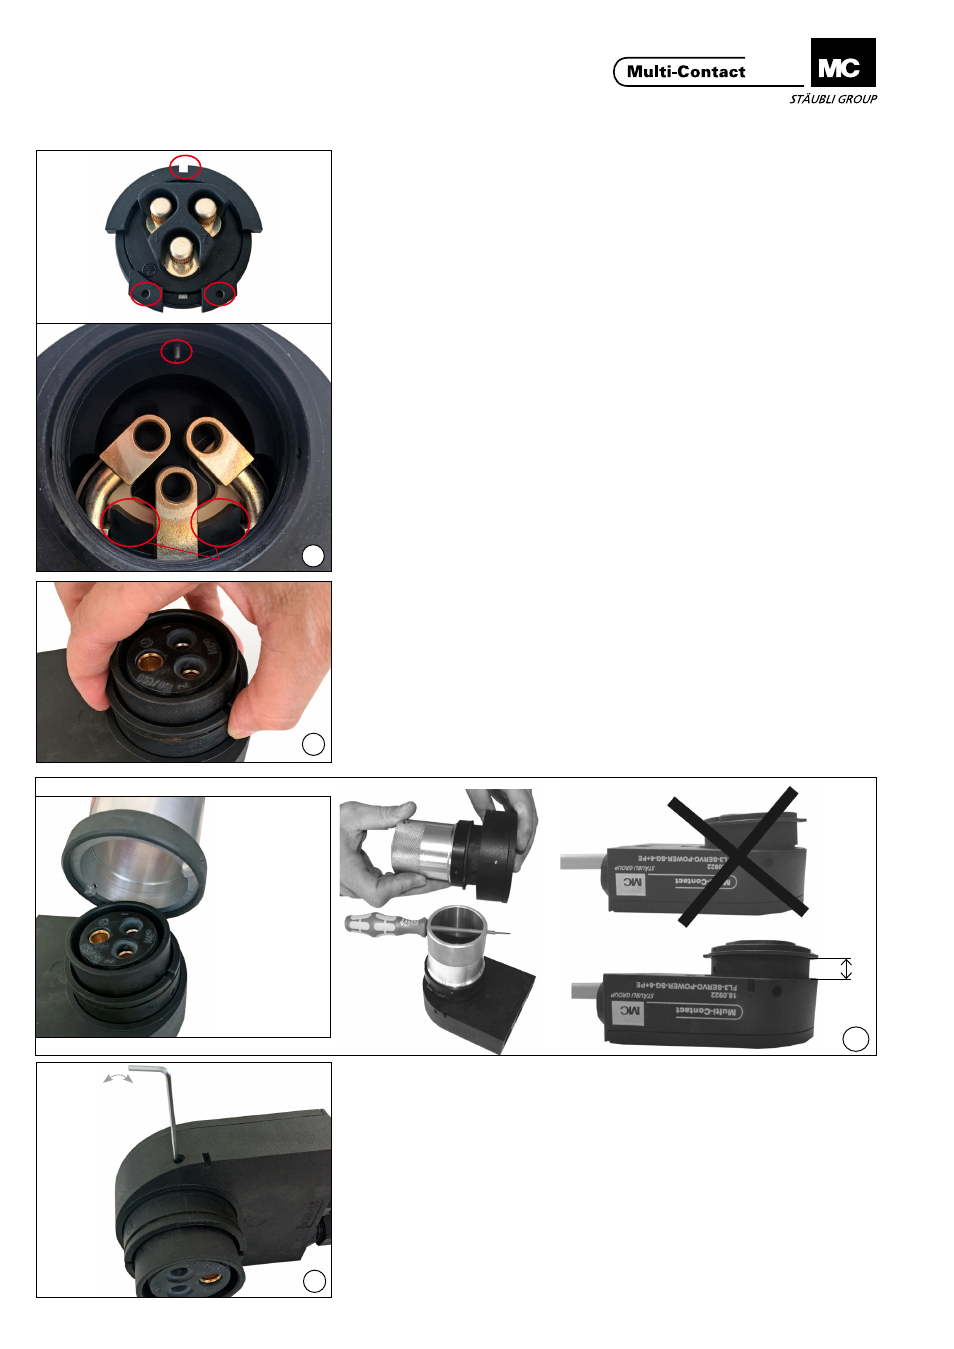
36
Montage Buchsengehäuse-
Vorderteil
New female housing front
part assembly
(ill. 33)
Neues Ersatz-Vorderteil (Buchsenge-
häuse) montieren.
Das Buchsengehäuse-Vorderteil
FL3-VT-2+PE-BS8 PA, 18.6901 lage-
richtig, zur Nut (N) und Positionier-
stiften (P), von Hand in die Buchsen
stecken.
(ill. 33)
Fit new front part (socket housing).
Manually fit the front part of the
socket housing FL3-VT-2+PE-BS8 PA,
18.6901 into the sockets, correctly
positioned in relation to the slot (N)
and the locating pins (P).
(ill. 34)
Haltering von Hand vorsichtig an-
setzen, leicht andrücken und gegen
den Uhrzeigersinn (links) ,1½ Umdre-
hungen bis zum hörbaren Knacken
drehen.
Kurz danach Haltering rechts herum
auf das Gehäuse drehen.
(ill. 34)
Carefully place retaining ring in posi-
tion by hand, press on gently and turn
1½ turns counter-clockwise (to the
left) until a click is heard.
Shortly afterwards rotate the retaining
ring to the right onto the housing.
(ill. 35)
Haltering mit Montagering (FL3-M-
RG) auf Mass X vorsichtig anziehen.
(ill. 35)
Carefully tighten the retaining ring to
dimension X by means of the assem-
bly ring (FL3-MRG).
(ill. 36)
Gewindestift links oder rechts mittels
Sechskantschraubendreher SW2
handfest anziehen (2 Nm).
Der Gewindestift sichert den Haltering
gegen unbeabsichtigtes Lösen durch
Vibration.
(ill. 36)
Tighten screw on right or left hand
side using hexagonal screwdriver
SW2 (2 Nm). This screw prevents the
retaining ring from being loosened by
vibration.